Saturday, August 30, 2008

Bento Delivery

3bentos
If you're visiting a friend and are thinking of what to bring with you, consider a bento lunch! Bentos are a great way of giving someone a present, too. Apart from the gift of the food itself, you can also buy a bento box for the person to keep and re-use. 

Yesterday I visited a friend and her 4 month old baby. As it is harder for her to go out, I made a bento lunch for both of us and brought it to her place. I made a western-style bento with tuna and salmon spiral pasta, meatballs and potato salad. For decoration, I cut out little carrot flowers and made an octodog (octopus-shaped frankfurter).

Wednesday, August 27, 2008

Banana and Walnut Muffins

muffin
Last year, I went a little crazy making batches and batches of cupcakes and muffins. This was much to the despair of YH, and 2 friends who were all trying to lose weight. Thankfully for all involved, I've stopped the baking madness for now, but there is one muffin I still make. I'm not a very good baker, as baking involves precise weighing and measurement, but this recipe is very forgiving. For those who are keen on baking muffins and just want one simple recipe that works consistently each time, this would be it.

It's also fairly healthy - there's very little butter in the recipe, and it is sweetened with honey and banana (and for my version, a crunchy sugar walnut cinammon topping, which adds a lovely toasted nutty flavour and texture to the muffin).

Continue reading...


This recipe is adapted from Nigella Lawson cookbook "How To Be A Domestic Goddess". It's under her "Children" cooking section, which probably explains why it is so simple and fool-proof. I've added a walnut topping which I find gives the muffin a nice texture and more flavour.

Banana and Walnut Muffins

Makes 10 standard size muffins

30g unsalted butter
2 heaped Tbsp honey
1 Tbsp vanilla essence
2 large ripe bananas
150g plain flour
1 heaped tsp baking powder
1/2 tsp bicarbonate of soda
1 tsp ground cinnamon
pinch of salt

Sugar Walnut topping
Mix together:
100g chopped walnuts
3 tsp golden raw sugar crystals (the large sugar crystals used for coffee)
dash ground cinnamon

Line muffin pan with 10 paper muffin liners and preheat the oven to 190 degrees C.

Melt butter, honey and vanilla extract on low heat in a small saucepan. Set aside to cool a little. Mash the bananas and add to the butter. In a separate bowl, sift flour, baking powder, bicarb of soda, ground cinnamon and salt together. Add the banana liquid into the dry ingredients all at once, and mix gently to combine. Don't overmix here or the muffins will be tough. I find mixing with a fork helps as well. 

Fill the muffin liners 2/3 full of muffin mixture. I find using an ice-cream scoop to helps to measure the mixture out evenly and quickly. Top with around 1 tsp of the sugar walnut topping (optional but highly recommended!) and bake for 25 minutes. 

muffin mix

During the last 5 minutes, check the muffins (the walnuts on top may brown quite a bit, watch they don't burn too much). Test with a skewer to ensure the inside is cooked (skewer should come out clean). Remove and cool on a wire rack.

muffin

Store the muffins in an air-tight container. They can last in room temperature about 4-5 days. They taste better warm, so after the first day, revive them by warming one muffin in the microwave on High for 10 seconds.


muffin

Back

Tuesday, August 26, 2008

Crab Croquette and Pineapple Salsa

crab bento
The 3rd bento of the "One Week of Pineapple" series! Presenting a crab croquette and pineapple salsa bento... Actually, I couldn't decide if the crab was a crab cake or crab croquette, but as I added mashed potatoes, it is more like a croquette. As it is only lightly pan-fried, it is healthier than the usual deep fried croquette. The pineapple salsa is made with pineapple and cucumber in a thai- style dressing. This dressing is the basis of a lot of Thai salads, and is very versatile.

Update: My One Week of Pineapple bento series only lasted 3 days...I ran out of bento friendly pineapple ideas - ie. I didn't really want to eat cold red duck pineapple curry and my other idea of a pineapple baked ham disappeared after I couldn't find any gammon ham in the supermarket to bake...

Continue reading...


Pan-fried Crab Croquette
Adjust quantities according to how many crab croquettes you wish to make. This is the rough estimate for 2 large crab croquettes.
4 small baby potatoes, or 2 medium sized potatoes
100-150g fresh crab meat or good quality canned crab meat (I used Phillips brand)
1/3 onion
around 50g milk or water
golden breadcrumbs
salt & pepper
dash cayenne pepper/paprika (optional)
squeeze lime or lemon juice
  1. Peel and cut the potatoes into smaller chunks. Boil in a saucepan until soft (around 10 - 15 mins). Drain away the water and mash, adding a little milk or water to soften the mash. Set aside to cool.
  2. Chop 1/3 onion finely. In a small non-stick frying pan, heat up a little oil and fry the onion until translucent. 
  3. Add the crab meat and fry on low heat. Add salt and pepper and a dash of cayenne pepper/paprika (optional). Squeeze a little lime or lemon juice on top. If you are making the pineapple salsa as well, you can also add a bit of the salsa dressing here.
  4. Add the crab mixture with the mashed potatoes and stir well to combine. Season to taste with more salt and pepper. 
  5. Pour some golden breadcrumbs onto a small plate. Scoop the crab mixture to form two round ovals, and coat with the breadcrumbs. 
  6. Heat up a little oil in the small frying pan, and lightly pan-fry the crab croquettes until golden. 
  7. Remove, cool, and pack into your bento. (You can also put the croquette on top of some shredded lettuce, as in the photo)
Decoration Tip:
Turn the crab croquette into a crab decoration by adding baby carrots for legs and crab claws, and dig two holes for eyes. Cut out a little triangle from the end of two baby carrots for crab claws, and cut three baby carrots into half lengthwise for the legs.

Pineapple Salsa (with Thai-style dressing)
Cucumber, cut into small cubes
Pineapple, cut into small cubes (fresh or canned pineapple, drained of their syrup)
For the Thai-style dressing (adjust quantities according to how much fruit and vegetables you have):
1/2 Tbsp white sugar
1 Tbsp Thai fish sauce
juice of 1 small lime
1/3 red chilli, deseeded and finely chopped
  1. Mix all the above ingredients for the dressing, then add to the cucumber and pineapple.
  2. Add more sugar, fish sauce, lime juice to taste.
  3. Leave in the fridge for 10 mins - overnight.
This dressing is very versatile and can be used for many Thai salads. It contains the basis of Thai cooking, with its 4 tastes - sweet, sour, salty, and spicy. I've added less sugar in this version as the pineapple is already quite sweet.

Back

Monday, August 25, 2008

Pineapple Fried Rice

pineapple rice bento
The second bento in my "Pineapple" series is Pineapple Fried Rice. This dish is actually a classic Thai recipe, but I've not followed the usual recipe strictly. 

Fried rice is a great way of using up leftover meat and vegetables you have in the fridge. As I'd made pizza the night before, I had leftover ham, chicken and mushroom. All these went into the fried rice, along with some onion, garlic, one chopped red capsicum, and of course, pineapple. (So... this dish should really be called Pineapple with Leftovers Fried Rice)

There are many variations of fried rice, and people differ as to what they like to include in it. There are things I generally wouldn't include in fried rice (eg. peas or bean sprouts) but there is really no wrong or right, just personal preference. Naturally different countries and cultures have their own traditional style which you can choose to follow - or not! I've included a general method on how to make fried rice, but I've left the actual ingredients open.

Continue reading...


How to Make Fried Rice

Cooked cool rice (great way to use up leftover rice)
Onion (depending on the amount of rice you have, half or one whole onion, chopped)
Garlic (few cloves, chopped)
Meat (optional, but you can include sliced ham, minced chicken/pork, etc.)
Vegetables (whatever you have on hand that can be found in a stir-fry works. Chop or slice everything up into bite-sized pieces, or smaller)
Egg (optional, but it does help bind everything together)
Soya sauce
pepper
Chilli powder (if you want it spicy)
  1. Heat up some oil on medium heat in a large frying pan or wok. 
  2. Add the onion and garlic, fry until fragrant and the onions are translucent. 
  3. Add the meat, fry until cooked (or re-heated). 
  4. Add the vegetables, fry until cooked. 
  5. Add a dash of soya sauce into your cooked rice, stir to loosen up the grains. Then pour the rice into the wok and mix everything together. 
  6. Move the rice to the sides of the frying pan/wok, leaving the centre exposed. Crack an egg into the centre, and stir the egg, mixing it into the rice until the egg is cooked. 
  7. Season with pepper, chilli powder or more soya sauce to taste. Serve on its own, or with some crisp fresh lettuce.
Tips:
For a Thai variation, add a dash of fish sauce during cooking. For a more fragrant Chinese version, try adding a few drops of sesame oil. For a Japanese omurice style, add some tomato sauce in the rice.

Sunday, August 24, 2008

Beef Noodles at 21 Gough St

beef noodles
A friend recommended a beef noodle place the other night, so we arranged to meet there. Even though both YH and I took down the address, when we arrived at Gough St, Central, we just walked into the first Beef Noodle restaurant we saw. It was brightly lit and had articles on the front, so we just assumed we were at the right place.... we found out shortly after that we weren't! So if you try this place out, make sure you go to 21 Gough St. The name of the place is "Gau Ke Ngau Lam" or "Kau Kee Ngau Lam" (it's in Chinese characters only) which roughly translates as "Nine Record Beef Brisket". 

Continue reading...


Apparently there is almost always a queue to get in, so be prepared to wait a while. We were lucky that evening as we didn't have to wait long, but after we were seated, there was a line outside for the entire time we were eating. Also be prepared to share your table with several other groups.

The restaurant is very local, so the decor isn't flash, and the service is a little hurried, but the beef noodles more than make up for it. There's beef brisket with a choice of noodles (ee meen, hor fun and bee hoon), in a clear soup or a curry soup. We tried the ee meen in both clear and curry (the hor fun was sold out - our friend informed us this usually happens by night-time). We all preferred the clear soup to the curry. Although our friend said the beef brisket was less tender than normal, I found it was still pretty good, as were the noodles. The soup was a little salty on its own, but it complemented the noodles and beef very well. It was also a tad oily, but that was probably why it tasted so good... 

We didn't see an English menu, but as their food options are fairly limited, I think one could get by with pointing at a fellow diner's bowl of noodles - someone is sure to be eating what you want to try!

Update: We later went back to try the hor fun noodles, which were very smooth, thin and tasty. I also spotted an English (and Japanese) menu that you have to ask for - they have one copy at the front counter.

To order the beef brisket with ee meen noodles, ask for "ngau lam ee meen" or "ngau lam ee".
For the beef brisket with hor fun noodles, ask for "ngau lam hor fun" or just "ngau lam hor" or even shorter, "ngau hor".

The restaurant is located at 21 Gough Street, Central. It opens from 12:30pm - 7:15pm, then closes and re-opens from 8:30pm - 11pm. They are closed on Sundays and Public Holidays.

Back

Friday, August 22, 2008

Pineapple Orange Chicken & "Duck" Bento

duck bento
To make this bento-making a little more fun and challenging, the next series of bentos will be entitled "One Week of Pineapple".

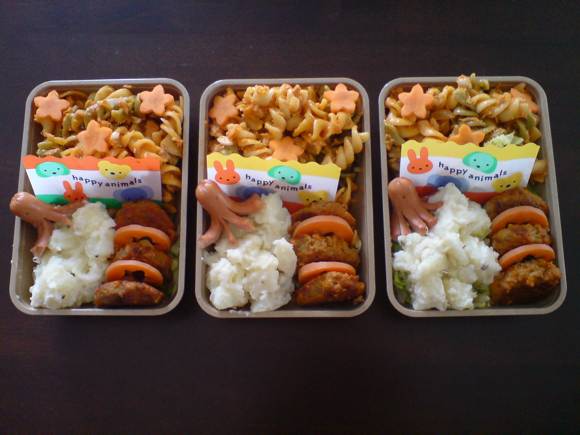
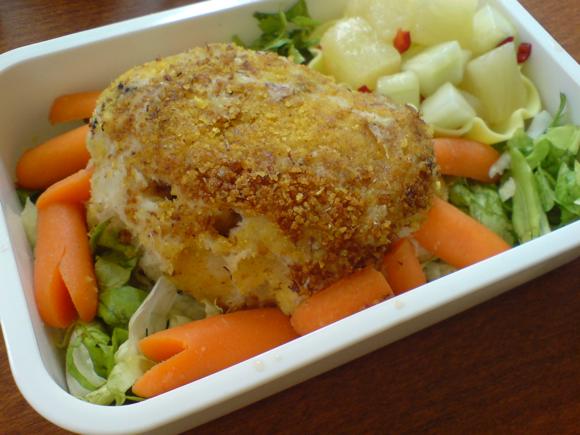
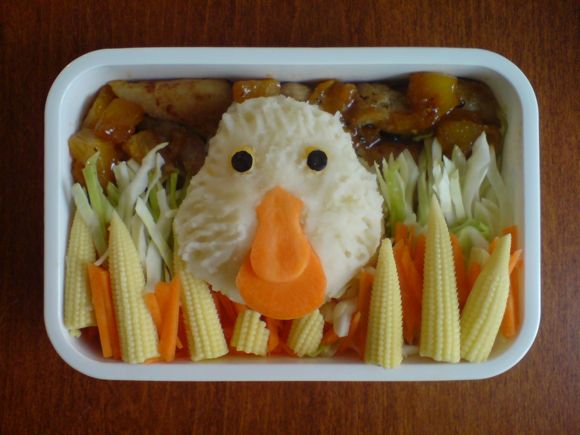
Here is #1 of the series - Pineapple Orange Chicken & "Duck" Bento.

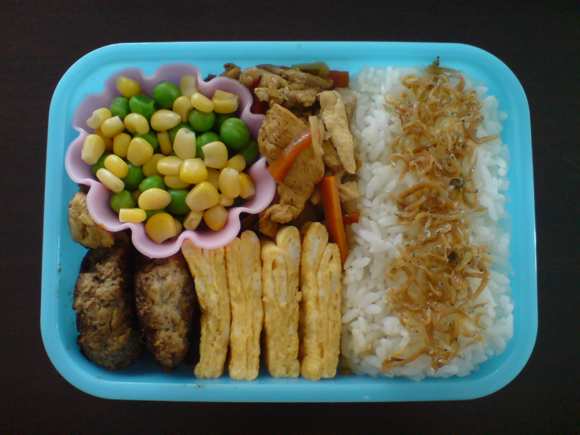
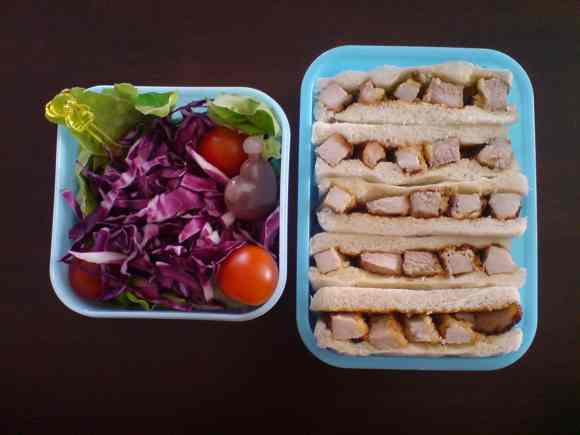
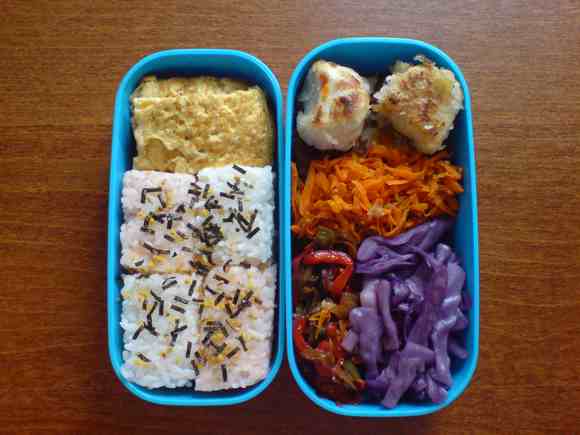
The bento contains braised chicken thighs in a tangy, slightly sweet sauce, potato and corn salad, and a cabbage, carrot and corn coleslaw.

Continue reading...

Pineapple rarely appears in meals I cook or eat, apart from the ol' Hawaiian Pizza, so I decided to select it for my new themed series.

The first pineapple recipe featured is actually one of my favourite ways of cooking chicken (yes, this contradicts my earlier statement!). I discovered this recipe on one of those free supermarket recipe brochures many years ago, and it works really well. The original version braises boned chicken thighs, but for this bento version, I've used deboned chicken thighs for a faster cooking time. The sauce is also made first, so the chicken doesn't overcook.

Pineapple Orange Chicken

2 deboned chicken thighs
around 150g canned pineapple, including the juice (I had a 300g can of pineapple. I used half the pineapple, but all the juice from the can)
around 100ml orange juice
around 100ml water
2 tsps soya sauce
1 small piece cinammon bark
freshly ground black pepper

Heat up a saucepan on medium heat, and add the pineapple, pineapple juice, orange juice, soya sauce, cinammon bark and some black pepper. Keep the mixture at a steady boil to reduce the liquids. Stir the mixture every now and again. Add around 100ml water when the mix starts to dry up, and continue until the mixture has been reduced and is quite thick.

In a separate frying pan, add a little bit of oil, and pan fry the whole chicken thighs until brown (it need not be totally cooked through at this stage). Add the chicken to the bubbling sauce mixture, and mix over medium heat. Ensure the chicken is well coated in the sauce and remove from the heat to cool once fully cooked through (the juices should run clear without any trace of red/pinkness). I find the meat is tender enough to be cut into smaller pieces with the spatula I use to fry the chicken, but you may prefer to cut it up into pieces after removing it from the saucepan.

Cool a little before putting the chicken into the bento. This chicken is good accompanied with potatoes or rice.

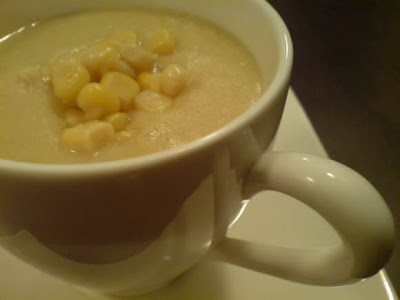
Mashed Potato & Corn Salad
Peel 2-3 potatoes, dice them into smaller pieces, then boil in water until soft. Drain, then mash the potatoes with a little water (if dry). Add around 4 Tbsp corn kernels, 1 -2 Tbsp mayonnaise (add more or less according to taste), as well as some freshly ground pepper and dash of salt. Mix well, and season further with mayonnaise, pepper, salt if needed. Set aside to cool.
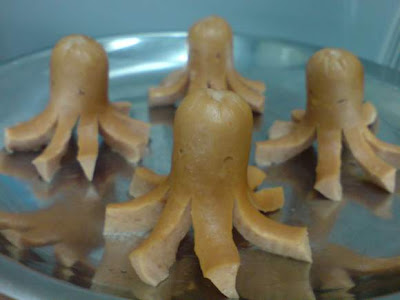
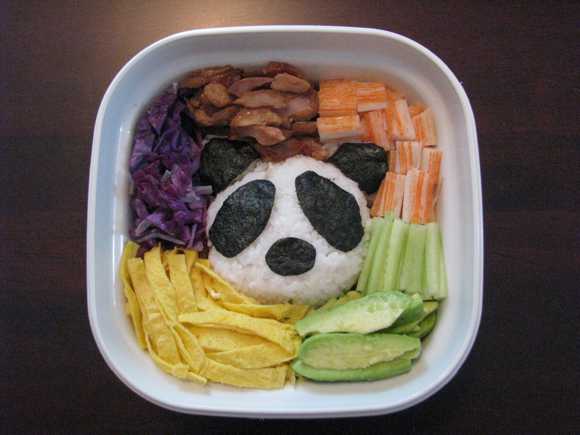
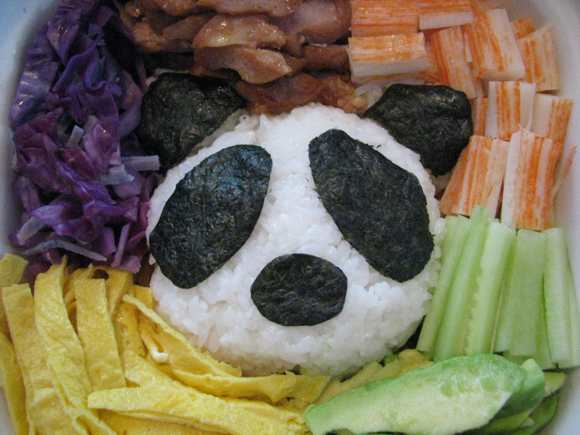
Mr Duck

Using two tablespoons, scoop up some mashed potato & corn salad and shape it roughly into a ball. Place the potato ball into the bento, and use the back of the spoons to shape the head and smooth the potato.

Peel part of a carrot, and slice down vertically to create 3-4 mm thick slices. Cut out a duck-shaped beak from this slice. Arrange on top of the potato head and use two corn kernels for eyes. Cut out two small circles of nori (seaweed) and place them over the corn kernel eyes. Using a fork or chopstick, make streaks in the potato to make a feathery pattern.
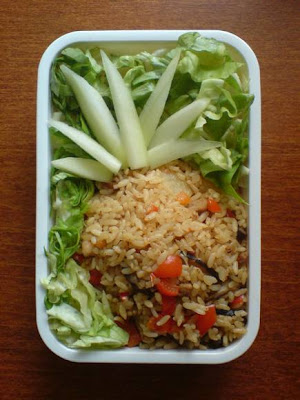
Salad
The salad used in this bento was shredded cabbage and carrot. Pack some additional mayonnaise in a squeeze bottle for a simple coleslaw, or just eat it plain. I also added some boiled baby corn for added sweetness and decoration value.

I found that the sweetness of the cabbage and carrot needed no further dressing. In addition, if you eat it with mouthfuls of the potato salad, the taste of the mayonnaise in the potato provides the vegetables with a sufficient mayonnaise taste.

duck bento


Back

Bento Safety

During the summer months or hot, humid weather (which could mean all year round for some), please remember to keep your bento as cool as possible, especially if it is going to be left out for several hours.

I find small, gel-filled ice packs work well. They are plastic packs filled with a gel that can be frozen and re-frozen. If you have a small container filled with salad, you can put a small ice-pack directly on top of the salad before closing the container. If you are worried about leakage, put the ice pack into a small ziplock bag first. (For HK residents, you can buy these gel packs from the Jusco $10 store.)

icepack

You can also pack the ice packs together with your bento in a cloth bag or insulated bag.


In order to stop bacteria growing quickly in the first place, make sure you heat up the food/leftovers well before packing them into the bento.


Back

Thursday, August 21, 2008

How To Use Egg Shapers

Place a large-sized egg in cold water, bring to the boil. Once the water is boiling, simmer on low heat for 5-7 minutes. Remove the egg, carefully peel away the shell, and put the egg inside a slightly wet egg shaper. Click the egg shaper shut. Put in the fridge for 10-15 minutes, or if you prepare the egg the night before, just keep the egg in its shaper in the fridge overnight and open it in the morning.

I've also read instructions where people put the egg shaper in the freezer - I've not tried this, but I guess the cooling principle is the same. If your eggs are too small for the shaper, you won't get a complete shape - like my ear-less bear above.

egg car
A car-shaped egg!

Chicken Avocado Sandwich & Caesar Salad Bento

chicken avocado bento
Today's bento is a sandwich and salad, to get away from the rice and noodles we've been having. I love chicken & avocado sandwiches, but they can be a bit more fiddly to put together especially if you don't have much time for preparation. Here is my quick and easy version. It's also another great way to use up leftover chicken...

Continue reading...


Instead of spending time teasing the chicken meat into strips, or slicing up the avocado, I just throw them both into a food processor and blend them together. True, the result is a slightly odd mushy green paste, but if you can eat guacamole (avocado dip), you won't mind this!

Quick Chicken & Avocado Sandwiches
(makes 4 -5 sandwiches)

Cooked chicken (Grill or poach the chicken. I used about 8-10 small chicken fillets, which I grilled for around 3 minutes until cooked. I prepared this the night before so I had even less to do in the morning. You can also use any leftover roasted, grilled, steamed, etc. chicken you have on hand.) 
1 ripened avocado
lemon juice
freshly ground black pepper
8 - 10 slices sandwich bread
  1. Put the cooked chicken in a food processor and process a little. Add a little bit of water if the mixture gets too dry. 
  2. Peel the avocado, remove the seed and add to the chicken (there's no need to slice up the avocado, you can add it in big chunks). 
  3. Squeeze a little lemon juice into the mixture and process until the chicken and avocado are well blended. You can process it as smoothly as you like, or leave little chunks in the mix. 
  4. Taste, and add more lemon juice if needed. You can also add some mayonnaise into the mix, but I prefer to leave it out.
  5. Remove the crusts from the bread (optional) and scoop the blended chicken avocado mix onto the slices of sandwich bread and spread. You can also butter the bread you like, but again, I prefer not to. I find the avocado is buttery enough on its own, plus it's a little more healthy without the butter. 
  6. Cut the sandwich into pieces and pack them into the bento. If you will be leaving your bento out in warm weather for some time, remember to add a few ice packs to keep it cool.

sandwich

You can also grill the sandwich if eating lunch at home or for a tasty snack.

toasted sandwich

Simple Caesar Salad

For an easy Caesar salad, I put some ripped up cos lettuce, bacon bits, parmesan cheese and a hard-boiled egg into a container, as well as some Caesar salad dressing in a squeeze container. Go for freshly fried bacon bits and freshly grated parmesan cheese if you like, but bottled bacon bits (made from real bacon, not the fake bacon) and pre-shredded parmesan aren't too bad, either. (I don't mean the parmesan you shake out of a can, though!). To make the hard boiled egg a little more exciting, I used my egg shapers. My egg wasn't large enough, so the bear turned out ear-less. How-to use egg shapers

Back

Bak Kut Teh

bak kut teh
I didn't realise how much Singaporean/Malaysian food I actually make until I started posting on this blog. Here's last night's offering - Bak Kut Teh. Bak Kut Teh (which is Hokkien for "meat bone tea"), is a Chinese soup made out of various herbs and spices, boiled with pork ribs. If you're interested in reading more about this dish, Wikipedia has a good description here.

As with mostly everything I cook, this can be made really quickly - about 40 minutes, with most of that just boiling time. The one thing you will need, though, is a packet of Bak Kut Teh spices. Without it, it would just be too much work. You can find Bah Kut Teh spice packets in Singaporean and Malaysian supermarkets - check your local Chinese store in other countries to see if they stock it, too... 

Continue reading...


Just follow the instructions on your Bah Kut Teh spice pack. Mine were - boil 1.5L water, add pork ribs, 12 cloves garlic, few drops dark soya sauce and boil everything for 35 minutes. In the meantime, I prepared some rice in the rice cooker, and went about making preparations for the next day's bento lunch. 

Towards the end of the 35 mins cooking time, I added in some mushrooms and also some bak choy (chinese cabbage). Once the bak choy was tender, I scooped it out to serve separately. These added ingredients are optional - you can just leave it as is. Taste the soup and add more soya sauce and pepper if necessary. And that's pretty much it! Serve the Bak Kut Teh with rice, and some chopped fresh red chilli and dark soya sauce. 

Simple Rice Decoration - Mounds of Rice


A fast, simple way of making a meal that includes rice look more fancy is to serve it moulded on your plate like they do in some restaurants. It makes the rice look so much better (compared to a heap of rice on a plate) and only adds a minute or so to prep time (and one more small bowl to wash up), that I usually make this effort.

Take a small bowl, wet it with water, then drain the water out (leaving a few drops inside the bowl), scoop cooked rice into the bowl (up to whatever height you wish) and press down gently but firmly to mould the rice into the shape of the bowl. Turn the bowl upside down onto a plate to unmould the rice, and serve. This works for all rice dishes including fried rice, coconut rice, etc.

Tips: If your mound of rice cracks a little on top, just use your rice scoop or a spoon to press it gently back together. Remember to wet the bowl a little before moulding each mound of rice. The water stops the rice from sticking to the bowl and helps it slide out. If your rice is too dry, the mound may fall apart. Try mixing your rice with a little warm water first to help it stick together.

Back

Wednesday, August 20, 2008

Spiral Pasta Bento with Chicken Schnitzel

pasta bento
Today's bento uses several ingredients from last night's dinner. This helps a lot in preparation time and with a few adjustments, can be made to taste a little different, so it's not exactly like eating two identical meals in a row! 

Continue reading...


Spiral Pasta Bento with Chicken Schnitzel
As I was preparing for dinner the previous night, I cut up extra garlic and sausage, as well as one green capsicum. I used that to make a similar pasta to the night before (click here for the rough directions) except I replaced the prawns with chopped green capsicum and the spaghetti with tri-coloured spiral pasta. Add extra tomato paste to coat the pasta well, and a little more salt, as the flavours will fade when eaten unheated.

If you are making the pasta the night before, undercook it slightly so it doesn't overcook when you reheat it the next morning (reheating the pasta the microwave is fine, but add some water to it first). 

To make the chicken schnitzel, I used 100g of chicken tenderloin, seasoned with a little salt and pepper, and coated with flour, then egg, then breadcrumbs. You can keep it like this in the fridge, covered with plastic wrap, and pan-fry it in the morning. (My method of making schnitzel is really a chicken version of tonkatsu.)

To complete the bento, I used the steamed asparagus from the night before and some cherry tomatoes, but any side salad would also be good.

Back

Spicy Sausage & Prawn Spaghetti

pasta
One way of getting a head start on your bento preparation is to chop up or set aside some extra ingredients when preparing dinner the night before. This may mean your dinner ends up being similar to your lunch, but if you like what you make, that shouldn't matter too much! An example of this is last night's dinner and today's bento. Dinner was a Spicy Sausage & Prawn Spaghetti, and lunch a Sausage & Capsicum Spiral Pasta.

Continue reading...

My favourite dish to cook is pasta! It can be as simple or as complex to prepare as you wish, it's hearty and satisfying, and there's a lot of room for improvisation. I have a lot of favourite variations, but this is the version I make when I want to prepare some pasta in a hurry, or when I'm at the supermarket and there are no good cuts of meat left (which unfortunately, happens more often than I'd like!). I also only use one large pot, which cuts down on washing up.

Here are some rough directions for the Spicy Sausage & Prawn Spaghetti. As with most of my recipes, I don't follow exact proportions - more sausage added just means more filling on top, and more or less garlic/chilli makes the pasta more or less garlicky/spicy! Just adjust according to your own preference.

Spicy Sausage & Prawn Pasta

Spaghetti (for 2 portions) - you can substitute spaghetti for another type of pasta, but I have a fondness for spaghetti. I find a thinner pasta works better, as there is not much sauce in this recipe to coat a thicker pasta properly.

1 whole bulb garlic (or less, according to how much you like garlic)
light olive oil
sprinkle of red chilli flakes
3 -4 sausages (I currently use a brand called Johnsonville's Hot Links, but you could substitute with sausages like cabana, or any other of your choice)
10 prawns (cut into half length-wise)
1 - 2 Tbsp tomato paste
chilli oil (optional)
salt & freshly ground black pepper to taste

Boil water in a large pot. When the water is boiling, add the pasta and cook according to the packet's instructions, less one minute. Add salt to the water and stir every now and again.

Meanwhile, chop the garlic and slice the sausage and prawns. (If you are making extra for a bento, chop up extra garlic and sausage at this point.)

When the pasta is cooked, drain and rinse under cold water to stop the pasta cooking. Set aside.

Heat up some olive oil in the same pot as before, and on low heat, lightly fry the garlic until fragrant and slightly golden. Add the sausage, a sprinkle of chilli flakes and a dash of chilli oil (optional). Turn up the heat a little and fry, then add the prawns. When the prawns are cooked, pour the pasta into the pot over the toppings and mix together. (You may need to loosen up the pasta with some water first before adding it.) Add some tomato paste and mix. Add salt, freshly ground black pepper, and more chilli, to taste. 

Serve immediately with a side salad or steamed asparagus.

pasta

Back

Tuesday, August 19, 2008

Somen Bento

somen bento
Today YH didn't need a bento, so it was just for me. I was feeling a bit lazy, so I ended up making this super easy somen (wheat noodle) bento. There's no cooking involved at all, apart from boiling the somen noodles. I was quite pleased as I finally got to use all 4 tubs of my Cinamaroll bento set.

Continue reading...
The somen noodles I used are purple in colour as they are flavoured with yam, but any type of somen would be fine.

Directions:
Boil water in a saucepan, then add the somen and stir the noodles around for 1 - 2 minutes until cooked. As somen is very thin, they cook very quickly. Then rinse the noodles in cold water and wash them gently until all the starch has been removed.

To make up the bento, put the somen noodles in one container (for easier eating, cut the noodles into shorter strands) and half-fill another container with some somen dipping sauce (tsuyu). If you like, pack some shredded nori (seaweed) in a small separate container (to keep the nori from getting soggy). Add the nori on top of the noodles just before eating. For a bit of vegetable and variety, you can pack a simple salad of crabstick and lettuce - this is very good dipped into the tsuyu as well.

Don't forget to add ice-packs to keep the somen bento fresh if you are planning on leaving it outside in warm weather. Another option is to leave it in the fridge, and take it out 10 minutes or so before eating.

somen bento

Back

Bak Chor Mee

bak chor mee
In an attempt to satisfy YH's mee pok craving, I tried to make Bak Chor Mee (the meat and mushroom version of mee pok). I couldn't find many recipes online, and since the last time I'd tasted this dish was many years ago, I had nothing much to go on except a vague memory and Wikipedia's description of mee pok and what ingredients were included. 

Continue reading...

Here's my version of Bak Chor Mee:

Mee pok noodles (or if you can't find them, you could use linguine)
Garlic (chopped finely)
Shallots (chopped)
Minced Pork
Shitake or Chinese Mushrooms, sliced (I couldn't find Shitake, so I used fresh Chinese Mushrooms)
Light Soya Sauce
Dark Soya Sauce (I used a thick dark soya sauce (Kecap Manis) for colour and flavour. I'm not sure if a Singaporean mee pok version would use this though - this is prob more of a Malaysian style)
Chinese Black Vinegar
Chilli Oil (or red pepper flakes)
Sambal Belachan Chilli
cooking oil (I use Light Olive Oil)

chopped red chilli and soy sauce (for dipping)

On low heat, lightly fry the garlic in a medium-sized saucepan with around 2 Tbsp oil until fragrant. (Don't let the garlic darken in colour or it will burn). Remove most of the garlic and oil onto a separate dish. Using the remainder garlic oil in the pot, turn up the heat to medium and add the chopped shallots. Fry, then add the minced pork. Continue to fry and mash the minced pork up so it doesn't clump together. Just before the meat is cooked through, add the mushrooms. Add some light soya sauce to stop the mixture from drying out. The mushrooms will also sweat out their liquids as they cook. Add a bit of chilli oil or red pepper flakes, and around 1 heaped tsp or more of Sambal Belachan Chilli (add more or less according to how spicy you want your noodles). Add the vinegar and some dark soya sauce (or Kecap Manis to taste). Turn off heat and set aside.

Boil a pot of water, add the mee pok, and stir. They will not take long to cook - you will see the noodles change colour slightly. Do a taste test to check if they are done - they should be springy, not mushy. Remove and drain, and rinse with water. If you are using linguine, cook in salted water according to the packet's instructions.

Mix the noodles with the set aside garlic and oil - I find this stops the noodles from drying out and makes it easier to mix it with the rest of the meat topping later.

Option 1: 
Heat up the meat mixture, divide the noodles on plates, and pour the heated meat mixture over the noodles. Serve with chopped red chilli and soya sauce, and some fishballs in clear soup.

I vaguely recall that this is how it is served at hawker stalls - you mix your topping into the noodles when it is served. However, I actually feel the second option is better, as it gives you a better control on the taste of the final dish.

Option 2:
Heat up the meat mixture, add the noodles, and mix together. Add more soya sauce, vinegar and chilli to taste. Serve with chopped red chili and soya sauce. 

Back

Monday, August 18, 2008

Freezer Stash Bento

bento

With no time to shop on the weekend, this morning's bento relied heavily on my previously prepared bento stash in the freezer. It's always nice to have a little something stored away, ready for days like these.

Continue reading...

Rice was leftover from last night's dinner, which I kept in the fridge. I re-heated it for a few minutes in the microwave this morning and topped it with some dried baby sardines. You should be able to buy small bottles of tiny fish like this in supermarkets that stock Japanese items. (Mine is from City Super in Hong Kong, and is called Kaomise Small Fish with Sansyo Spice.)

I raided my frozen bento stash, and defrosted a container of chicken, carrot, beansprout and ginger stir-fy. Then I defrosted some mini meatballs in a pan and coated them with a little teriyaki sauce for flavour. The tamagoyaki (Japanese fried egg) was made fresh, and I cut it up into 4 small squares.

For some vegetables, I mixed some frozen peas and corn kernels together. It's a super quick (and lazy) way to add some vegetables and colour to your bento. The frozen peas help keep the corn cool and will defrost well before lunchtime. You could include some salad dressing or mayonnaise, but I find the peas and corn are sweet enough to eat on their own. Plus, if you use corn kernels from a can/box, as I did, the corn is already sitting in slightly sweetened juices, which adds flavour.

Back

Home Town Dumpling

dumpling

Our weekend walk led us past an old-style corner shop called "Home Town Dumpling". We decided to go in for an impromptu snack, enticed by the food review articles from different magazines and newspapers (all in Chinese!) that were displayed on the window. The words "home-made noodles" in English were the deciding factor for me. 

Continue reading...


As it was around 4:30pm, the place only had one other couple dining inside. To my surprise, the restaurant was very spacious and roomy with a high ceiling and ample table space. The man on the photos outside with black hair, was seated behind the counter, now with a full head of white hair, so we concluded this place had been around for quite a while.

We sat down at a long table facing the television screen (the Olympics were on!) and to my great happiness, the full menu was in English and Chinese (and not a limited range English menu you sometimes find in local places). There was a lot of choice - rice and noodle sets, dumplings of all varieties in small and larger portions, dumplings with noodles or without. As it was just a snack before dinner, we ordered one bowl of dan dan noodles to share, and a small serve of steamed vegetarian dumplings (5 pieces). We also ordered 2 cold soyabean drinks. 

The noodles arrived first, and to my surprise there was a lot of soup in the bowl. I had been expecting the noodles to come with more sauce than soup, but I know there are many soup versions of it around - I'd just forgotten to ask before we ordered. Speaking of which, we had also forgotten to specify we wanted hand made noodles (which you can order for HKD 3 extra). 

After a fairly long wait, the waitress came out with 2 soybean drinks but served another table who had come in after us. Since there were only 3 occupied tables in the store, including ourselves, it was a bit hard not to notice. We were slightly put off since it was a hot day, we were very thirsty, and we'd noticed the waitress standing around doing nothing for a long time. We ended up blaming it on the Olympics on the tv - I guess it was distracting for everyone there. 

YH liked the dumplings, but I thought the taste was only so-so. Since pure vegetable dumplings are not really my cup of tea, I was probably a little biased. The dumpling skin was also just a tinge on the dry side. The dan dan noodles were very good, though. Very spicy but not a Sichuan ma-la chilli type of tongue numbing. And no strong overwhelming peanut taste, just a slight crunchiness here and there. The noodles were also firm and springy, which made me wonder how their home-made noodles compared.

I'd go back again, to try the home-made noodles, some other meat dumplings and also the ja jiang mian that was on the menu!

Home Town Dumpling is located at G/F, 102 Caine Road, Mid Levels, Hong Kong. Tel: (852) 2517 0969

Back

Friday, August 15, 2008

how to make octopus frankfurters

octopus 4
Here's how I make my octopus franks:

Continue reading...


octopus1
Step 1: Take a frankfurter and cut it into half. I find shorter, thin frankfurters work well.

Step 2: Hold the frankfurter vertical with the cut side up. You will see it is circular in shape. Imagine it is like a round pie you are going to divide into eight equal slices. This will form the eight legs of the octopus.

Firstly make a vertical slice down to cut the 'pie' into half. Keep going until you reach about 2/3 of the way down the frankfurter. The remaining 1/3 will form the body of the octopus.

Step 3: Rotate the frank and make a similar vertical slice 2/3 down the frank to divide the 'pie' into 4 equal quarters.

Step 4: Rotate the frank again, and slice down to make six, then eight sections. Take care on these last two cuts as it is easy for the legs to break off here. Try to divide the pieces as evenly as possible so the legs are of equal width. It helps to hold the other pieces together tightly as you slice (watch your fingers, though).

Step 5: Cut two eyes in the body section of the octopus by twisting two small holes into the frank with your knife, a skewer or chopstick. I find a pointed chopstick works well.

Step 6: Boil water in a small pot. Put the franks inside and boil for a few minutes (or follow the instructions for your brand of franks). Watch as the legs magically spread out in the water! Your octopus franks are learning to swim...

octopus2

Step 7: Once the legs have opened, remove the octopus franks and use them to decorate your bento or any other dish to thrill your kids (or yourself)!

octopus3

There are several other methods for slicing the legs, but I find this method gives the best control to create legs of even width. Another option is to panfry the franks a little to give them more colour.

Back

Olympic bento week (Day #5) - Chap Chae Noodles

chap chae bento
It's the last day of my Olympic Bento Week! YH surprised me last night by saying his Friday lunch meeting had been cancelled, so he wanted a bento for the next day. My original plan had been to throw together some leftovers for myself, but now I had to come up with something a little better, as well as enough food to feed two...

Luckily, I found a pack of cellophane noodles (also called tanghoon or green bean vermicelli) in the cupboard and decided to make my own version of Chap Ch'ae, a popular Korean noodle dish. I ended up with this Leftover Chap Ch'ae & Octopus Frankfurter Bento.

Continue reading...


The traditional Chap Ch'ae recipe usually includes bean sprouts, mushrooms, spinach and meat such as chicken mixed with cellophane noodles, seasoned with garlic, sesame seed oil, sesame seeds and soy sauce. However, there is really nothing to stop you from making your own variation by adding whatever vegetables and meat you have on hand. Basically, if the ingredients are suitable for a Chinese-style stir-fry dish, it would work for the Chap Ch'ae. My version today had carrots, onions, capsicum and chicken inside.

As I had leftover vegetables, I packed a small side salad to accompany the noodles made up of potato, lettuce and cherry tomatoes. (As you will note, I've finally given up on adding strange purple/blue items for the Olympic colours...) I also had some frankfurters in the fridge, so I made some octopus frankfurters to decorate the bento as the pile of noodles on their own looked a little plain. The Japanese love to make little shapes out of frankfurters for their bentos, and although I don't usually cook with frankfurters (unless I'm making hot dogs) I must say the octopus frank is so easy to make and visually appealing that I just can't resist.

octopus frank

Here's a rough how-to guide for the Chap Cha'ae - I don't have a proper recipe as I just sort of add whatever amount I need according to taste...

Firstly, boil some water in a saucepan and add the cellophane noodles. Mix them to separate, but be ready to take them out of the water as they cook very quickly. The instructions on my pack said to boil the noodles for 5 minutes - but after less than a minute, they were done (taste a noodle to check). Rinse the noodles in cold water until cooled, and put them back in the saucepan. With a pair of scissors, cut up the noodles a bit so they will be easier to mix and eat.

Next, chop up some garlic, slice whatever meat you are using (chicken, pork and beef all work well) and the rest of the ingredients into strips. Fry the garlic gently with some some oil (I use light olive oil), add the meat and stir fry until cooked. Add the meat on top of the cooked noodles in the saucepan. Then individually, fry (or re-heat) the rest of the ingredients you wish to add, and add them to the noodles. Mix everything together and season with soy sauce, sesame oil and a dash of sesame seeds to taste. If it is a bit tasteless you can also sprinkle in some chicken stock powder and a dash of oyster sauce, too.

Chap Ch'ae is great as it can be served warm or at room temperature, which makes it perfect for bento. If you plan to microwave it before eating, remember to check if your bento container is microwavable, as some aren't.

Back

Thursday, August 14, 2008

Olympic bento week (Day #4)

bento
Olympic bento #4 is an attempt at one of my all-time favourites - a tonkatsu (deep fried pork cutlet) sandwich! I will always look out for it when I'm in Japan (or anywhere else I can find it). Having an aversion to deep frying anything at home - far too messy and uses up too much oil - I usually partake of deep-fried goodness only when eating out. I also don't like to fry pork - I tend to overcook it just to make sure it's cooked through, and the meat ends up too dry... However, ever since reading a tonkatsu recipe featured on one of my favourite websites - Just Hungry (www.justhungry.com), I decided to try it out.

Continue reading...

It was actually much easier to make than I'd thought. I couldn't find a boneless pork chop/cutlet, so I bought a slab of what was labelled "lean pork". I sliced it lengthwise to make thinner steak-shaped pieces, then dipped the pork in flour, beaten egg, and breadcrumbs (Japanese style panko breadcrumbs work best - I made my own following the recipe in Just Hungry). The meat should also be lightly seasoned with salt and pepper first, which I forgot to do! Ah well, I made the more healthy "just oil, no-salt" version! I used light olive oil, and didn't really deep fry it, just sort of pan fried it with a little more oil than usual.

The tonkatsu turned out well when I fried it last night - the meat was still tender inside. However, the crumbs had turned soggy after a night in the fridge, and the re-heating this morning probably sent the meat over the well-cooked edge. Looks like I've no choice but to wake up extra early to fry it fresh next time. I also made a mistake in slicing the tonkatsu up last night - upon reflection I should have kept it whole, then reheated it this morning, then sliced it with the sandwich.

This morning, after it was re-heated, I waited until it was cool before putting it on crustless sandwich bread that was buttered on one side, and spread with Bulldog brand tonkatsu sauce on the other, with a dash of pepper on top. Putting the meat in when it's cooled stops the sandwich from getting too soggy. I went easy on the tonkatsu sauce, but realised later I should have been more generous with it - by lunchtime, the bread had soaked up the sauce and its flavour had almost disappeared. I sliced the sandwich into thirds, cutting up the sliced tonkatsu further, which made it harder to pick up but easier to eat. I figured if the meat was going to be tough, best it be in smaller chunks. One of the most terrible things that can happen when one eats a sandwich is to have a hard time biting through the meat filling, and then being forced to eat it up first, leaving the rest of the sandwich meat-less! Thankfully, the meat wasn't overly tough or dry, but the small chunks did help the chewing. The bread was a little squashed after I'd cut it, though...Overall, I think it turned out well for a first try, but it needs further improvement!

I packed the tonkatsu sandwich with a side salad of butter lettuce, cherry tomatoes, red cabbage and some Japanese citrus soy-based salad dressing in a little squeeze container. Together with my little yellow plastic elephant spork, it makes a sort of Olympic-coloured salad!

Back

Wednesday, August 13, 2008

Olympic bento week (Day #3)

bento
Today's bento was a little haphazardly put together. The one in the picture is also not packed to the brim, so it wouldn't travel too well (YH's one had a little more in it). I had fun using my new rice cuber, though, and made a mix of white and light orange rice cubes. The orange rice was made by mixing some salmon flakes with the warm rice. The bento also has some pan-fried chicken, tamagoyaki (fried egg), carrots and stir-fried capsicum and onion. The red cabbage made another appearance as well.

I decided to stick with the mad emphasis on colour for this Olympic bento week. It appeared today...

Continue reading...

...in the form of an Olympic Fruit Salad!

fruit
Blueberries, Black Cherries, Strawberries, Chinese Pear and Kiwi Fruit made up the Olympic colours. Last night I peeled and cut the fruit, de-seeded the cherries, put them into tubs and froze them. This morning I took the tubs out and the fruit was nicely defrosted by lunchtime. The only trouble was, the fruits had become a little soggy, with the pear losing most of its crunch. On the other hand, the juices had combined to make a nice fruit salad syrup. An air-tight container is really needed for this to prevent the syrup leaking. For best results, the fruit should be cut up in the morning and kept cold using an ice pack, but morning prep time would take a little longer...

Back

Tuesday, August 12, 2008

Olympic bento week (Day #2)

bento
Today's bento was simple as I didn't feel like cooking too much last night. I prepared a simple pasta made with small pasta shells, garlic, a green capsicum and a red pimento I found in the fridge, and a shake of bacon bits. Then I added some leftover frozen tofu beef meatballs and the leftover red cabbage (which boiled into a nice purple colour). It was only halfway through making the pasta that I realised - Voila! All the Olympic colours AGAIN, and I swear, it was not intentional!

Summer Somen

somen
Last night I was feeling lazy and sluggish and not really up to a lot of cooking. So we had a simple meal of cold somen (Japanese noodles made out of wheat flour) and some dumplings. The different somen colours make the dish look a little more elaborate, but it was really quite simple to prepare, as the somen noodles were so thin they cooked almost instantly.

And yes, we are still in the Olympic colour food theme... actually, it was really not my fault. I was at City Super last week, and lo and behold, in front of me were bundles of multi-coloured somen in green, yellow, pink, purple and black (actually white-ish but the label said it was black tea flavoured). How could I possibly resist? It was too perfect. I was hoping the black somen would be darker, but it was creamy with tiny black flecks.

Continue reading...

I served the somen on two smaller plates, plus the remainder on a larger plate. We each had a little bowl half-filled with Yamasa brand tsuyu (sauce) to dip the somen into. It was tasty - a little more salty than Yamasa's tsuyu for soba. I'm guessing it's because somen is thinner than soba and has less taste per mouthful, so a saltier sauce gives the somen more flavour. It was just right to eat on a warm summer's evening.

Back

Monday, August 11, 2008

Olympic panda bento

panda bento
Since I'm on a roll with this corny cutesy Olympic coloured food, I decided to go all out, no holds barred. I'd been planning on making this for YH's lunch last Friday, to time it with the Olympics Opening Ceremony, but he had a farewell lunch to attend, so I postponed it to today. He says his lunches are all free for bentos this week, so prepare for a full week of bento fun! I hope Mr Panda survives the trip down to his office...

Update: YH just rang - he got a huge surprise when he opened up his bento and saw Mr Panda staring back at him. He said he couldn't bear to eat it, and that it would be hard for me to top this one. Sounds like a challenge! Am really pleased because he was chuckling away in office - hope it cheers up his day!

Continue reading...

This bento is my first attempt at a charaben bento (cute bento). It's a very simple one - nothing compared to the amazing charaban bentos out there, but I'm happy with how it turned out. Plus, at 7am, this is about all I can manage right now...

Olympic Panda Chirashizushi (scattered sushi) Bento

panda bento2

Mr Panda is made out of one round, slightly flattened ball of sushi rice, and the ears of two smaller rice balls. I cut his ears, eyes and nose out of nori seaweed. It was actually easier to cut nori shapes than I thought - I just folded one nori sheet into quarters, used a pair of scissors to cut out a shape and voila, I had four eyes vaguely the same shape. Just like primary school again.

The toppings for the chirashizushi are nestled around the panda. I tried to follow the order and colour of the Olympic rings to follow my Olympic theme.

Blue: Red cabbage & blue-dyed ham

I tried to dye the ham blue using red cabbage juice, but it didn't work too well and I resorted to my blue food dye. Which made the ham dry up. Needless to say, I only added a bit of shredded blue ham for effect. The red cabbage is more purple than blue, and it doesn't quite fit with the sushi, but I decided it could be a sort of side salad.

Black: Teriyaki chicken

This is more brown than black, but I wasn't prepared to douse the chicken with too much soy sauce.

Red: Crab sticks

I think foodies probably don't think much of crab sticks, but I love them. Of course real crab is better, but a california handroll with a crab stick inside is still tasty. In an attempt to find a better quality crab stick, I bought some luxury looking ones from Korea.

Yellow: Shredded egg

Green: Cucumber sticks & avocado

Accompanying the bento (not pictured) is a small container of cut up nori squares to eat with the sushi (sort of like a de-constructed handroll) and a squeeze container of Kewpie mayonnaise.

I packed the bento with two small ice packs sitting inside the container to keep everything cool and food-safe. I did most of the preparation the night before, so in the morning I just had to make up the sushi rice, mold and decorate the panda, and add the toppings. I also sliced up the avocado and dipped the slices in a little lemon juice to stop them turning brown.

Saturday, August 9, 2008

Happy Sg National Day!

fruit platter

Happy Singapore National Day to all my Singaporean friends! It's one of my annual quirks to celebrate this day by wearing red & white and making some red & white themed food (Singapore's flag colours). No, I don't always want my food to be a particular colour - this is my usual Sg National Day quirk, and the Olympics the previous night was just unfortunately timed closely together with National Day. Anyway, this morning we started off with a simple fruit platter of red delicious apples and a chinese pear. There were only 2 apples and 1 pear, but cut up, it looked like a lot.

Continue reading...

For lunch, I surprised YH with fried hokkien mee. I've never made it before, so was quite pleased with the results. I used one of the ever faithful Prima Taste ready-to-cook pastes, but it was for the soupy hokkien prawn mee, not the fried version, so it did require slightly more effort to put together. I'd recommend all the Prima Taste range - they do an amazing job at enabling home cooks to produce pretty authentic dishes.

hokkien mee
The first attempt was ok, but the noodles were a little soggy. I'd cooked them just right and forgot I had to refry them. I told YH to imagine we'd bought it take away and by the time it arrived back wrapped in the traditional banana leaf and newspaper, all the juices had made the noodles soggy. ha. We ate while watching the 239km men's cycling event on tv. The way the cyclists helped carry water to pass to fellow teammates, and how cyclists chatted to their competitors along the way was amazing. Who knew cycling could be so interesting? We learnt that they cycle in small and big groups to make it easier aerodynamically and saw them take turns to lead. Like birds flying, I guess. The second plate I fried up was better. I made a fresh batch of noodles and stopped boiling them before they were fully cooked so they continued cooking when I fried them. I think this added the starchiness to the dish because the 2nd plate was more gooey (as fried hokkien mee often is). I also didn't use the authentic mix of white and yellow noodle because well, I don't like yellow noodles. Here's a pic of the 2nd attempt:

hokkien mee2


For dinner, I surprised YH with chicken curry with roti prata (sort of red & white in colour?) and rojak. He was very happy - think he's not eaten prata for quite a while. I pulled out the 'ol Prima Taste pack again for the curry, but didn't add all the coconut mix into it.

curry

I wasn't about to attempt making my own prata, so I bought a packet of frozen prata. The brand is called Chinatown, and it's made in Singapore. Surprisingly for frozen food, it works really well. There are two cooking options - fried in a frying pan, or oven baked. I've tried both before, and I would recommend the frying pan version. The results in the oven aren't as good, and seriously, added a light spray of canola oil into the frying pan won't make any difference considering how much oil is already in the prata. It only takes a few minutes for the prata to puff up wonderfully. It sinks pretty fast on the plate, but for a few moments it is this wonderful puffed oval shaped bread in the pan.

prata

I cut up some pineapple, green apple and cucumber for a simple rojak, mixed in some rojak sauce and topped it with some crushed peanuts.

rojak

Time for dessert again, and the konnyaku jelly made another appearance - this time, with strawberries inside. I wanted to have a red & white theme, so I sprinkled some sugar on top before serving. Of course the sugar immediately dissolved, but it made the jellies much nicer tonight - sweeter and actually edible.

jelly

Back

an olympic-themed meal

meal
In honour of the Olympics Opening Ceremony, and possibly just to make life a little more interesting, I decided to make an Olympic-themed dinner. Given that it ended up being 6 courses long, it was possibly an Olympic-sized dinner as well. After too much thought into the various combinations - 5 colours in each course, or one colour per course? - I picked the latter option. As I'd wanted to make 5-colour-ring-jellies for a long time leading up to the event, I ended up with 6 courses - 1 colour per course, plus all 5 colours at the end.

Continue reading...

1st course
Corn potato soup

yellow soup
It's yellow and a Chinese classic (well, the corn soup part, anyway). Adding the potato and having it creamy rather than a thinner soup with egg floating around is probably less Chinese.

2nd course
pink salmon & prawn tomato pimento

red appetiser
The salmon mixed with the tomato pimento sauce ended up tasting like sardines, but oh well, it was still tasty. YH's favourite course. As I was placing the sauce around the plate, the commentator on TV was talking about how the performance (a square surrounded by people in a circular formation) reflected ancient China's view of the world, where the heavens are round, and the earth square. I looked down, and my dish looked like the performance on stage. Very cool...

3rd course
spinach pork dumplings green tea somen noodles in piquant sesame dressing

green appetiser
This course didn't turn out as green as I'd hoped. I could have stuck to a safe bright green lettuce capsicum salad, but I wanted to try something a little different, and a dumpling noodle dish was a nod to China as well. I didn't have the time or desire to make my own dumplings and I couldn't find green-skinned ones so I made do with cutting them open to show the spinach inside. I had an urge to dye the skins green, but luckily I resisted. (Well, ok, I confess I actually tried dyeing one, but it didn't turn out - those skins are quite dye-resistant...) The green tea somen noodles when raw was a promising bright lime green, but when it cooked the colour faded. I didn't want another soup dish, so I dribbled a spicy vinegar-soy-sesame oil dressing over everything which made it quite tart and refreshing.

4th course
grilled lamb fillet portobello mushroom & squid-ink spaghetti

black main
In an attempt to make the lamb darker, I marinated it in soy sauce, but I left it a tad long so it was a little too salty. The portobello mushrooms were from Canada and they were huge! YH's one was at least 12cm in diameter. It's hidden under the lamb in the picture, so you can't really see how large it was. Tasty, too, when grilled - even I liked it...

5th course
Assorted platter with blue brie, blueberry cheese & blue potato crisps
Cream soda vanilla ice cream

blue dessert
It wasn't exactly blue, but it is seriously difficult to find a true blue food. I made do with a chunk of King Island Blue Brie (served with non-blue crackers). I found some Japanese blueberry cheese balls that were purple in colour, and also some potato chips made of blue potatoes, that were also more purple than blue in colour. We were too full to eat the brie, but we nibbled on a chip and one blueberry cheese ball. Strange and sweet.

At the last minute, I bought a box of blue icy poles. It was the last box in the store, and I felt it was calling out to me. Actually YH had wanted to buy it some time back and I had exclaimed - but it's blue, it looks so fake...oops... actually, it tasted quite nice, with a slight bubblegum flavour.

blue icypole

6th course
olympic ring jelly

jelly
I had planned this jelly dish some time back when I saw multiple coloured konnyaku jelly packets in the supermarket. However, they didn't have blue, only a purple grape flavoured jelly (which I turned blue with some food colouring) and the lemon jelly (flavoured with black tea) wasn't black, but a browny colour. The most disappointing was the green apple jelly - it was a light green, which I darkened a little with food dye, but when I poured it out, it was still too dilute and after it cooled it became a pale yellow colour (see the stripe above the brown). So I headed out to buy more green jelly, and really went wild with the food dye. Taste-wise, I thought the konnyaku jelly didn't taste that good as it wasn't sweet enough. And it was a bit too chewy... I stopped after the red layer. YH finished it all up, though! The spacing of the courses was just right - we ate the jellies towards the end of the ceremony as the Olympic torch was being lit. A very memorable evening!

Back