Showing posts with label bento decoration. Show all posts

Friday, March 6, 2009

Owl Bento

owl bento
I've taken a long break from making kyaraben (character) bento. I've just not been all that inspired, I suppose. It's been a blob of pasta, or leftovers with rice for poor YH for a few months! As my parents are visiting us right now, I thought I'd make the effort and make a special bento for them, especially since my mum has been hinting about how she'd love to eat one. My mother loves owls, so I thought an owl bento would be appropriate. To be honest, it was not one of my best efforts. But it was easy to put together...

The owl is made out of rice, with carrots for eyes, and brown mushrooms for its beak, wings and feathers. Surrounding the owl is a forest of broccoli, fried green capsicum, beef soboro, tamagoyaki (rolled egg omelette), corn and a little tofu moon and tamagoyaki star. The colours were a little dull (I guess it's nighttime) but my mum was pleased with it, and I guess that's all that matters.


Tuesday, December 23, 2008

Rudolph Bento

rudolph bento
The Christmas season crept up on me this year and took me completely by surprise. (Yes, decorations have been displayed everywhere for ages, but as they've been up since November, I really lost track.) It finally dawned upon me that if I didn't get my act together it would be next year... so I dug through my bento stash and leftover rice to make this simple Christmas-themed bento.

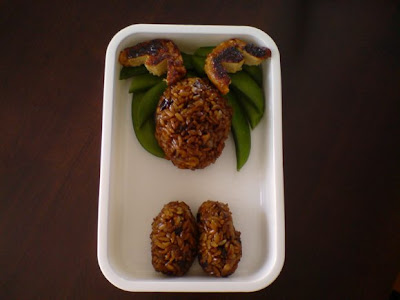
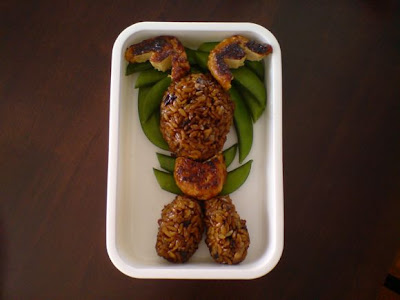
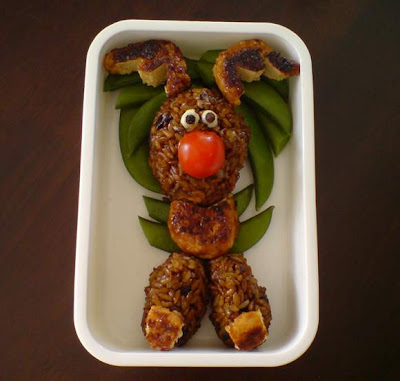
It's Rudolph the red-nosed reindeer, who, by the way, I feel very sorry for. I also object to the song about him - he was laughed at because he looked different, and then he became popular just because he was useful?? Anyway(!), Rudolph's head and legs are made out of mushroom and soya sauce fried rice, and his antlers and body are made out of teriyaki chicken meatballs. He has a cherry tomato nose, and surrounding (and underneath) him is a simple display of grapes and cherries, and some sugarsnap peas. 
Continue reading for a Step-by-step guide on how to make this Rudolph Reindeer Bento...

Step-by-Step Guide: How To Make a Rudolph Reindeer Bento

Ingredients:
  • 5 heaped Tbsp cold, cooked rice
  • 1 clove garlic, chopped
  • sesame oil
  • soya sauce (light and thick, dark soya sauce)
  • 2 shitake mushrooms, chopped
  • 3 teriyaki chicken meatballs (made fresh, or from your freezer stash)
  • 1 cherry tomato
  • 2 black peppercorns
  • small squeeze of mayonnaise
For the rest of the bento (if you wish to follow the bento pictured) or feel free to substitute with other vegetables, fruit, etc.
  • handful sugarsnap peas (boiled)
  • small bunch seedless green grapes
  • 5 - 7 cherries
Equipment:
  • Small paring knife
  • Small non-stick frying pan (to fry the rice) and small saucepan (to boil the sugarsnap peas)
  • 1 bento box (I used a single tier, 630ml capacity container).

Step 1 - Make the Fried Rice

In a small frying pan, add a few drops of sesame oil, and fry the chopped garlic until fragrant. Add the mushrooms, rice, a splash of light soya sauce, and some thick, dark soya sauce. Stir and fry together until the rice grains are well coated with the soya sauce. Set aside to cool.

Step 2 - Make Rudolph's Head
rudolph1
Place a square sheet of strong plastic wrap on your open palm, and scoop 3 Tbsp of warm fried rice onto the plastic.

rudolph2
Close your fingers around the rice, which will enclose the rice in the plastic. Twist the plastic at the top and compress the rice ball. Shape one end of the ball so it is slightly pointed in shape. Unwrap the rice and place it in the bento box.

Step 3 - Make Rudolph's Legs
rudolph3
For each leg: Repeat Steps 2 and 3 using 1 Tbsp of rice and squeeze the rice ball to form a long sausage shape. Unwrap and place into the bento box.

Step 4 - Make Rudolph's Antlers
rudolph4rudolph5
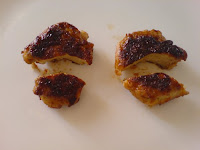
Take 2 meatballs, and cut a small semi-circle from the bottom of each one with a small paring knife. Set aside the semi-circles.

rudolph6
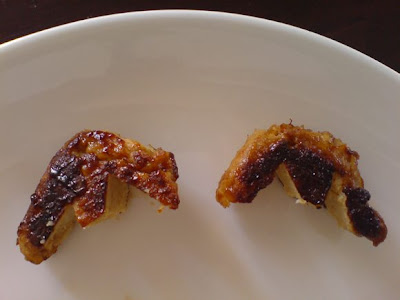
Cut out two small triangles from each of the remaining meatballs (as pictured) to form the antlers.

rudolph7
Place some sugarsnap peas into the bento box around Rudolph's head, and then place the antler meatballs above the head. Shift the legs down.

Step 5 - Rudolph's Body
rudolph8
Cut a small semi-circle out of the 3rd meatball, and place it in-between the head and the legs to form Rudolph's body.

Step 6 - Rudolph's Face & Hooves
rudolph9
Slice a cherry tomato into two, and place the bottom part on his face to form the nose.

Squeeze a small amount of mayonnaise onto a dish, and use a chopstick/skewer to dab two small circles of mayonnaise above the nose to form eyes. Stick the black peppercorns onto the mayonnaise eyes to form pupils.

Slice bits of the remaining meatballs into small squares and place them on Rudolph's legs to form hooves.

Step 7 - Filling up the rest of the bento box
Finish off the bento by placing cherries, grapes and some extra sugarsnap peas around Rudolph. I chose these for their red and green Christmas colours, but substitute with other fruits/vegetables if you wish.
rudolph bento

Back


Tuesday, December 16, 2008

Ham n Egg Rolls

ham n egg rolls
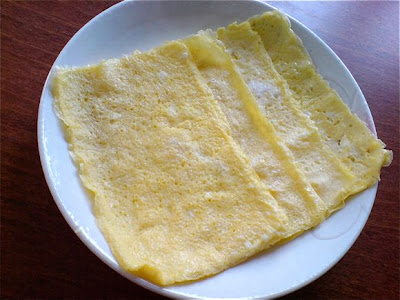
Eggs are extremely versatile, and the same holds true for using eggs in bento. Along with the popular tamagoyaki, another great way of using egg is making a thin omelette (usuyaki tamago). These thin sheets of egg are great for cutting out into little shapes, rolling up, as a wrap or nori (seaweed) substitute, or shredded as a topping for noodles. Recently, I used these thin omelettes to make some ham and egg rolls. Continue reading...

A traditional usuyaki tamago is usually made with a little dashi stock and sugar, as well as cornstarch or potato starch (to strengthen the egg mixture).

However, if you plan on using the omelette to cut out shapes, as I often do, I don't bother to add cornstarch. I'm also not very keen on sweet egg, so I usually just make a savoury, thin omelette - with egg, a splash of water and a dash of salt. I use a small non-stick square pan which is great for making tamagoyaki and square thin omelettes, but a small (round) frying pan works just as well. If you make tamagoyaki often enough, it may be worthwhile to invest in a small square tamagoyaki pan. My one was cheap, and very small (for 1 - 2 eggs). I find the small ones more handy, as you need many eggs to cover the larger tamagoyaki pans.

Ham n Egg Rolls
1 large egg
dash salt
1 tsp water
1 slice of ham per thin omelette (I get 4 thin omelettes out of 1 large egg, but this differs according to the size of your pan)
light olive oil (or other oil for cooking)
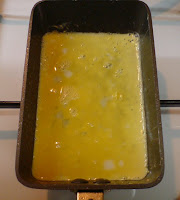
1. Beat the egg well with the salt and water. Heat up a well oiled small frying pan on low heat.
(Edit: You can strain the egg through a strainer for finer results, but I usually don't bother, as you can see from the bits of egg white showing in the picture...)


2. Add a small amount of egg mixture and tilt the pan so the egg coats the base.


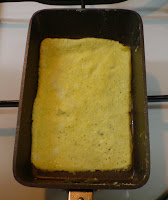
3. When the egg mixture hardens slightly, use a spatula or pair of chopsticks to loosen the sides of the egg. Carefully flip the egg over.


4. Cook for a further 10 seconds. The egg is so thin that it cooks very quickly.


5. Remove, re-oil the base of the frying pan, and repeat until all the egg mixture has been used up.

ham n egg rolls
6. Add a slice of ham on top of each egg omelette, and roll it up together. You can roll it with the egg or the ham on the outside, or a combination of both. Slice into pieces to fit the height of your bento box.


You can also use the thin omelette to decorate your bento by using cookie cutters to cut out shapes from the omelette. 
eg. flower shapes to decorate onigiri.

Back


Sunday, December 14, 2008

Monokuro Boo Bento

monokuro boo bento
I have taken a short break from kyaraben (character bento) recently as they do take some time to make, and I have not been feeling too inspired. However, when I read that the topic for this week's bento challenge over at the Live Journal Bento Challenge community was "twins", I suddenly wanted to make a Monokuro Boo Bento. I love these monochrome square-shaped pigs by San-X, and to fit the Bento Challenge theme, I have decided the pigs are fraternal twins...

My Monokuro Boo pigs are rice onigiri filled with salmon flakes. One is wrapped, and the other isn't (to form one black and one white pig). They are sitting in a colourful garden of carrot, cheese and egg flowers, edamame, broccoli and cherry tomatoes, and some ham and egg rolls.

Monokuro Boo is quite easy to make, as it is basically a square-shaped onigiri. The hardest part is to cut out the little eye and nose details. It helps if you have cutters, but if not, you can make do with a small, sharp pair of scissors and a little patience. Here's a step-by-step guide on how to make this bento.  Step-by-Step Pictorial Guide: How To Make A Monokuro Boo Bento...


Step-by-Step Guide: How To Make a Monokuro Boo Bento

Ingredients:
(For 2 Monokuro Boo Pigs)
  • 6 heaped Tbsp cooked short-grain rice
  • Filling for the onigiri (I used salmon flakes, but you can use whatever filling you wish)
  • 1 triangular sheet of nori seaweed
  • + extra piece nori
  • 1 slice processed cheese
For the rest of the bento (if you wish to follow the bento pictured) or feel free to substitute with other vegetables, meat, etc.
  • 1/4 carrot
  • 1 large egg
  • 2 slices ham
  • edamame
  • broccoli
  • 2 cherry tomatoes
Equipment:
  • Small paring knife
  • Scissors (preferably small ones)
  • Small circle cutter or a straw
  • Flower-shaped cutter (ordinary cookie cutters are fine), or any shaped-cutter you prefer eg. stars, hearts, etc.
  • Small frying pan (to fry the egg) and small saucepan (to cook the broccoli)
  • 1 bento box (I used a single tier, 630ml capacity container, but you can use other sizes - the amount of food you fit around the pigs will just increase/decrease according to what size box you use.)

Step 1 - Making the Onigiri (Rice Balls)
MB Step 1
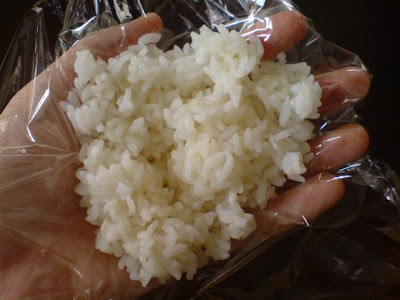
Start by making 2 rice onigiri. If your rice is cold, sprinkle a few drops of water over the rice and warm it up in the microwave. Tear a square-shaped piece of strong plastic wrap and place it on the palm of your hand. Scoop 2 heaped Tbsp of warm rice onto the plastic wrap in your palm.

Step 2 - Filling the Onigiri
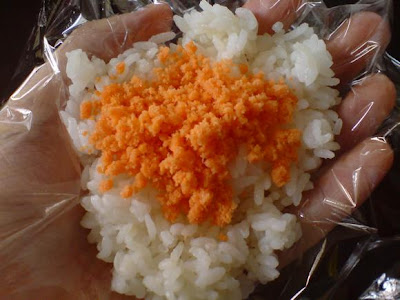
MB Step 2
To make an onigiri with filling, add your filling on top of the rice. Here, I have added a few tsps of salmon flakes. Other fillings you can use - teriyaki chicken bits, canned tuna with mayo, minced beef soboro, etc.

If you just want to make a plain rice onigiri without any filling, proceed to Step 3.

Step 3 - Completing the Onigiri
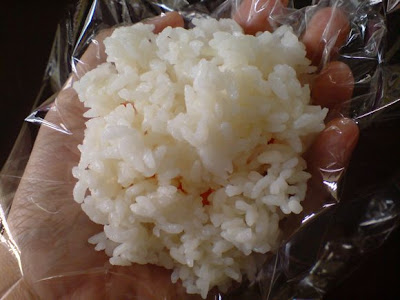
MB Step 3
Add 1 heaped Tbsp of rice on top of the filling to cover it. (For a plain onigiri, just add 1 Tbsp of rice. You can also sprinkle a little salt on the rice for flavour.)
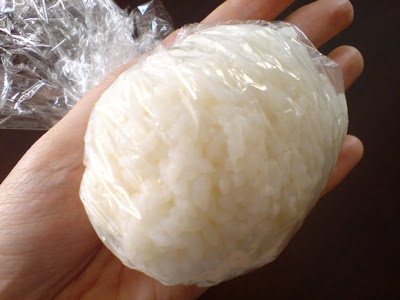
MB Step 4
Gather up the sides of the plastic wrap by closing your fingers inwards (as if you were gripping a tennis ball in your palm). Twist the plastic wrap together at the top. You should now have a ball of rice.

Step 4 - Shaping the Onigiri
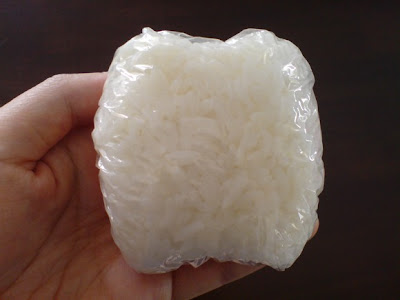
MB Step 5
Compress the rice together and shape the onigiri as you desire. As we are making Monokuro Boo, press the rice ball to form a flat square shape, and squeeze out two ears and two feet at each end of the square. Set aside the shaped onigiri in the plastic wrap, and repeat Steps 1 - 4 for the second pig.

Step 5 - Making the Black Pig
(You should now have two pig-shaped onigiri wrapped in plastic.)
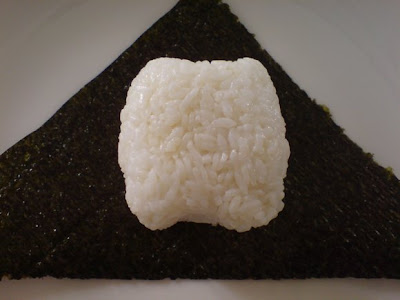
MB Step 6
To make the black coloured pig, take one of the onigiri and warm it up in the microwave for 10 seconds. You need the rice to be warm so the nori wraps around it easily.

Place a triangular piece of nori (seaweed) on a flat surface. (You can buy triangular-shaped nori, or just cut a big square of nori into half diagonally to form a triangle.) Unwrap the warm onigiri and place it on the nori seaweed.

Wrap the nori around the onigiri by tucking the top down (the ears will form quite naturally) and wrap the sides around the square. The back should look something like this -
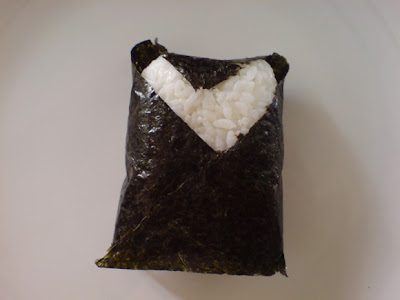
MB Step 7

...and the front should look something like this -
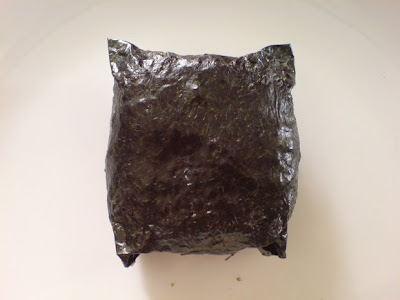
MB Step 7.5
Tuck and squeeze the nori a little to form the legs.
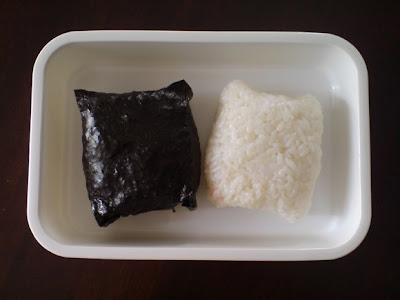
MB Step 8
Place the wrapped nori pig and the white rice pig into a bento box. Set aside as you prepare their faces.

Step 6 - Making the Eyes and Noses
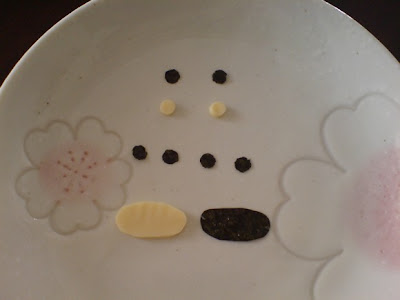
MB Step 9

Eyes
Black Pig: Take a slice of processed cheese and cut out 2 little circles using a straw or a little round cutter.

White Pig: With a small piece of nori, cut out 2 little circles using a nori face punch, or a small pair of scissors.

Nose
Black Pig: With a sharp paring knife, cut out an oval-shaped piece of cheese for the nose. Estimate the size of the nose according to the size of your onigiri pig. Tip: If you are unsure of how big it should be, cut out a larger oval, and slowly trim the ends until it is the right size.

White Pig: With a small pair of scissors, cut an oval out of nori. Try to make it the same size as the cheese oval you just made.

Nostrils
Black & White Pig: Cut out 4 small oval shapes out of nori, using a pair of scissors. The nostrils should be slightly smaller than the eyes.

If you used a nori face punch to cut out the eyes, cut out 4 more small circles, then convert them into oval shapes with the scissors. (This is what I did, therefore the nostrils in the above picture are round as I had not shaped them yet. See the picture below for the shaped nostrils)

Step 7 - Adding the Faces
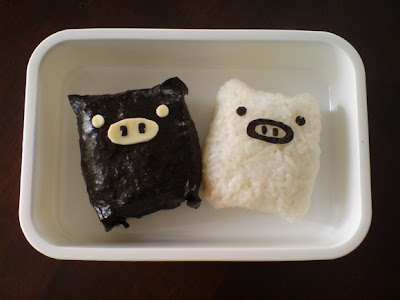
MB Step 10
Black Pig: Place the cheese eyes, cheese nose, and nori nostrils onto the black pig.

White Pig: Place the nori nose lightly onto the white pig, then quickly lift it off before it sticks. The nori should now be soft, but not soggy. Fold the nose slightly and make a small cut in the centre with a pair of scissors. Then unfold and cut around the inside of the oval to make an oval ring as pictured. Place the nose on the white pig, as well as the nori nostrils and eyes.

Your Monokuro Boo pigs are now complete!

Step 8 - Packing the Rest of the Bento
Now surround the pigs with colourful vegetables, meat, eggs, etc. of your choice.

Here is what I added:
  • steamed broccoli;
  • carrots (shaped into flowers using a flower cookie cutter. You can also shape them into stars, hearts, etc.);
  • cherry tomatoes;
  • edamame;
  • ham and egg rolls (Edit: Link added for the ham n egg rolls);
  • egg (fried thinly, then cut into flower shapes);
  • processed cheese (cut into flowers - a good way to use up the remainder of the cheese slice).
How I packed the bento:
I began by selecting the "harder", more bulky items. In this case, it was the broccoli, which I added around the sides of the bento box.
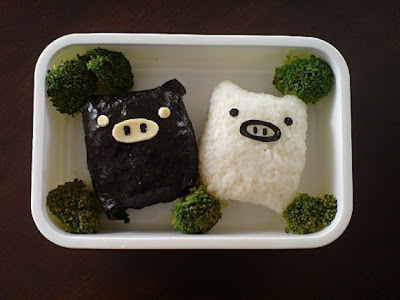
MB Step 11

This was followed by the cherry tomatoes and the ham and egg rolls.
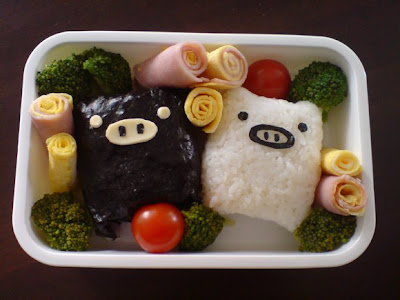
MB Step 12

Next, half of the carrots and the edamame were added to fill in the gaps. The remaining carrots were placed on top to create a flower scene, and the egg and cheese flowers were added for further colour and design. The completed bento:

MB Step 13

Back


Tuesday, November 11, 2008

Batman Bento

batman bento
My godson J is currently into Batman, so when I went over to visit, I attempted to make a Batman Bento for him. Batman to me is rather dark and gloomy, but as J is only 4 years old, the bento is a light-hearted one, with little masked onigiri (rice balls), chicken teriyaki meatballs, and a batman emblem cut out of nori (seaweed) sitting on top of an oval tamagoyaki (fried egg omelette). Edamame, slices of baby corn and glazed fried luncheon meat stars complete the bento. 

Continue reading for the Glazed Fried Luncheon Meat recipe...


Glazed Fried Luncheon Meat
Luncheon meat is not the healthiest, but it is extremely tasty and I do indulge once in a while. Try to buy a good quality luncheon meat. For this recipe, I used Spam Lite, but other brands would work just as well. The ingredients used for the marinade and glaze are similar to those for a teriyaki sauce, except for the soya sauce, as the luncheon meat is already very salty.
Luncheon meat
Mirin (Japanese rice wine)
Sake
Sugar
  1. Slice and cut the luncheon meat into decorative shapes, or cubes.
  2. Mix together equal amounts of mirin, sake and sugar in a bowl and add the cut luncheon meat. Stir gently to coat the luncheon meat. Add more marinade if necessary. (For half a small tin of luncheon meat, I added 1 Tbsp each of mirin, sake and sugar)
  3. Heat up a non-stick frying pan over medium low heat. Add a very small amount of oil if desired, although I prefer not to add any oil, as the fat in the luncheon meat will exude when it is fried.
  4. Fry the luncheon meat on both sides until browned.

Back


Sunday, October 19, 2008

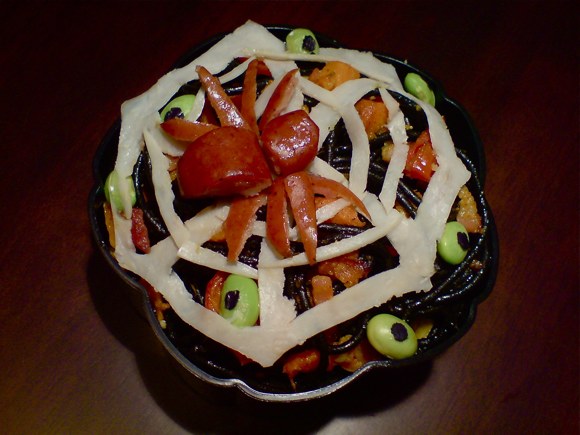
Halloween Witches' Brew Spider Bento

spider bento
I don't usually make Halloween-themed food, but this year, since I've been bitten by the bento bug, it seemed like another great opportunity to design a bento. I suppose I got a little too excited, as it isn't even Halloween yet! But the stores and restaurants here are covered with Halloween-inspired decorations, so I'm not that early, either.

The bento is my little Ode to Macbeth - "Double, double toil and trouble; Fire burn and cauldron bubble" - but the fire must have bubbled out for some time because a spider came along and decided to build a web over it...

The bento contains squid-ink spaghetti tossed with roasted pancetta, pumpkin, garlic and tomato, representing some foul-looking (but tasty) witches' brew. "Eye of newt" edamame with nori eyes have been tossed in here and there, and the spider web is made from a slice of smoked turkey. The spider itself is made out of polish sausage (I didn't want to go the frankfurter route with this one, and the polish sausage is an adult-version, I suppose!)

Note: I don't usually pack spaghetti for cold bento, but this pasta is covered in enough garlicky-oily goodness that it doesn't dry out.

You can also use this pasta and decorate it in a similar way for a Halloween themed dinner, if you feel so inclined...See Roasted Pumpkin & Pancetta Pasta
spider pasta


Tuesday, October 14, 2008

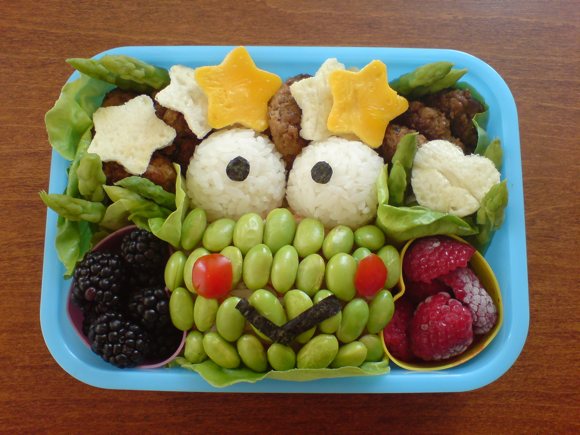
Edamame Keroppi

edamame kerropi
My previous charaben (kyaraben) designs have been a little serious and more for adults, so I thought I'd venture into Sanrio-land for today's bento. Of course, I had to start with Kero Kero Keroppi, my (not so secret) favourite... There's something about a cute green frog. I don't know why I like them so much, especially since a real life green frog does not inspire the same sort of feeling. 

Anyway, back to Keroppi! - his face is made out of rice mixed with salmon flakes, covered with edamame. I thought it would be interesting to use edamame instead of colouring the rice green. His eyeballs are plain rice balls, and little cherry tomato cheeks and nori (seaweed) eyes and mouth complete his face.

Surrounding him are beef meatballs, asparagus, lettuce, and fried egg yolk and egg white omelettes cut out into stars and hearts. The bits of leftover egg are hidden underneath the pretty cut outs on top. A little tub of blackberries and raspberries add colour and a bit of fruit to the bento.


Friday, October 10, 2008

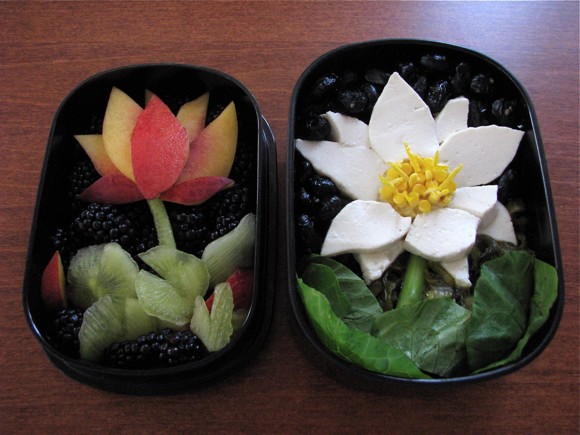
Lotus Flower Bento

lotus flower bento
This week's theme on Bento Challenge is "Flowers", so I decided to make a lotus flower (actually two) with Korean-style food. For me, design is one thing, but at the end of the day, how a bento tastes is most important. There's no point if the design is fantastic but you don't enjoy eating it...

The petals of the white lotus flower are made out of tofu, with an egg centre. Not pictured is a soy-sesame dressing to pour over the tofu. Underneath the flower are lettuce rolls containing Korean beef bulgogi and gochujang (red pepper paste). To fill up the background, there are boiled black beans with soy, sugar and black sesame seeds (kong jang) and some takana (mustard leaf) pickles.

The orange-red lotus (that is slightly closed) is made out of a nectarine. It is sitting on a background of blackberries and there are also some lotus leaves/pads made out of kiwi fruit.

Korean Beef Bulgogi Recipe...


Korean Beef Bulgogi
(double/triple proportions if you are making a larger amount)
190g boneless short rib beef (or rib eye), thinly sliced
1/2 kiwi fruit (see note at end)
1 Tbsp brown sugar
1 Tbsp soya sauce
1 tsp sesame oil
1 tsp garlic (1 clove, finely chopped or mashed)
1/2 Tbsp sake
dash black pepper
  1. Sprinkle 1/2 Tbsp of brown sugar over the beef and let it rest for a few minutes as you mix up the marinade.
  2. Mix the other 1/2 Tbsp brown sugar with the soya sauce, sesame oil, garlic, sake and pepper.
  3. Cut the kiwi in half, then squeeze it over the meat as if you were juicing an orange, except the whole kiwi is being squashed and mashed up. Discard the kiwi skin. Mix the kiwi into the beef (you can use your hands for this). The juice of the kiwi fruit tenderises the meat.
  4. Add the marinade to the beef, mix well, and leave it for 10 minutes. As the beef is thinly sliced, you do not have to marinade it for long.
  5. Grill (or pan fry) the beef for a minute or so each side until just cooked (the beef will cook very quickly).
  6. Serve with lettuce leaves and gochujang (Korean red pepper paste). Wrap a slice of beef and some gochujang in the lettuce, and eat.
Tip: You can make your own Korean bbq at home by setting up a cast iron grill on an induction cooker on the dining table, and frying the beef bulgogi at the table. Serve with white rice, lettuce, gochujang, pickles and other meats to bbq.

Note: If your beef is very thinly sliced, omit the kiwi fruit juice, as the meat doesn't need to be tenderised. Otherwise, the juice will make the meat go mushy.

Back


Monday, October 6, 2008

Teriyaki Chicken Bento in 2 styles

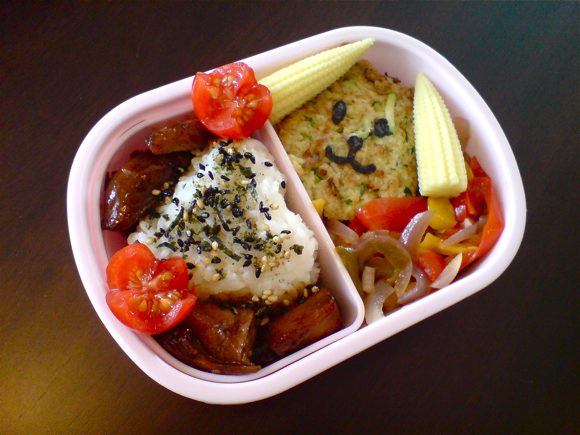
Here's an example of how you can use similar ingredients to create two different bento looks - the cute and the more serious...

teriyaki chicken bento1
Firstly, the more serious-looking bento contains teriyaki chicken, zucchini fritters, along with a plain rice onigiri, blanched haricot beans, cherry tomatoes and baby corn. The little sauce container has some tomato sauce for dipping the zucchini fritters.

Now, taking those ingredients (and substituting the haricot beans for some rainbow sweet n spicy peppers, we have the second bento:
teriyaki chicken bento2

The plain rice onigiri has been moulded into a heart, and the fritters have turned into a dog, with the help of a nori (seaweed) face and baby corn ears. (There is a lack of green here, as I ran out of haricot beans, and had to use sweet peppers instead.)

This is another reason why I love to make bentos - there are endless design possibilities :)


Wednesday, October 1, 2008

Bamboo Bento

bamboo bento
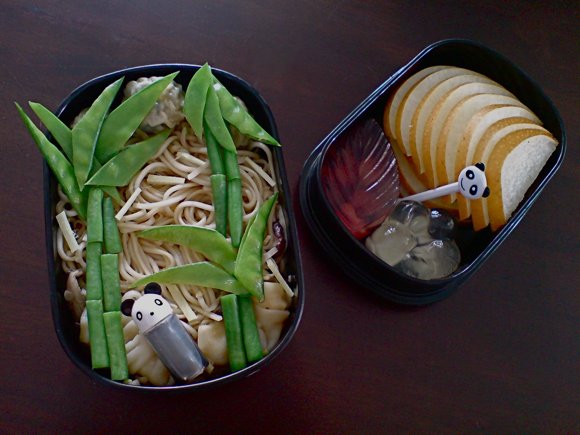
Today is 1st October, China's National Day. It is a public holiday here in Hong Kong, so I thought I would mark the day with a themed bento. After wild thoughts of re-creating the Great Wall out of cubes of egg, I settled for a more simple bamboo design.

The "bamboo" is made out of cut pieces of blanched haricot beans, and snow peas cut in the shape of leaves. Instead of rice, I decided to give the bento a slight Shanghainese twist, with dumplings and la mian noodles. The dumplings are just frozen ones (meat and vegetable wonton and shrimp dumplings) and the la mian is a cold noodle concoction I made up. 

La mian (拉麵) noodles are made from wheat flour. The best kind are the ones that are freshly made (pulled) and then served in soup with toppings such as pork and preserved vegetables. I used a packet of dried la mian, which is the only type I can easily buy. It's of course not as good as fresh la mian, but it's pretty decent, too.

Accompanying the lunch is rather Japanese dessert of konnyaku jelly and slices of Japanese Hosui pear (no political reference intended, really).

Since it's China's National Day, it was fitting for the panda picks and sauce bottles to make an appearance - the bottle contains some soya sauce to loosen the noodles a little, although the garlic oil coating the noodles did stop most of the clumping.

Continue reading...

Cold La Mian Noodles
(2 fairly large portions)

200g dried la mian noodles
4 - 5 chinese mushrooms/shitake mushrooms
half a bulb of garlic (if you are not a garlic fan, reduce this down to 3-4 cloves)
light olive oil
soya sauce
oyster sauce
xo sauce (optional, if not available)
chilli oil (optional)
thinly sliced straws of fresh ginger (optional)

frozen dumplings (optional)

If you are using frozen dumplings, boil them in water (for timing, follow the packet instructions) and set them aside whilst you make the noodles.
  1. Bring a pot of water to the boil and add the la mian noodles. Stir them around until cooked (should only take 1.5 - 2 minutes). Be careful not to overcook them. Drain them in a colander and rinse them well under running cold water. Set aside.
  2. Peel and chop the garlic finely, and slice the mushrooms.
  3. Heat up a pot with some olive oil (approx 3 Tbsp) and fry the garlic on low heat until fragrant (not brown). If you have some xo sauce, add 1/2 tsp.
  4. Add the mushrooms and fry them. (If using dumplings, add the pre-cooked dumplings here and fry lightly, then remove them from the pot - this stops them breaking up when you stir the noodles about)
  5. If the noodles have clumped together, separate them under cold water, drain, then pour them into the pot.
  6. Mix the garlic oil and the noodles together on low heat.
  7. Add a dash of soya sauce and oyster sauce. Mix into the noodles. Taste test and add a little more if necessary.
  8. If you like your noodles spicy, mix in a few drops of chilli oil. Serve topped with a few thin slices of ginger and dumplings (optional).
Tip:
If you do not have dumplings, you can also add some mince meat (beef/pork/chicken). Just fry the meat in the garlic oil before you add the mushrooms (there is no need to remove the meat before adding the noodles in this case).

Back


Wednesday, September 24, 2008

Sea Turtle Bento

sea turtle bento
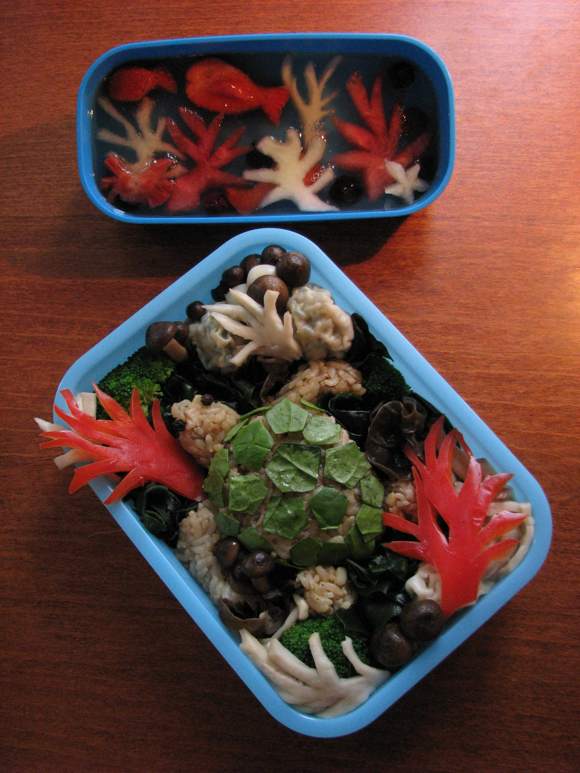
This week's Bento Challenge entry! The theme was "Under the Sea"... The sea turtle is in memory of the one we spotted when snorkeling in the Maldives.

It's a bit hard to see the turtle, as he's camouflaged in all the seaweed, dried black fungus, mushrooms, dumpling and capsicum coral - quite realistic, I guess! The turtle is made out of shrimp and mushroom fried rice, with a spinach shell.

The side dish is a fruit jelly, with a konnyaku jelly sea (which is lighter in colour, the photo makes it look a little dark, but by the time I was done I'd lost most of the natural light) and a strawberry parrot fish, and watermelon and honeydew coral. There's also a little strawberry crab and a honeydew starfish that's sitting in the corners, but they are a little hard to make out in the photo.


Thursday, September 18, 2008

Kookaburra Sits In The Old Gum Tree

kookaburra

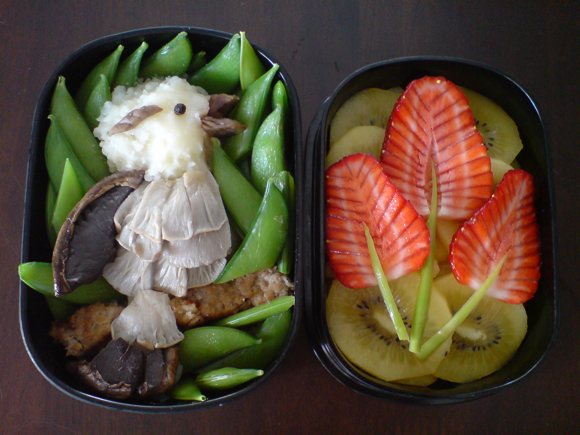
A little ode to Australia and my entry for this weeks bento challenge topic - "winged" (at the LiveJournal Bento Challenge Community).

The laughing kookaburra is made out of mashed potato, covered with oyster mushroom feathers and a portobello mushroom wing and tail. He's sitting on a meatball tree branch surrounded by snap pea gum leaves. (More meatballs are hidden under the leaves.) Accompanying him (and to match the Australian setting) are some golden kiwi slices and strawberry banksia flowers.

Anyone else from Australia who sang (and liked) the kookaburra song? It was one of my childhood favourites!

Kookaburra sits in the old gum tree-e,
Merry, merry, king of the bush is he-e,
Laugh, Kookaburra, laugh,
Kookaburra gay your life must be!

Btw, they used this song in an episode of the new Doctor Who series (Series 2, Ep.11 "Fear Her"). I found it a little odd though - ie. an Aussie folk song being sung by an English mother to her daughter to calm her down..


Thursday, September 11, 2008

Sunflower Bento

sunflower bento
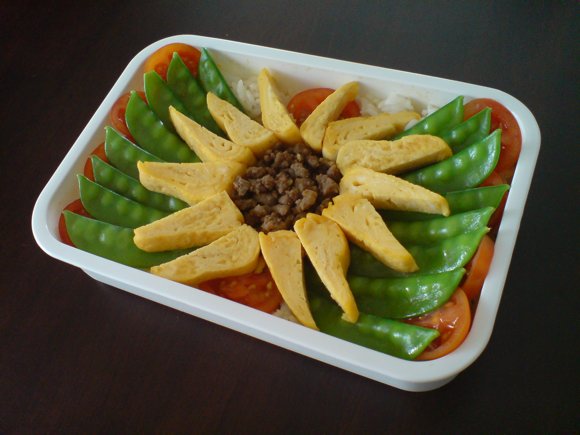
Despite having several two-tier bento boxes, I actually find myself using a single layer box more often. I like the feel of all that open space to lay out the food, like for today's sunflower bento. You don't need any fancy accessories for this bento, and apart from laying out the fillings, it is pretty easy to make.

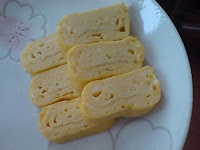
I made the sunflower using beef soboro (minced beef) and cut-up tamagoyaki (Japanese rolled omelette) - see how to make tamagoyaki for a pictorial step-by-step guide. The background is made out of cherry tomatoes and blanched snow peas on a bed of rice. I also added some stir-fried capsicum (hidden under the rice) for added flavour.

tamago5
Directions for the sunflower petals:
Make a rectangular shaped tamagoyaki and slice it into 1/4 inch (or 1/2 cm) pieces as shown in the picture. Cut each rectangular slice into half diagonally to make one petal. Arrange in a circle to form the sunflower.


Wednesday, September 10, 2008

Ode to the 80s Bento

80s bento
My entry for this week's Bento Challenge (at the LiveJournal Bento Challenge Community). The theme was "I Love the 80s".

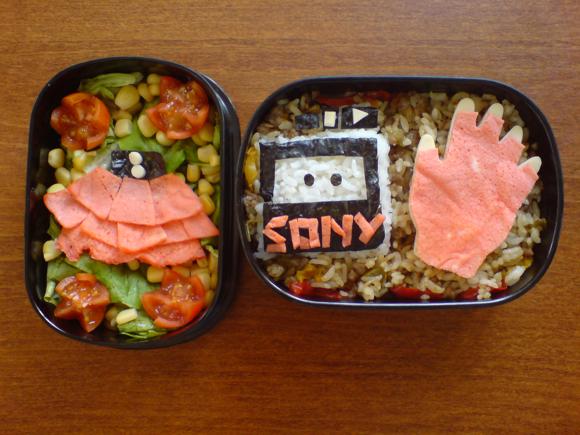
Yes, I'm showing my age a little, but I did have very fond memories of the 80s! Who can forget the one-hand fingerless glove, the frilly skirt with the thick black elastic belt that snapped close at the front with shiny silver buttons, and of course, the legendary Sony Walkman (not that I had one - I had some other cheaper brand). I still remember staying up late on a Sat night, listening to the Top 40 music on the radio, anxiously waiting for the No.#1 song, only to discover it was Lionel Richie's "Hello"...

Contents of my 80s bento - a cheese hand, an egg (dyed pink) fingerless glove, and a rice and nori seaweed Walkman, on top of fried rice. The rice was fried with minced beef, onion and capsicum. The side salad contains lettuce, corn and cherry tomatoes, with a frilly skirt made out of dyed pink egg and a seaweed belt with cheese buttons.


Friday, September 5, 2008

Backgammon Bento

backgammon bento
Backgammon, anyone?

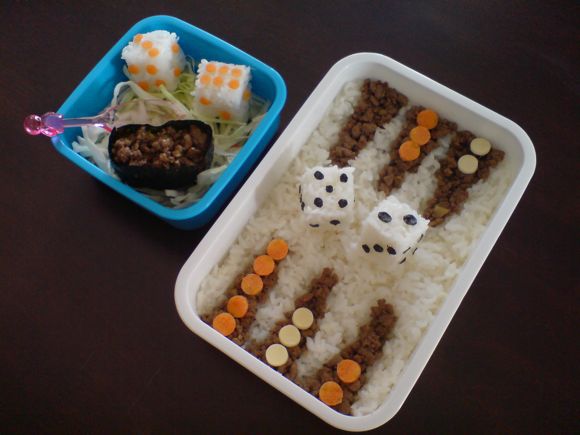
Today's bento was prepared for the Bento Challenge Live Journal Community I recently joined. Every week a different theme is given, and everyone has one week to prepare their themed bento (if they wish to). This week's theme is "board games", so I thought I would try it out for fun. I remember playing backgammon with my sister when I was young, but thinking about it now, I've actually forgotten how to play it!

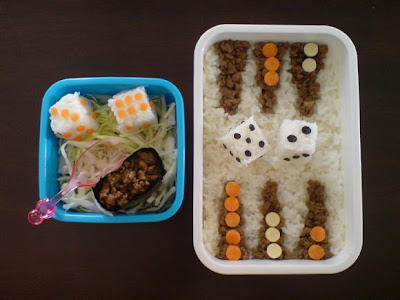
The bento contains minced beef soboro and rice for the board, little carrots and cheese pieces, rice dice, and a beef soboro gunkan sushi for the dice cup on a bed of shredded cabbage. Taste-wise, there's not much variety of food, but it was very fun to make.

backgammon bento


Tuesday, August 26, 2008

Crab Croquette and Pineapple Salsa

crab bento
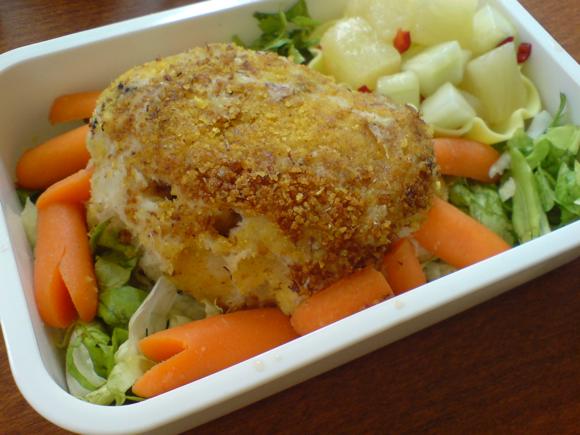
The 3rd bento of the "One Week of Pineapple" series! Presenting a crab croquette and pineapple salsa bento... Actually, I couldn't decide if the crab was a crab cake or crab croquette, but as I added mashed potatoes, it is more like a croquette. As it is only lightly pan-fried, it is healthier than the usual deep fried croquette. The pineapple salsa is made with pineapple and cucumber in a thai- style dressing. This dressing is the basis of a lot of Thai salads, and is very versatile.

Update: My One Week of Pineapple bento series only lasted 3 days...I ran out of bento friendly pineapple ideas - ie. I didn't really want to eat cold red duck pineapple curry and my other idea of a pineapple baked ham disappeared after I couldn't find any gammon ham in the supermarket to bake...

Continue reading...


Pan-fried Crab Croquette
Adjust quantities according to how many crab croquettes you wish to make. This is the rough estimate for 2 large crab croquettes.
4 small baby potatoes, or 2 medium sized potatoes
100-150g fresh crab meat or good quality canned crab meat (I used Phillips brand)
1/3 onion
around 50g milk or water
golden breadcrumbs
salt & pepper
dash cayenne pepper/paprika (optional)
squeeze lime or lemon juice
  1. Peel and cut the potatoes into smaller chunks. Boil in a saucepan until soft (around 10 - 15 mins). Drain away the water and mash, adding a little milk or water to soften the mash. Set aside to cool.
  2. Chop 1/3 onion finely. In a small non-stick frying pan, heat up a little oil and fry the onion until translucent. 
  3. Add the crab meat and fry on low heat. Add salt and pepper and a dash of cayenne pepper/paprika (optional). Squeeze a little lime or lemon juice on top. If you are making the pineapple salsa as well, you can also add a bit of the salsa dressing here.
  4. Add the crab mixture with the mashed potatoes and stir well to combine. Season to taste with more salt and pepper. 
  5. Pour some golden breadcrumbs onto a small plate. Scoop the crab mixture to form two round ovals, and coat with the breadcrumbs. 
  6. Heat up a little oil in the small frying pan, and lightly pan-fry the crab croquettes until golden. 
  7. Remove, cool, and pack into your bento. (You can also put the croquette on top of some shredded lettuce, as in the photo)
Decoration Tip:
Turn the crab croquette into a crab decoration by adding baby carrots for legs and crab claws, and dig two holes for eyes. Cut out a little triangle from the end of two baby carrots for crab claws, and cut three baby carrots into half lengthwise for the legs.

Pineapple Salsa (with Thai-style dressing)
Cucumber, cut into small cubes
Pineapple, cut into small cubes (fresh or canned pineapple, drained of their syrup)
For the Thai-style dressing (adjust quantities according to how much fruit and vegetables you have):
1/2 Tbsp white sugar
1 Tbsp Thai fish sauce
juice of 1 small lime
1/3 red chilli, deseeded and finely chopped
  1. Mix all the above ingredients for the dressing, then add to the cucumber and pineapple.
  2. Add more sugar, fish sauce, lime juice to taste.
  3. Leave in the fridge for 10 mins - overnight.
This dressing is very versatile and can be used for many Thai salads. It contains the basis of Thai cooking, with its 4 tastes - sweet, sour, salty, and spicy. I've added less sugar in this version as the pineapple is already quite sweet.

Back