Friday, October 31, 2008

Happy Halloween

halloween apple
Happy Halloween to all those celebrating! Apologies for the short absence - I just got back from a lovely but short trip to Hokkaido, Japan! I went mad eating the delicious food there, and buying up as many bento-related accessories as I could find. I must have had too much fun, as I promptly fell ill upon my return... 

The apple in this photo was picked by hand at the Sobetsu Fruit Village in the Lake Toya district in Hokkaido. It is a very beautiful orchard, and for JPY500 per adult, you can enter and freely eat any of the fruits growing there. We visited in late October, so there were mainly apples and pears and a few grapes left. You can also pick the fruits and fill them in bags to take home - they charge different prices according to the size of the bag and type of fruit picked. We filled up two small bags of apples and pears, which cost us JPY900, and we managed to fit at least 10+ apples and pears inside each plastic bag.

More bento and other recipes to come soon!

Monday, October 20, 2008

Roasted Pumpkin & Pancetta Pasta

spider pasta
I made this Roasted Pumpkin and Pancetta Pasta for a Halloween themed dinner, but it is actually a fabulous pasta to make any time of the year. It does have an autumn feel to it though, with the use of pumpkin and its orange and red tones. Make it with normal spaghetti and without the decorations for a non-Halloween themed dinner. 
Continue reading for the Roasted Pumpkin & Pancetta Pasta recipe...


Roasted Pumpkin & Pancetta Pasta
(serves 2)

200g spaghetti
160g pumpkin, chopped into bite-sized pieces
160g pancetta, cut into small cubes
80g (approx 10) cherry tomatoes, cut into half
3 Tbsp light olive oil
6 cloves garlic, sliced thinly
freshly ground black pepper
  1. Put the chopped pumpkin with a little water into a microwave-proof dish and microwave on HIGH for 10 minutes.
  2. Preheat oven to 200 degrees C (400 degrees F).
  3. Put the microwaved pumpkin, pancetta, cherry tomatoes, garlic, olive oil and black pepper into an oven-proof dish. Stir well to coat the oil over everything.
  4. Roast for 30 minutes.
  5. Cook the spaghetti according to the packet instructions (less 1 minute). Drain the pasta.
  6. Pour the roasted pumpkin mix into a saucepan. Add the spaghetti and fry lightly over low heat to combine.
  7. Season with sea salt/more black pepper to taste. (You may not need to add any salt as the pancetta is already quite salty.)
Serve (with or without Halloween decorations).

Back

Sunday, October 19, 2008

Halloween Witches' Brew Spider Bento

spider bento
I don't usually make Halloween-themed food, but this year, since I've been bitten by the bento bug, it seemed like another great opportunity to design a bento. I suppose I got a little too excited, as it isn't even Halloween yet! But the stores and restaurants here are covered with Halloween-inspired decorations, so I'm not that early, either.

The bento is my little Ode to Macbeth - "Double, double toil and trouble; Fire burn and cauldron bubble" - but the fire must have bubbled out for some time because a spider came along and decided to build a web over it...

The bento contains squid-ink spaghetti tossed with roasted pancetta, pumpkin, garlic and tomato, representing some foul-looking (but tasty) witches' brew. "Eye of newt" edamame with nori eyes have been tossed in here and there, and the spider web is made from a slice of smoked turkey. The spider itself is made out of polish sausage (I didn't want to go the frankfurter route with this one, and the polish sausage is an adult-version, I suppose!)

Note: I don't usually pack spaghetti for cold bento, but this pasta is covered in enough garlicky-oily goodness that it doesn't dry out.

You can also use this pasta and decorate it in a similar way for a Halloween themed dinner, if you feel so inclined...See Roasted Pumpkin & Pancetta Pasta
spider pasta

Turkey Wraps & Salad Bento

wraps bento
Another wrap bento... I wanted to use up the last of the tortillas, as well as the leftover avocado sitting in the fridge. These wraps are filled with turkey slices, cheese, avocado, home-made spicy tomato sauce and cucumber. I packed cherry tomatoes and some sliced plum pieces next to the wraps, 2 dried dates underneath the fruit container, and then a salad of rocket leaves and parmesan cheese in the second layer.

This is one of my favourite salads - rocket, parmesan, balsamic and a little black pepper. Unfortunately, I had run out of balsamic vinegar, so I had to make do with a little ponzu dressing, which worked quite well. The parmesan was pre-shredded from a pack (that I keep in the freezer, no less!), although if you have it on hand, freshly grated parmesan is really much better.

Home-made (Spicy) Tomato Sauce Recipe


When you want something a little more fancy than tomato ketchup from a bottle, make up this simple home-made tomato sauce. It is thicker than ketchup, but still smooth (unlike a chunky salsa). For a non-spicy version, just omit the red pepper flakes.

Home-made (Spicy) Tomato Sauce
(makes 1 small bowl)
400g chopped canned tomatoes
1 tsp dried basil
freshly ground black pepper
red pepper flakes (optional)
  1. Pour the tomatoes into a small saucepan. Add the basil, dash of black pepper, and a shake of red pepper flakes (optional).
  2. Cover the saucepan and bring the mixture to a boil on medium high heat.
  3. Turn the heat down to low, and boil until the mixture thickens. Stir every now and again. (Keep the lid half on as the mixture will splatter, leaving a small vent for the steam to escape.)
  4. When the tomato mixture is dry and thick, remove from the heat. Taste and season with salt/pepper if necessary (although I find the tomato is salty enough on its own).
  5. Cool, then store in an airtight container in the fridge. (Keeps for around 3 -4 days.)
This sauce is great to spread in wraps, to use as a dip with meatballs, chicken nuggets, or as a tomato ketchup substitute.

Back

Friday, October 17, 2008

Vegetarian "Riceapple" & "Grapeplant" Bento

pineapple eggplant design bento
This week's theme at the BentoChallenge LiveJournal Community was "Vegetarian" as this month is Vegetarian Awareness Month (which I was not aware of)! I found this week's challenge to truly be a challenge, as I am a gleeful carnivore. (A funny quote I read once by someone I've forgotten goes, "I didn't get to the top of the food chain to eat vegetables".) Jokes aside, I do respect vegetarians and went through a (short but memorable) vegetarian period myself. 

Anyway, back to the bento. I pondered about what to make and what design would be suitable. In the end, YH struck upon a great idea of grapes being turned into an eggplant. The "grapeplant" is made out of seedless black grapes, with a green apple stem, on a background of green apple cubes.

For the main part of the lunch, I finally decided on a Thai food theme, and made vegetarian pineapple fried rice (with mushrooms instead of seafood) and red curry tofu cakes with beans (instead of the more common thai fish cakes). I covered the fried rice with extra pineapple, and cut out pieces of cucumber for the top of the "riceapple". There's also a thai-style dressing (not pictured) to pour over the cucumber and tofu cakes (which have been crumbled at the top to form the background for design purposes). 

Click here for the Vegetarian Pineapple Fried Rice recipe

A basic fried rice recipe is here.

The thai-style dressing is here (previously used for my pineapple salsa).

Vegetarian Pineapple Fried Rice


This is a variation of my previous Fried Rice recipe. The method to frying the rice is the same, but the ingredients are listed especially for a vegetarian pineapple fried rice. Continue reading for the recipe...


Vegetarian Pineapple Fried Rice
(serves 1)
1 cup cooked rice (cooled)
1/4 small onion, chopped
2 cloves garlic, chopped
4-5 Chinese or Shitake mushrooms, chopped (if dried, soak mushrooms in water until soft)
1/2 red or green capsicum (sweet pepper), chopped
1 slice pineapple ring, chopped (canned or fresh)
handful of raisins
curry powder
1 tsp soya sauce
1 tsp Thai fish sauce
white pepper
light olive oil, for frying
  1. Heat up a little oil on medium heat in a frying pan.
  2. Add the onion and garlic, fry until fragrant and the onions are translucent.
  3. Add the chopped capsicum (sweet pepper), mushrooms, pineapple and raisins.
  4. Add soya sauce, fish sauce and shake some curry powder into the rice (add more or less according to your preference).
  5. Fry everything until the vegetables are cooked.
  6. Season with pepper, taste, and add more soya sauce, fish sauce or curry powder if necessary.
Tips:
For added protein, crack an egg into the rice after Step 5 and stir until the egg is cooked.

Change this into a non-vegetarian dish by adding some seafood (prawns/squid) or minced pork/chicken. (Add the meat after the onions and garlic, fry until cooked, then add the vegetables in Step 3. For seafood, which cooks quickly, add it together with the vegetables in Step 3.)

Back

Wednesday, October 15, 2008

Chicken Avocado Wraps

wrap bento
Just a simple bento lunch today. I decided to make some wraps - flour tortillas filled with chicken schnitzel, homemade spicy tomato sauce and avocado. Wraps are a little like western sushi rolls - you stick the filling inside, roll 'em up and slice. As the chicken had been sitting with the avocado and tomato, it was no longer crunchy, but it was still tasty. The avocado and spicy tomato were a nice complement to the chicken as well as a form of guacamole and salsa to match the tortillas.

The second layer of the bento contained cut kiwi fruit and dragon fruit, as well as some asparagus and cherry tomatoes (for colour).

Tuesday, October 14, 2008

Edamame Keroppi

edamame kerropi
My previous charaben (kyaraben) designs have been a little serious and more for adults, so I thought I'd venture into Sanrio-land for today's bento. Of course, I had to start with Kero Kero Keroppi, my (not so secret) favourite... There's something about a cute green frog. I don't know why I like them so much, especially since a real life green frog does not inspire the same sort of feeling. 

Anyway, back to Keroppi! - his face is made out of rice mixed with salmon flakes, covered with edamame. I thought it would be interesting to use edamame instead of colouring the rice green. His eyeballs are plain rice balls, and little cherry tomato cheeks and nori (seaweed) eyes and mouth complete his face.

Surrounding him are beef meatballs, asparagus, lettuce, and fried egg yolk and egg white omelettes cut out into stars and hearts. The bits of leftover egg are hidden underneath the pretty cut outs on top. A little tub of blackberries and raspberries add colour and a bit of fruit to the bento.

Friday, October 10, 2008

Lotus Flower Bento

lotus flower bento
This week's theme on Bento Challenge is "Flowers", so I decided to make a lotus flower (actually two) with Korean-style food. For me, design is one thing, but at the end of the day, how a bento tastes is most important. There's no point if the design is fantastic but you don't enjoy eating it...

The petals of the white lotus flower are made out of tofu, with an egg centre. Not pictured is a soy-sesame dressing to pour over the tofu. Underneath the flower are lettuce rolls containing Korean beef bulgogi and gochujang (red pepper paste). To fill up the background, there are boiled black beans with soy, sugar and black sesame seeds (kong jang) and some takana (mustard leaf) pickles.

The orange-red lotus (that is slightly closed) is made out of a nectarine. It is sitting on a background of blackberries and there are also some lotus leaves/pads made out of kiwi fruit.

Korean Beef Bulgogi Recipe...


Korean Beef Bulgogi
(double/triple proportions if you are making a larger amount)
190g boneless short rib beef (or rib eye), thinly sliced
1/2 kiwi fruit (see note at end)
1 Tbsp brown sugar
1 Tbsp soya sauce
1 tsp sesame oil
1 tsp garlic (1 clove, finely chopped or mashed)
1/2 Tbsp sake
dash black pepper
  1. Sprinkle 1/2 Tbsp of brown sugar over the beef and let it rest for a few minutes as you mix up the marinade.
  2. Mix the other 1/2 Tbsp brown sugar with the soya sauce, sesame oil, garlic, sake and pepper.
  3. Cut the kiwi in half, then squeeze it over the meat as if you were juicing an orange, except the whole kiwi is being squashed and mashed up. Discard the kiwi skin. Mix the kiwi into the beef (you can use your hands for this). The juice of the kiwi fruit tenderises the meat.
  4. Add the marinade to the beef, mix well, and leave it for 10 minutes. As the beef is thinly sliced, you do not have to marinade it for long.
  5. Grill (or pan fry) the beef for a minute or so each side until just cooked (the beef will cook very quickly).
  6. Serve with lettuce leaves and gochujang (Korean red pepper paste). Wrap a slice of beef and some gochujang in the lettuce, and eat.
Tip: You can make your own Korean bbq at home by setting up a cast iron grill on an induction cooker on the dining table, and frying the beef bulgogi at the table. Serve with white rice, lettuce, gochujang, pickles and other meats to bbq.

Note: If your beef is very thinly sliced, omit the kiwi fruit juice, as the meat doesn't need to be tenderised. Otherwise, the juice will make the meat go mushy.

Back

Thursday, October 9, 2008

Snack Bento

snack bento
A little bento idea - prepare a snack bento to give to a loved one who is going away on a work trip, or for yourself when packing to go overseas! Sometimes there is nothing like having your own stash of healthy (or not so healthy) snacks whilst away in a hotel room with nothing but expensive mini-bar items available. The best part about packing snacks into a bento is that you restrict the amount of you bring (so you don't eat a whole bar of chocolate or pack of biscuits, even if you secretly wanted to).

I made this one for YH before his overseas work trip. He loves snacking, especially when at the computer working, which he'll be doing for the next few nights, so the snacks are to cheer him up a little. 

Contents of this snack bento:
1 small packet DARS chocolate (YH's favourite right now)
3 boxes of organic raisins
4 mini packets of honey roasted almonds
6 individually wrapped almond chocolates
6 individually wrapped dried prunes
assorted individually wrapped rice crackers
7 rice crackers dolls

I was surprised at how much could fit inside the bento box. I used my collapsible box from MUJI, which is great for travel, because after it's empty, it folds into a very flat bit of plastic for the trip back.

Teriyaki Chicken Meatball Bento

teriyaki chicken meatballs bento

Another version of teriyaki chicken - this time, in a meatball. Meatballs are great bento fillers, and are very handy to have as part of your bento freezer stash. Make up a batch to freeze, so you'll always have a little something ready on days you need to make a bento in a hurry.

Also in the bento: potato salad, rainbow sweet n spicy peppers, zucchini fritters, baby corn and cherry tomato flowers.

Continue reading...


Teriyaki Chicken Meatballs
(makes around 11 small meatballs)
150g chicken mince
7 Tbsp breadcrumbs
2 Tbsp teriyaki sauce (pre-bought, or make your own; see below)
1 large egg
light olive oil/cooking oil

extra teriyaki sauce (for glazing)
  1. Mix the chicken mince, breadcrumbs, 2 Tbsp teriyaki sauce and egg together.
  2. Heat up a little olive oil/cooking oil in a small frying pan on medium heat.
  3. Scoop little balls of mince mixture into the frying pan. Fry on both sides until cooked.
  4. Pour a little extra teriyaki sauce in the small frying pan. Turn the heat to medium low. When the sauce bubbles, add the meatballs, and stir to coat them in the teriyaki sauce.
Tips: For a quick and easy way of forming the meatballs, use a small ice-cream scoop.

If you are making the meatballs to freeze, after Step 3, remove the meatballs. Let them cool a little before packing into freezer safe bags. 

When you want to use them, defrost them in the microwave or in a small frying pan (with the lid on) over low heat until warmed through. Then turn the heat up a little, and add some teriyaki sauce to glaze the meatballs as per Step 4. (I got this defrosting tip from Just Bento).

Teriyaki Sauce
4 Tbsp soya sauce
3 Tbsp mirin
3 Tbsp sake
2 Tbsp sugar
Mix the above ingredients together and pour into a small frying pan. Boil until the liquid reduces into a thick sauce.
Back

Wednesday, October 8, 2008

Garlic-Butter Seafood Pasta

marinara pasta
When I was young, my mother used to make a seafood pasta we called spaghetti marinara, but it was a garlic & butter-based seafood pasta. Therefore I grew up thinking marinara sauce contained seafood (with or without tomatoes). It was only later that I realised this is not quite accurate. The word "marinara" is from the Italian marinaro (sailor), therefore many people assume the sauce contains seafood of some type. Actually, the sauce first originated in Naples after they were introduced to the tomato, and it was a meatless sauce made by the sailors. Most marinara sauces contain olive oil, ripe tomatoes, garlic and herbs. 

The butter-based seafood pasta my mother made is still delicious though, whatever you call it...

Continue reading...


Garlic-Butter Seafood Pasta (Mum's "Marinara")
(serves 2)
250g spaghetti (or any long, thin pasta like linguine, or bavette (as in the photo)
1 bulb garlic (if you are not a garlic fan, reduce the amount to half a bulb, or less)
variety of seafood - I used 6 mussels, 6 prawns, 100g scallops and 170g clam meat (this was a little extravagant; you can cut down on these amounts)
10 - 20g butter
light olive oil
sea salt and freshly ground black pepper
chilli oil (optional)
  1. Boil water in a large pot, add some salt and cook the pasta according to the instructions on the packet (less one minute). When the pasta is ready, drain it, and cool it under cold water. Set aside. (Apologies to Italians who may shudder at this, but the cold water stops the pasta from cooking further...)
  2. Chop the garlic.
  3. If you are using mussels and prawns, scrub the mussels to clean the shells and devein the prawns. You can shell the prawns or leave their shells on, whichever you prefer.
  4. Heat up some light olive oil in the large pot (around 1 - 2 Tbsp) and lightly fry the chopped garlic on low heat, until the garlic is soft and fragrant, but not brown or burnt. Add the seafood (except the clam meat) in batches and fry in the garlic oil until cooked. Remove the seafood from the pot. This is to stop the seafood from over-cooking.
  5. Add the butter to the pot. Turn the heat up to medium. Add the clam meat and fry (the clam meat I buy are small bits of clam, therefore I do not cook them in the above step, as they would be too difficult to scoop up). 
  6. Loosen the pasta with a little water if it has stuck together, and pour the pasta into the pot. Mix well to coat the pasta in butter. You can use butter or light olive oil here, or a mixture of both. This is one of the rare times I add butter to pasta dishes as it really improves on the taste.
  7. Gently mix the pasta and seafood. Season with sea salt and freshly ground black pepper. 
Tips: If you like your pasta spicy, add a few drops of chilli oil (optional). This may sound odd, but it is like adding Tabasco sauce to pasta, which I find tangy and strange. Chilli oil, however, is perfect. The chilli oil I use is not the one which contains sediments of chilli inside, it, but a clear oil, like this: 

Hot Smoked Salmon Soba Bento

soba salad
This is a very easy dish to make, and a great way of combining western and Japanese food. Hot smoked salmon is mixed into cooked soba noodles that have been coated with sesame oil and tsuyu (soba dipping sauce). Also mixed in are some stir-fried snow peas and chinese mushrooms.

Continue reading...


Hot Smoked Salmon Soba Salad
(serves 2)
120g cha soba (soba flavoured with green tea) or normal soba
60g snow peas, cut into 2
6-8 chinese or shitake mushrooms, sliced
100g hot smoked salmon
sesame oil
soba dipping sauce (ready-made is fine)
  1. Boil some water in a small saucepan. Cook soba for a few minutes. Once it is just cooked and still a little firm, remove and rinse well under cold running water. Set aside.
  2. Lightly fry snow peas and mushrooms with 1 tsp sesame oil. Set aside to cool.
  3. Flake the hot smoked salmon into chunks.
  4. Return the soba to the pot. Add 1 tsp of sesame oil and 2 - 3 Tbsp soba dipping sauce and stir gently to coat the soba. 
  5. Add the cooled snow peas, mushrooms, and flakes of salmon, and stir lightly to combine. 
Back

Tuesday, October 7, 2008

Grilled Lamb & Speedy "Roast" Potatoes

lamb n potatoes
Sometimes there's nothing more comforting than good ol' meat n potatoes. Best of all, on days you want some comfort, you probably don't want to be stuck in the kitchen for too long. This meal is great because it can be prepared in 25 minutes.

I grilled the lamb fillets using a George Foreman grill, which was recommended to me by a friend, and I absolutely love it. It's quick and easy to use, with brilliant grilling results every time, and, most importantly, it is super easy to clean. I highly recommend it (and no, I'm in no way affiliated to that company)!

The trick to "roasting" potatoes quickly is to microwave them first and then place them under the top griller in the oven to brown. These take around 20 - 25 minutes to cook, and are crispy on the outside and soft and tender inside.

Continue reading...

Speedy "Roast" Potatoes
scrubbed new potatoes
light olive oil
sea salt and freshly ground black pepper
rosemary (fresh is best)
  1. Wash the potatoes and put them in a microwave safe container. Add a little water.
  2. Cover and microwave on HIGH for 10 minutes.
  3. Put the potatoes on an oven-proof dish. Coat with a little olive oil, dash of sea salt and black pepper, and some rosemary leaves.
  4. Grill the potatoes in the oven for 10 - 15 minutes, until browned. 
Tip: If you have a convection oven with a grill combo cooking option, you may wish to grill the potatoes with the microwave setting on low wattage.

Grilled Lamb
lamb fillets
rosemary leaves (fresh is best)
light olive oil
soya sauce
  1. Put the lamb fillets in a plastic bag and pour in a little olive oil and a dash of soya sauce. Add some rosemary leaves.
  2. Mix everything together by massaging the fillets a little in the liquid.
  3. Grill the fillets for 2 -3 minutes, until cooked to your liking.
Serve with potatoes and some heated through frozen peas (or other vegetable).

Tip: If you buy fresh rosemary but have extra leaves, remove the leaves from the stems and freeze the leaves in a small ziplock bag. Remove and use when needed. This is a great way to 'preserve' fresh herbs.

Back

Monday, October 6, 2008

Teriyaki Chicken Bento in 2 styles

Here's an example of how you can use similar ingredients to create two different bento looks - the cute and the more serious...

teriyaki chicken bento1
Firstly, the more serious-looking bento contains teriyaki chicken, zucchini fritters, along with a plain rice onigiri, blanched haricot beans, cherry tomatoes and baby corn. The little sauce container has some tomato sauce for dipping the zucchini fritters.

Now, taking those ingredients (and substituting the haricot beans for some rainbow sweet n spicy peppers, we have the second bento:
teriyaki chicken bento2

The plain rice onigiri has been moulded into a heart, and the fritters have turned into a dog, with the help of a nori (seaweed) face and baby corn ears. (There is a lack of green here, as I ran out of haricot beans, and had to use sweet peppers instead.)

This is another reason why I love to make bentos - there are endless design possibilities :)

Teriyaki Chicken

teriyaki
Teriyaki is a Japanese method of cooking involving food broiled/grilled (yaki) in a sweet soya sauce (tare). In Japan, fish such as salmon, mackerel or cod are often cooked this way. 

Teriyaki chicken is a favourite bento food item. It's saltiness lends itself to being eaten with plain rice, and it tastes great cold, too. One problem I find with preparing food for bento in advance is the re-heating before the bento is packed. The additional heating tends to overcook small bento-sized chicken pieces, especially for breast meat. So with that in mind, I tried to find a way of preparing this dish so the meat stays as juicy as possible, even with the re-heating. 

Continue reading...

Teriyaki Chicken
I use chicken thighs, as breast meat tends to cook too quickly and dry out. Of course you can use breast meat if you like. 
300g boneless chicken thighs (skin on or off)
4 Tbsp soya sauce
3 Tbsp mirin
3 Tbsp sake
2 Tbsp sugar
light olive oil/other cooking oil
If you are eating the teriyaki chicken straight away, or are packing it directly into your bento:

  1. Trim the fat off the chicken thighs and poke holes into the thighs with a fork. This allows the marinade to enter the meat more quickly.
  2. Mix the remaining ingredients together in a bowl, and add the raw chicken thighs. Marinade for a short while (5 mins is fine) as you are getting everything else ready.
  3. Coat the base of a large frying pan with a little oil, and heat the pan on medium heat.
  4. Lift up the chicken pieces and try to drain off as much marinade as you can, before adding the chicken to the hot pan.
  5. Fry the chicken on both sides until just cooked (around 2 - 3 minutes).
  6. Remove the chicken and set it aside.
  7. Turn up the heat to medium high, and pour the marinade into the pan. Boil until the marinade bubbles and thickens.
  8. Slice the chicken into smaller pieces, add back into the marinade and mix to glaze and coat the chicken (on low heat).
  9. Serve immediately, or cool down and pack into your bento.
If you wish to prepare this dish ahead and keep it in the fridge for your bento the next day:

Version 1 (This takes slightly less time, but the chicken may be a little more cooked)
  • Follow steps 1 to 7 (above).
  • Then pour the marinade into a small bowl. Cover the marinade and plate of chicken (uncut) with plastic wrap and keep it in the fridge.
  • The next morning, heat up the piece of chicken in a small frying pan. Remove and cut into smaller pieces. Heat up the marinade in the pan, turn the heat off, and stir in the chicken pieces. Cool a little, then pack into your bento. 
Version 2 (Takes a little longer, but is the best way to keep the chicken juicy)
  • The night before, prepare the teriyaki sauce by mixing the soya sauce, mirin, sake and sugar together. Heat up a frying pan and boil the sauce until it thickens. 
  • Pour into a small bowl, cover and refrigerate.
  • The next morning, poke holes into the raw chicken with a fork, then cut up the raw chicken meat into smaller pieces. 
  • Add a little of the marinade into the frying pan, and fry the chicken until cooked. Set aside.
  • Heat up the remaining marinade in the pan until bubbling, add the chicken pieces and mix.
  • Cool a little before packing into your bento.

Tip: You can also use the teriyaki sauce to coat meatballs and grill/panfry cod or salmon fillets.


Back

Zucchini Fritters

zucchini fritters
This is a great recipe for a bento filler or even a light brunch. If you are using it in a bento, accompany it with more salty foods such as teriyaki chicken or other meats, as it has quite a delicate taste.

Continue reading...


Zucchini fritters
(makes around 12 small fritters)
1 large green zucchini, shredded (fills around 2 cups when shredded, before being squeezed)
1 large egg
1/2 - 2/3 cup breadcrumbs
salt and pepper
light olive oil/other cooking oil
  1. Shred the zucchini and squeeze it to remove excess moisture.
  2. Add the egg and breadcrumbs. Season with salt and pepper and mix well to combine.
  3. Lightly coat a small frying pan with oil. On medium heat, drop tablesppons of zucchini mixture into the pan. 
  4. Cook for about a minute, then flip over and cook the other side until lightly browned on both sides.
Tips:
For added flavour, add some shredded cheese to the mixture before frying the fritters.

If you plan on eating the fritters on their own, or without a more salty side dish, season with a little more salt.

Back

Danish Hotdog Bento

hotdog bento
I had one of my Danish hotdog and remoulade cravings, so I made up a batch of remoulade late Friday night, and by Sunday morning is was ready to eat. It may sound mad to prepare a bento when you stay at home to eat it, but really, it isn't! Bentos are a great way of portion control and ensuring your meal is balanced. This is important for me, as I tend to get lazy and greedy when cooking. I'll prepare too much food (greed + fear there's not enough food) and tend to overlook the fruit and vegetable component of a meal. However, with a bento, it is painfully obvious if the whole box contains your main meal and no vegetables. Also if you use a small, cute box, and spend a little time on decoration and presentation you can cut down on portions whilst still enjoying your meal.

This bento is rather small, so we do have another hot dog half each on a side plate (not pictured). To accompany the Danish hotdogs, there are carrot sticks and a rather disgruntled hummus rabbit. Dessert was some chopped kiwi fruit. The little container had deep fried shallots inside, to sprinkle on top of the hotdogs. The portion looks small, but to my surprise (and happiness) I was actually full after eating it.

Continue reading...

Danish Hot Dogs
hot dog buns
red hotdog frankfurters, or other good quality frankfurters (one per hot dog bun)
remoulade
deep fried shallots (You can find these ready-made at Asian grocery stores)

Optional: other hotdog condiments (tomato sauce, pickles, etc.)
  1. Boil or heat the frankfurters according to the packet instructions.
  2. Warm up the hot dog buns (in the microwave/toaster oven).
  3. Make up the hotdogs by placing one frankfurter into each hotdog bun. Top with remoulade, deep fried shallots, and other condiments (optional).
Tip: You can prepare your own shallot topping by cutting them up into little bits and deep-frying them until crispy, but a simpler way is to buy them ready-made. Try to find them in your local Asian grocery store - they are commonly used sprinkled over Chinese noodle dishes.

See related: Simple remoulade recipe

hotdog bento2


Back

Remoulade & Danish Hotdogs

remoulade
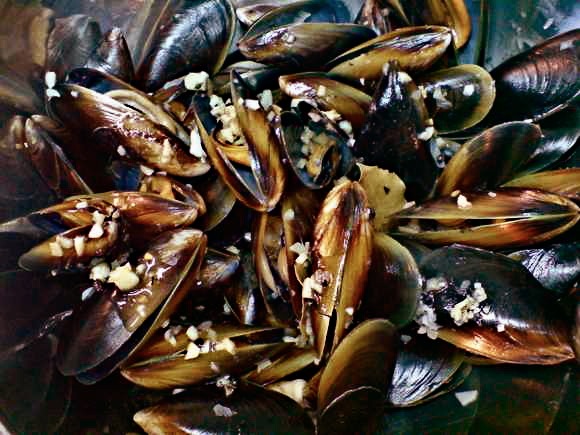
My mother used to constantly rave about the hotdogs in Denmark, so the first thing we did when we visited Copenhagen (after walking past the Little Mermaid, who was very little indeed) was to track down a hotdog street vendor and eat a Danish hotdog. They were every bit as good as my mother had promised. The hotdog sausage and bun were normal enough (although still delicious) but the crispy fried onions and lashings of remoulade on top were heavenly. (There were additional toppings available such as mustard, tomato sauce, raw onions, pickled cucumbers, etc. but I kept my one very simple.)

Remoulade is a sauce that was invented in France, and is similar to tartar sauce. It is usually mayonnaise-based, and there are many variations that include chopped pickles, horseradish, anchovies, capers, paprika, and even curry flavouring. Danish remoulade is medium yellow in colour, has a slight sweet-sour-tangy taste, and often includes capers, chopped cabbage, picked cucumber, sugar, mustard and cayenne.

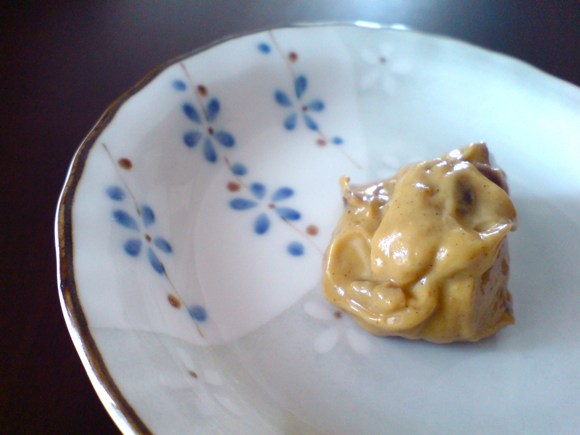
Every now and again I will crave for remoulade and a Danish hotdog. As I cannot find remoulade in the supermarkets, I decided to make my own. However, when I read up on what it contained, I wasn't sure why I liked it so much, because capers, horseradish and anchovies are not on my list of favourite foods. 

I ended up adapting a recipe by excluding the capers and anchovies, etc. which resulted in a remoulade-y style sauce which I think is still great. Not authentic by any means, but it is simple to make and a great hotdog topping. It can also be used to accompany battered fried fish, fish fingers, roast beef, etc.

Simple Remoulade Recipe...
Danish Hot Dog recipe


Simple Remoulade
6 Tbsp mayonnaise (light mayonnaise works as well)
2 Tbsp sweet pickle relish
2 tsp mustard (Dijon or yellow mustard)

Mix all the ingredients together in a small bowl. Cover and refrigerate at least 2 hours, but preferably overnight. This allows time for the flavours to blend together, which is necessary for a better tasting sauce.
Use as a hotdog topping, or serve with battered fish, fish fingers, roast beef. It keeps in the fridge for up to a week.


See related: Danish Hot Dog recipe

Back

Sunday, October 5, 2008

Grilled Cajun Chicken Pita Bento

pita bento
On the weekend we headed out to eat a bento lunch in the park, and I got the chance to use my collapsible bento boxes from Muji, which I bought thinking they would be useful for hiking or travel. We've neither hiked nor travelled since their purchase, but they were equally useful for our impromptu picnic.

Collapsible bentos are great because the boxes are (usually!) light and compact when folded, so you can carry them around (or complete your hike) with ease after you've eaten. Since they tend to have holes in them, they lend well to sandwiches, which are dry. I prefer to line the base and sides with foil, so the food won't leak and dirt won't get in. You can also use baking paper or a piece of paper towel as a disposable lining.

This bento contains grilled cajun chicken mini whole wheat pita sandwiches, with carrot sticks and hummus in a little sauce container for dipping. I was a little pressed for time, so for fruit/dessert we had an apple (uncut - saves carrying around another container!)

closed boxes

Continue reading...

Grilled Cajun Chicken Mini Pita Sandwiches
(makes 6-8 mini pita sandwiches)
200g chicken fillets
Cajun spice mix (Pre-bought or make your own by mixing together paprika, cayenne pepper, pepper, and salt)
6 - 8 pieces of mini pita bread (whole wheat or white)
butter lettuce, washed
tomatoes, sliced
hummus
  1. Liberally coat the chicken fillets with the Cajun spice mix. 
  2. Grill or pan-fry the chicken until cooked (around 3 minutes). The juices should run clear when they are done.
  3. Set aside to cool a little, then cut the fillets diagonally into 1cm slices. (Cut them diagonally across the grain of the meat, so that it is easier to eat)
  4. Set aside to cool.

    grilled chicken

  5. Lightly toast or microwave the pita bread. Split them 3/4 way open. 
  6. Spread one side with hummus.
  7. Fill pita with chicken, lettuce and tomatoes. Add some freshly ground pepper to taste.
Back

(Light) Scrambled Eggs

eggs on toast

The traditional method of scrambling eggs involves adding milk or cream to the eggs. However, my mother always used to make scrambled eggs without milk or cream. To me, it tastes better this way, and it is a lot more healthy than the cream version. Naturally, the freshness of the eggs you use is important here.

Continue reading...


(Light) Scrambled Eggs

1 or more eggs (the freshest you can find. Organic is good)
dash sea salt
freshly ground black pepper
light olive oil (or butter, if you want)
  1. Crack the eggs into a small bowl. 
  2. Add 1/2 tsp of water per egg used. This prevents your egg mixture from becoming too thick, and also stops the eggs from weeping moisture as it cooks.
  3. Add a dash of sea salt and black pepper. 
  4. Beat eggs lightly with a fork or small whisk until yolks and whites are combined.
  5. In a small frying pan or small saucepan, heat up a small amount of olive oil on medium-low heat. If you want to give yourself a bit of a treat, use some butter instead.
  6. Add the beaten egg.
  7. Allow the bottom to cook slightly, then gently lift and fold the egg mixture with a spatula until the eggs are cooked. 
  8. Serve on toast, on their own, or with sausages, bacon, etc.
Tips:
Give the scrambled eggs a boost of flavour (and a more gooey texture) by adding 1Tbsp of (lowfat) shredded cheddar cheese per egg. Mix the cheese into the beaten egg before cooking.

Use a small frying pan or even saucepan. If you cook one scrambled egg in a large frying pan, the egg mixture will spread out and cook too quickly, causing your scrambled egg to become dry.

Back

Friday, October 3, 2008

Teriyaki Cod Bento

cod bento
I love grilled teriyaki cod (gindara) and will often order it in Japanese restaurants. So it was only a matter of time before it found its way into a bento...

Bento contents: rice with furikake, tamagoyaki, rainbow sweet n spicy peppers, grilled teriyaki cod, and a kiwi fruit.

After using my black bento box quite often, I found myself thinking this blue box (my old favourite) is now looking a bit too garish. Maybe it is because the food in this bento is already quite colourful...hmm... and I realised that the little fish food pick looks like the ghost of the cod fish shouting "Don't eat me!". It was not intentional, really...

fish pick
Continue reading...

Rainbow Sweet n Spicy Peppers
Despite the name, this dish is not spicy. I used green Japanese shishito peppers, which are 3 inch long, sweet-hot peppers. They are only slightly hotter than sweet peppers (capsicum), and not as spicy as chilli peppers. 
1 small red onion
1 clove garlic
1 yellow sweet pepper (capsicum)
1 red sweet pepper (capsicum)
8 - 10 shishito peppers, deseeded
1 tsp light olive oil
1 tsp sesame oil
sea salt
  1. Slice up the onion, sweet peppers (capsicum) and shishito peppers.
  2. Finely chop the garlic.
  3. Add the oils in a pot, and fry the onion and garlic for a few minutes.
  4. Add the rest of the peppers and fry until soft.
  5. Sprinkle a little sea salt over the peppers for added flavour.
Tip: The colours in this dish look amazing right after they are just fried. However, after a day in the fridge, the colours fade (especially the green of the shishito peppers). For best colour effect, fry and pack directly in your bento.


Teriyaki Cod
Grilling or pan-frying fish is really very easy. The most important part is not to overcook the fish.
2 small cod fillets
teriyaki sauce (pre-bought, or make your own by mixing 2 Tbsp soya sauce, 1.5 Tbsp mirin, 1.5 Tbsp sake and 1 Tbsp sugar together)
  1. Marinade the cod fillets in teriyaki sauce for 10 - 15 minutes.
  2. Grill the cod for 1 - 2 minutes, or pan-fry the cod until just cooked. (The fish will continue to cook a little) 

Tips: Some ways to check if fish is cooked - press the fish down lightly (the flesh should feel firmer when cooked); insert a fork into the fish to see if the fish meat "flakes"; note the change of colour in the cross-section of the fish as you cook it. The colour of the fish will change from a translucent jelly colour to a matte colour (this method works well with salmon fillets). 

It is fine (and more tasty) to leave salmon fillets slightly raw in the middle, but please ensure your salmon is from a good quality source if you plan on doing this.

Back

Thursday, October 2, 2008

Spaghetti Bolognaise Bento


Traditional Bolognese sauce originated from Bologna, Italy, and is a thick meat based sauce/ragu with very little tomato in it. However the version I make is the non-traditional form that has become very popular outside of Italy.

Spaghetti Bolognaise (or Spaghetti Bolognese) is one of my favourite comfort foods as it reminds me of my childhood. My mother used to make this dish with a lot of gravy and I'd always wished I had second helpings. (Now I can, but I usually regret it after!) When I have time, I will make the sauce from scratch (with carrots, celery, tomatoes, etc.) but I've become more lazy and am more into fast, easy cooking, so I now often buy a pre-made tomato pasta sauce. 

The spaghetti I used for today's bento is not only from purchased pasta sauce, it is also leftover from last night's dinner. A wonderful part of bento is the ability to use and dress up leftover food in an attractive way. However I refuse to eat this dish cold, so I packed it into a microwavable Lock n Lock container. The side dishes (peas, raspberries and smiley cheese cubes) and grass food separators were removed before microwaving the pasta.

spaghetti bolog bento

Wednesday, October 1, 2008

Bamboo Bento

bamboo bento
Today is 1st October, China's National Day. It is a public holiday here in Hong Kong, so I thought I would mark the day with a themed bento. After wild thoughts of re-creating the Great Wall out of cubes of egg, I settled for a more simple bamboo design.

The "bamboo" is made out of cut pieces of blanched haricot beans, and snow peas cut in the shape of leaves. Instead of rice, I decided to give the bento a slight Shanghainese twist, with dumplings and la mian noodles. The dumplings are just frozen ones (meat and vegetable wonton and shrimp dumplings) and the la mian is a cold noodle concoction I made up. 

La mian (拉麵) noodles are made from wheat flour. The best kind are the ones that are freshly made (pulled) and then served in soup with toppings such as pork and preserved vegetables. I used a packet of dried la mian, which is the only type I can easily buy. It's of course not as good as fresh la mian, but it's pretty decent, too.

Accompanying the lunch is rather Japanese dessert of konnyaku jelly and slices of Japanese Hosui pear (no political reference intended, really).

Since it's China's National Day, it was fitting for the panda picks and sauce bottles to make an appearance - the bottle contains some soya sauce to loosen the noodles a little, although the garlic oil coating the noodles did stop most of the clumping.

Continue reading...

Cold La Mian Noodles
(2 fairly large portions)

200g dried la mian noodles
4 - 5 chinese mushrooms/shitake mushrooms
half a bulb of garlic (if you are not a garlic fan, reduce this down to 3-4 cloves)
light olive oil
soya sauce
oyster sauce
xo sauce (optional, if not available)
chilli oil (optional)
thinly sliced straws of fresh ginger (optional)

frozen dumplings (optional)

If you are using frozen dumplings, boil them in water (for timing, follow the packet instructions) and set them aside whilst you make the noodles.
  1. Bring a pot of water to the boil and add the la mian noodles. Stir them around until cooked (should only take 1.5 - 2 minutes). Be careful not to overcook them. Drain them in a colander and rinse them well under running cold water. Set aside.
  2. Peel and chop the garlic finely, and slice the mushrooms.
  3. Heat up a pot with some olive oil (approx 3 Tbsp) and fry the garlic on low heat until fragrant (not brown). If you have some xo sauce, add 1/2 tsp.
  4. Add the mushrooms and fry them. (If using dumplings, add the pre-cooked dumplings here and fry lightly, then remove them from the pot - this stops them breaking up when you stir the noodles about)
  5. If the noodles have clumped together, separate them under cold water, drain, then pour them into the pot.
  6. Mix the garlic oil and the noodles together on low heat.
  7. Add a dash of soya sauce and oyster sauce. Mix into the noodles. Taste test and add a little more if necessary.
  8. If you like your noodles spicy, mix in a few drops of chilli oil. Serve topped with a few thin slices of ginger and dumplings (optional).
Tip:
If you do not have dumplings, you can also add some mince meat (beef/pork/chicken). Just fry the meat in the garlic oil before you add the mushrooms (there is no need to remove the meat before adding the noodles in this case).

Back

Hosui Pears

sliced hosui pears
Ever see the really expensive fruit from Japan that look so round and perfect, like they were cloned? Well, I am always eyeing them in amazement - both the fruit and the price tag! City Super supermarket recently featured Japanese pears, and I decided to buy some to try. Two Hosui pears set me back HKD44.00 (USD5.66). 

Hosui pears are a type of Japanese pear that are round, with a slightly rough light brown skin that ripens in August. I left the skin on and it was a nice contrast to the crunchy sweet pear inside. I don't often describe fruit as fragrant, but this pear definitely was. Other Asian pears I buy are a little tart inside, especially nearer the core, but the Hosui pear was just sweet and very juicy. Overall, it was good, and YH liked it a lot. To be honest, it was a little too sweet for my liking. But then I'm odd and dislike sweet fruit and like sour fruit! So I think that almost everyone else would like it...

hosui pears
A Hosui pear and its cloned brother...

Mussels - Moules Marinières

mussels
I've been wanting to cook mussels for some time, and I finally got around to it last night. City Super sometimes has 1kg packs of live Australian mussels which are pre-scrubbed (fabulous), so it was really very simple to make. 

I decided to make the classic French Moules Marinières. It turned out well - the mussels were juicy and very fresh. We soaked up the gravy (which was a tad salty, but still delicious) with a small loaf of hearth bread that was baked with bits of camembert cheese inside (a wonderful crusty savoury loaf, not the horrible sweet bread you find all over Asia).

Continue reading...


Moules Marinières
(for a 1kg pot of mussels)

1 kg live mussels
2 shallots
6 cloves garlic
200ml white wine
40g butter
2 Tbsp light olive oil
freshly ground black pepper
2 bay leaves
fresh parsley (I left this out as I didn't have any on hand)

  1. Finely chop the garlic and shallots.
  2. Wash and scrub the mussels under cold running tap water. I found it handy to use a pair of scissors to cut away any byssal threads (mussel beards) that hang out of the mussel.
  3. In a deep, heavy based pot, add the olive oil and half of the butter. Cook the garlic and shallots on low heat until they are soft and fragrant. Make sure the garlic does not burn.
  4. Add the white wine, bay leaves and freshly ground black pepper. 
  5. When the liquid comes to a boil, pour in the mussels and put the lid on the pot. Shake the pot gently to distribute the mussels.
  6. After a minute and a half, open the lid and start scooping out the mussels that have opened up into a serving bowl. This may sound tedious, but you really don't want them to overcook.
  7. Continue scooping out the opened mussels and gently stir the remaining mussels in the hot liquid until they open. Turn the heat down to medium if it is taking you a long time to scoop.
  8. After all the mussels have been removed from the pot, turn up the heat to high and add the remaining butter and parsley (optional). When the liquid is bubbling, pour it over the mussels and serve with hot, crusty bread.
Tips:
Use a large slotted cooking spoon to scoop the mussels out quickly.
Add a sprinkle of chilli flakes to make the liquid a little spicy.


Back