Tuesday, December 30, 2008

Sticky Date Maple Cupcakes

date cupcakes
Tomorrow, New Years Eve, we are off on a short cruise with my parents and sister's family to celebrate my dad's birthday, and the New Year. (Look out for my next post from the cruise ship which will document our first meal on board!) 

I wanted to prepare a little something for my dad, so in the spirit of bento (as in packing food in a box) I decided to make a little birthday cupcake bento to bring along with us. This is obviously technically not a bento lunch, it's just cake packed into one of my bento boxes! But it is another versatile way of using your bento accessories. 

My dad is not very keen on cakes, but he does love sticky date puddings. So I decided to make a sticky date maple syrup cupcake which is very moist and pudding-like, rather than the normal buttercake recipe that many cupcakes are based on... This recipe is really simple and pretty fail-proof - you simply stick everything in a blender/food processer and zap it. Happy New Year!
Continue reading for the recipe...

Sticky Date Maple Cupcakes
(makes approx 12 cupcakes)
200g dried and pitted dates
310ml (1 1/4 cup) boiling water
1 tsp bicarbonate of soda
50g butter
100g brown sugar
2 Tbsp pure maple syrup (try and use pure maple syrup, not the maple-flavoured syrup)
2 eggs
150g plain flour
2 tsp baking powder
Pre-heat the oven to 175 degrees C.

1. Put the dates in a blender/food processor. Mix the bicarbonate of soda with the boiling water, and add it to the dates. Soak for 5 minutes.

2. Blend/Process the date mixture a little. Add the butter and sugar, and blend.

3. Add the maple syrup, lightly beaten eggs, flour and baking powder. Blend until all the ingredients are combined. You should have quite a liquid batter.

4. Line a muffin pan with cupcake liners, or lightly oil the muffin pan (if you are using the pan directly). Alternatively, you can use silicon moulds. Fill whichever container you use 3/4 full of batter. Bake for 15 - 20 minutes until browned. Poke the middle of the cupcake with a metal skewer/cake tester (or raw piece of spaghetti) to test if the centre is cooked. The skewer should come out clean.


Tip: If you are making mini cupcakes, lessen the cooking time accordingly.

Back

Saturday, December 27, 2008

(Turkey) Pasta Salad


Christmas for me usually includes roasting a turkey, and it's around this time that I'm faced with a fridge full of leftover turkey meat. This is not a burden, mind you - I absolutely love having leftover turkey, and I suspect if a day comes when the turkey is completely eaten on Christmas itself, I would be very depressed. 

This year, I didn't roast a turkey, but went over to a friend's place for dinner instead. She'd ordered a giant 6kg turkey(!), and as she was busy the next few days and not particularly keen on leftovers, I (the Leftovers Queen) had the happy honour of taking most of the meat and bones back. The turkey carcass, in large ziplock bags, went straight into the freezer and the packets of turkey meat (also in ziplock bags) were stored in the fridge. Over the next few days, I've been making turkey and avocado sandwiches, turkey pasta salad and tomato turkey pasta. I'm not sick of turkey, yet...!

Here's the recipe for a simple (Christmas-coloured) turkey pasta salad. This pasta salad (without the turkey) is a great side dish to accompany meat (roasts, sausages, etc.), and works well at picnics and BBQs. Continue reading...

(Turkey) Pasta Salad
375g spiral pasta (use tri-colour spiral pasta for added colour)
1 whole bulb garlic
1 red capsicum
1 green capsicum
light olive oil
sea salt
freshly ground black pepper
chicken stock (optional)
red pepper flakes (optional)

leftover roast turkey meat (omit for a plain pasta salad)

1. Cook the spiral pasta in a large pot of boiling, salted water according to the timing on the pasta packet (less 1 minute). Drain, rinse with cold water and set aside.

2. Peel and chop the garlic.

3. Chop the capsicum finely into small pieces.

4. On low heat, pour some light olive oil in a pot and add the garlic. Fry until the garlic is fragrant, but not brown/burnt.

5. Turn up the heat to medium, add the capsicum and turkey meat and fry for a short while. Add the cooked pasta. Mix well. If the pasta looks a little dry, add some more olive oil.

6. Season with sea salt and freshly ground black pepper. For added taste and some spice, sprinkle a little chicken stock (optional) and red pepper flakes (optional).


Tip: Substitute the turkey meat for chicken meat, slices of ham, bacon bits, etc.

Back

Caviar Canapes


I like to make this dish on special occasions such as Christmas or New Years Eve, although it would work well for any party, any time of the year. I was first introduced to caviar at a friend's party many years ago, and I've never looked back. The blobs of black may not seem particularly appealing, but if you enjoy eating fish roe in Japanese cuisine, such as tobiko (flying fish roe), ikura (salmon roe) and tarako (salted pollock roe), chances are you will most likely also enjoy caviar. 

Good quality black caviar from sturgeon fish can be ridiculously expensive, so I generally use lumpfish roe, which is the cheaper alternative, although you could of course use either one for this recipe. 

Continue reading...


Caviar Canapes
(makes a decent sized bowl)
1 bottle 100g black caviar (or black lumpfish caviar)
4 large eggs (normal chicken eggs)
1/4 red onion
juice of half a lemon
1. Hard boil the eggs. Place the eggs, in a small saucepan. Cover the eggs with cold water (the water level should be just above the eggs). Put a lid on the saucepan and heat over medium high heat until the water is boiling. Turn the heat down a little and simmer rapidly for 4 minutes. Turn the heat off and leave the saucepan as is while you prepare the onions and lemon juice. (You want the egg yolks to be hard and cooked through.)

2. Chop 1/4 red onion as finely as possible and place in a medium-sized bowl. (If you are not a raw onion fan, make sure you chop the onion into really, really small bits). Squeeze the lemon.

3. When the eggs are ready, peel them, and pat them dry. Separate the egg yolks from the egg white by slicing into each egg carefully to remove the yolk.

4. Finely chop the egg whites. In a separate small bowl, mash the egg yolks with a fork until powdery.

5. Add the egg white, egg yolk, caviar and lemon juice to the onion, and gently toss together with a fork until well combined. Taste and season with more lemon juice if necessary.

6. Serve the caviar on top of something hard and crunchy, such as a crispy vol-au-vent, or the more traditional melba toast. I feel obliged to add that due to the amount of eggs in this dish (caviar plus chicken eggs), it probably isn't good to eat a lot of it if you are watching your cholesterol.

Back

Thursday, December 25, 2008


I'm back-dating this post and it's off-topic, but here's wishing everyone a Very Blessed Christmas! Happy Feasting!

Tuesday, December 23, 2008

Rudolph Bento

rudolph bento
The Christmas season crept up on me this year and took me completely by surprise. (Yes, decorations have been displayed everywhere for ages, but as they've been up since November, I really lost track.) It finally dawned upon me that if I didn't get my act together it would be next year... so I dug through my bento stash and leftover rice to make this simple Christmas-themed bento.

It's Rudolph the red-nosed reindeer, who, by the way, I feel very sorry for. I also object to the song about him - he was laughed at because he looked different, and then he became popular just because he was useful?? Anyway(!), Rudolph's head and legs are made out of mushroom and soya sauce fried rice, and his antlers and body are made out of teriyaki chicken meatballs. He has a cherry tomato nose, and surrounding (and underneath) him is a simple display of grapes and cherries, and some sugarsnap peas. 
Continue reading for a Step-by-step guide on how to make this Rudolph Reindeer Bento...

Step-by-Step Guide: How To Make a Rudolph Reindeer Bento

Ingredients:
  • 5 heaped Tbsp cold, cooked rice
  • 1 clove garlic, chopped
  • sesame oil
  • soya sauce (light and thick, dark soya sauce)
  • 2 shitake mushrooms, chopped
  • 3 teriyaki chicken meatballs (made fresh, or from your freezer stash)
  • 1 cherry tomato
  • 2 black peppercorns
  • small squeeze of mayonnaise
For the rest of the bento (if you wish to follow the bento pictured) or feel free to substitute with other vegetables, fruit, etc.
  • handful sugarsnap peas (boiled)
  • small bunch seedless green grapes
  • 5 - 7 cherries
Equipment:
  • Small paring knife
  • Small non-stick frying pan (to fry the rice) and small saucepan (to boil the sugarsnap peas)
  • 1 bento box (I used a single tier, 630ml capacity container).

Step 1 - Make the Fried Rice

In a small frying pan, add a few drops of sesame oil, and fry the chopped garlic until fragrant. Add the mushrooms, rice, a splash of light soya sauce, and some thick, dark soya sauce. Stir and fry together until the rice grains are well coated with the soya sauce. Set aside to cool.

Step 2 - Make Rudolph's Head
rudolph1
Place a square sheet of strong plastic wrap on your open palm, and scoop 3 Tbsp of warm fried rice onto the plastic.

rudolph2
Close your fingers around the rice, which will enclose the rice in the plastic. Twist the plastic at the top and compress the rice ball. Shape one end of the ball so it is slightly pointed in shape. Unwrap the rice and place it in the bento box.

Step 3 - Make Rudolph's Legs
rudolph3
For each leg: Repeat Steps 2 and 3 using 1 Tbsp of rice and squeeze the rice ball to form a long sausage shape. Unwrap and place into the bento box.

Step 4 - Make Rudolph's Antlers
rudolph4rudolph5
Take 2 meatballs, and cut a small semi-circle from the bottom of each one with a small paring knife. Set aside the semi-circles.

rudolph6
Cut out two small triangles from each of the remaining meatballs (as pictured) to form the antlers.

rudolph7
Place some sugarsnap peas into the bento box around Rudolph's head, and then place the antler meatballs above the head. Shift the legs down.

Step 5 - Rudolph's Body
rudolph8
Cut a small semi-circle out of the 3rd meatball, and place it in-between the head and the legs to form Rudolph's body.

Step 6 - Rudolph's Face & Hooves
rudolph9
Slice a cherry tomato into two, and place the bottom part on his face to form the nose.

Squeeze a small amount of mayonnaise onto a dish, and use a chopstick/skewer to dab two small circles of mayonnaise above the nose to form eyes. Stick the black peppercorns onto the mayonnaise eyes to form pupils.

Slice bits of the remaining meatballs into small squares and place them on Rudolph's legs to form hooves.

Step 7 - Filling up the rest of the bento box
Finish off the bento by placing cherries, grapes and some extra sugarsnap peas around Rudolph. I chose these for their red and green Christmas colours, but substitute with other fruits/vegetables if you wish.
rudolph bento

Back

Friday, December 19, 2008

Bacon & Asparagus Roll Bento

rolls bento
Today's bento contains my favourite Bacon & Asparagus Rolls, hard-boiled eggs, cherry tomatoes, stir-fried mushrooms, rice and some pickled cabbage in the little heart container.

Bacon & Asparagus Rolls

rolls4
In addition to Ham n Egg Rolls, another roll that's easy to make and great as a bento filler is a Bacon & Asparagus Roll. You can adapt this dish and use the bacon to wrap many other things like vegetables, sausages, etc, but my favourite is asparagus. 

Continue reading...


Bacon & Asparagus Rolls
  • Asparagus (you really need fresh asparagus here, not the canned variety)
  • Streaky Bacon Rashers (streaky bacon works best as it is more malleable than back bacon, although the fat in the bacon means this isn't the healthiest of recipes)
(With 4 thick stalks of asparagus and 4 long rashers of streaky bacon, I could make 16 mini rolls, but this will depend on your asparagus, width and length of bacon rashers)

Teriyaki Glaze
equal parts of:
  • Soya Sauce
  • Sake
  • Mirin
  • Sugar
1. Wash and trim around 1cm (1/2 inch) off the base of the asparagus stalks.

2. Boil some water in a saucepan and when the water is boiling, add the asparagus. Turn down the heat and simmer for around 4 minutes, or until just cooked through. Drain and set aside.

3. Cut the asparagus into shorter lengths. I cut mine to around 5cm (2 inches) long, but go along with the original length of your asparagus as well (eg. cut it into thirds or quarters if more convenient).

4. Cut the bacon into shorter lengths. A good gauge is to make the lengths of bacon around twice the length of your asparagus stalks. Slice the bacon to adjust the width if necessary as well. (You may want to cut one slice first to test if the width and length are correct.)

5. Roll a strip of bacon around the asparagus. If you are using thick stalks, you can wrap the bacon around each stalk. If your asparagus stalks are thinner, wrap the bacon around 3 - 4 stalks. Put the rolls tightly next to each other in a small bowl (to help prevent them from unrolling). If the bacon unrolls too easily, the lengths of bacon are too short.
rolls 1

6. Make the teriyaki glaze by mixing equal amounts of soya sauce, sugar, sake and mirin. For a small batch of bacon & asparagus rolls, 1 Tbsp of each seasoning is sufficient. Pour the glaze over the rolls.

7. Heat up a little oil in a non-stick frying pan and fry the bacon and asparagus rolls on both sides until the bacon is cooked and lightly browned. Baste the rolls with the extra glaze in the bowl as you are frying them. You can also cook the rolls on a bbq/cast iron grill/George Foreman grill.
rolls 3 rolls4
Back

Tuesday, December 16, 2008

Ham n Egg Rolls

ham n egg rolls
Eggs are extremely versatile, and the same holds true for using eggs in bento. Along with the popular tamagoyaki, another great way of using egg is making a thin omelette (usuyaki tamago). These thin sheets of egg are great for cutting out into little shapes, rolling up, as a wrap or nori (seaweed) substitute, or shredded as a topping for noodles. Recently, I used these thin omelettes to make some ham and egg rolls. Continue reading...

A traditional usuyaki tamago is usually made with a little dashi stock and sugar, as well as cornstarch or potato starch (to strengthen the egg mixture).

However, if you plan on using the omelette to cut out shapes, as I often do, I don't bother to add cornstarch. I'm also not very keen on sweet egg, so I usually just make a savoury, thin omelette - with egg, a splash of water and a dash of salt. I use a small non-stick square pan which is great for making tamagoyaki and square thin omelettes, but a small (round) frying pan works just as well. If you make tamagoyaki often enough, it may be worthwhile to invest in a small square tamagoyaki pan. My one was cheap, and very small (for 1 - 2 eggs). I find the small ones more handy, as you need many eggs to cover the larger tamagoyaki pans.

Ham n Egg Rolls
1 large egg
dash salt
1 tsp water
1 slice of ham per thin omelette (I get 4 thin omelettes out of 1 large egg, but this differs according to the size of your pan)
light olive oil (or other oil for cooking)
1. Beat the egg well with the salt and water. Heat up a well oiled small frying pan on low heat.
(Edit: You can strain the egg through a strainer for finer results, but I usually don't bother, as you can see from the bits of egg white showing in the picture...)


2. Add a small amount of egg mixture and tilt the pan so the egg coats the base.


3. When the egg mixture hardens slightly, use a spatula or pair of chopsticks to loosen the sides of the egg. Carefully flip the egg over.


4. Cook for a further 10 seconds. The egg is so thin that it cooks very quickly.


5. Remove, re-oil the base of the frying pan, and repeat until all the egg mixture has been used up.

ham n egg rolls
6. Add a slice of ham on top of each egg omelette, and roll it up together. You can roll it with the egg or the ham on the outside, or a combination of both. Slice into pieces to fit the height of your bento box.


You can also use the thin omelette to decorate your bento by using cookie cutters to cut out shapes from the omelette. 
eg. flower shapes to decorate onigiri.

Back

Sunday, December 14, 2008

Monokuro Boo Bento

monokuro boo bento
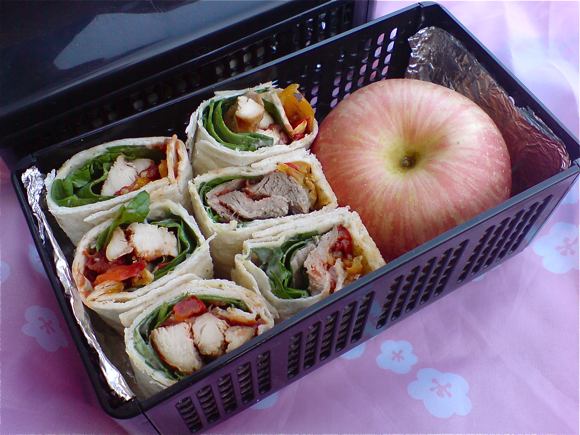
I have taken a short break from kyaraben (character bento) recently as they do take some time to make, and I have not been feeling too inspired. However, when I read that the topic for this week's bento challenge over at the 
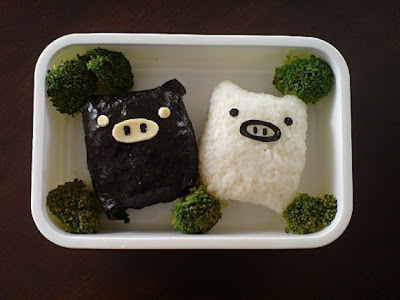
Live Journal Bento Challenge community was "twins", I suddenly wanted to make a Monokuro Boo Bento. I love these monochrome square-shaped pigs by San-X, and to fit the Bento Challenge theme, I have decided the pigs are fraternal twins...

My Monokuro Boo pigs are rice onigiri filled with salmon flakes. One is wrapped, and the other isn't (to form one black and one white pig). They are sitting in a colourful garden of carrot, cheese and egg flowers, edamame, broccoli and cherry tomatoes, and some ham and egg rolls.

Monokuro Boo is quite easy to make, as it is basically a square-shaped onigiri. The hardest part is to cut out the little eye and nose details. It helps if you have cutters, but if not, you can make do with a small, sharp pair of scissors and a little patience. Here's a step-by-step guide on how to make this bento.  Step-by-Step Pictorial Guide: How To Make A Monokuro Boo Bento...


Step-by-Step Guide: How To Make a Monokuro Boo Bento

Ingredients:
(For 2 Monokuro Boo Pigs)
  • 6 heaped Tbsp cooked short-grain rice
  • Filling for the onigiri (I used salmon flakes, but you can use whatever filling you wish)
  • 1 triangular sheet of nori seaweed
  • + extra piece nori
  • 1 slice processed cheese
For the rest of the bento (if you wish to follow the bento pictured) or feel free to substitute with other vegetables, meat, etc.
  • 1/4 carrot
  • 1 large egg
  • 2 slices ham
  • edamame
  • broccoli
  • 2 cherry tomatoes
Equipment:
  • Small paring knife
  • Scissors (preferably small ones)
  • Small circle cutter or a straw
  • Flower-shaped cutter (ordinary cookie cutters are fine), or any shaped-cutter you prefer eg. stars, hearts, etc.
  • Small frying pan (to fry the egg) and small saucepan (to cook the broccoli)
  • 1 bento box (I used a single tier, 630ml capacity container, but you can use other sizes - the amount of food you fit around the pigs will just increase/decrease according to what size box you use.)

Step 1 - Making the Onigiri (Rice Balls)
MB Step 1
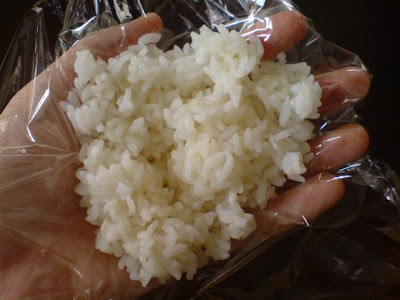
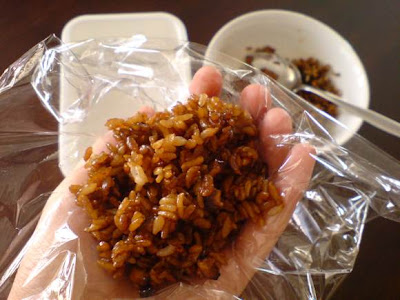
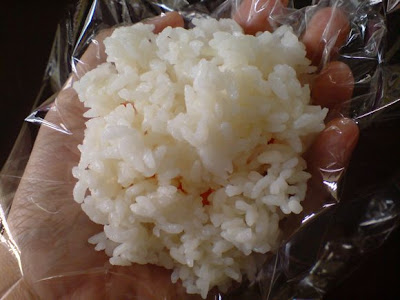
Start by making 2 rice onigiri. If your rice is cold, sprinkle a few drops of water over the rice and warm it up in the microwave. Tear a square-shaped piece of strong plastic wrap and place it on the palm of your hand. Scoop 2 heaped Tbsp of warm rice onto the plastic wrap in your palm.

Step 2 - Filling the Onigiri
MB Step 2
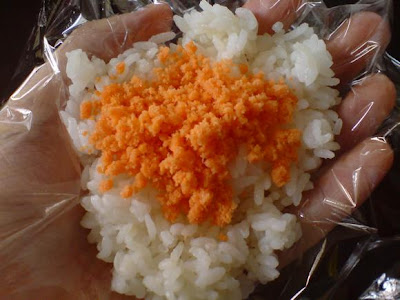
To make an onigiri with filling, add your filling on top of the rice. Here, I have added a few tsps of salmon flakes. Other fillings you can use - teriyaki chicken bits, canned tuna with mayo, minced beef soboro, etc.

If you just want to make a plain rice onigiri without any filling, proceed to Step 3.

Step 3 - Completing the Onigiri
MB Step 3
Add 1 heaped Tbsp of rice on top of the filling to cover it. (For a plain onigiri, just add 1 Tbsp of rice. You can also sprinkle a little salt on the rice for flavour.)

MB Step 4
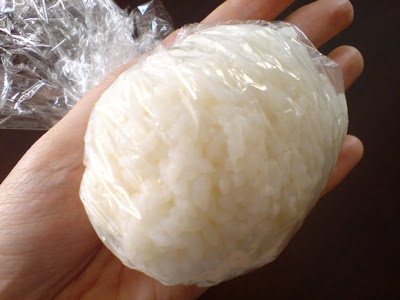
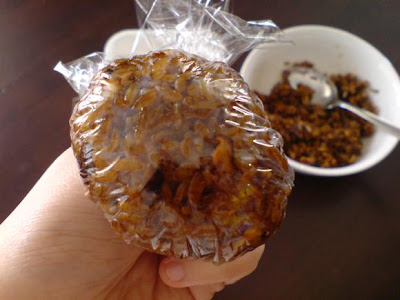
Gather up the sides of the plastic wrap by closing your fingers inwards (as if you were gripping a tennis ball in your palm). Twist the plastic wrap together at the top. You should now have a ball of rice.

Step 4 - Shaping the Onigiri
MB Step 5
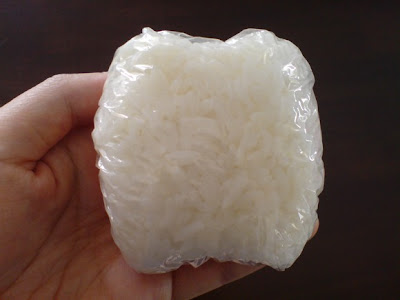
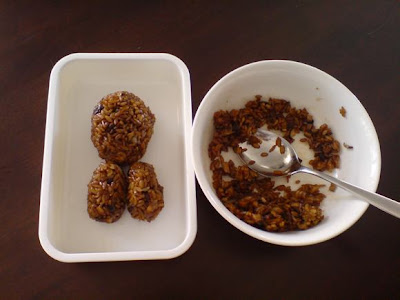
Compress the rice together and shape the onigiri as you desire. As we are making Monokuro Boo, press the rice ball to form a flat square shape, and squeeze out two ears and two feet at each end of the square. Set aside the shaped onigiri in the plastic wrap, and repeat Steps 1 - 4 for the second pig.

Step 5 - Making the Black Pig
(You should now have two pig-shaped onigiri wrapped in plastic.)
MB Step 6
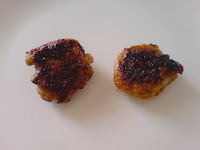
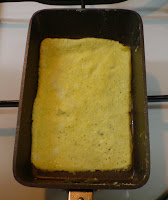
To make the black coloured pig, take one of the onigiri and warm it up in the microwave for 10 seconds. You need the rice to be warm so the nori wraps around it easily.

Place a triangular piece of nori (seaweed) on a flat surface. (You can buy triangular-shaped nori, or just cut a big square of nori into half diagonally to form a triangle.) Unwrap the warm onigiri and place it on the nori seaweed.

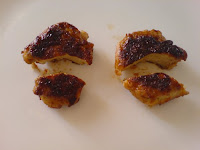
Wrap the nori around the onigiri by tucking the top down (the ears will form quite naturally) and wrap the sides around the square. The back should look something like this -
MB Step 7

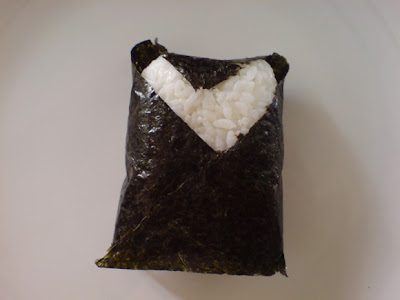
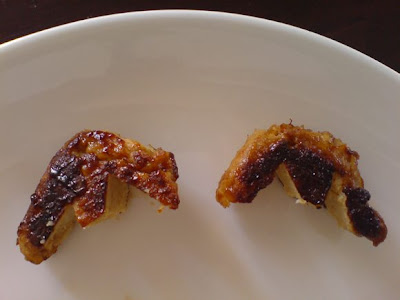
...and the front should look something like this -
MB Step 7.5
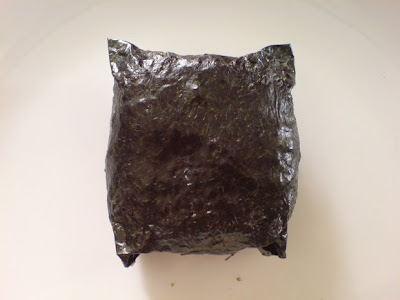
Tuck and squeeze the nori a little to form the legs.

MB Step 8
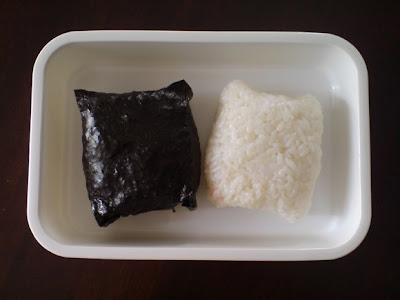
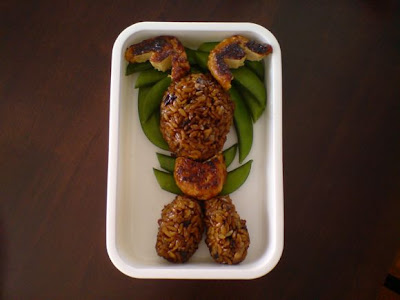
Place the wrapped nori pig and the white rice pig into a bento box. Set aside as you prepare their faces.

Step 6 - Making the Eyes and Noses
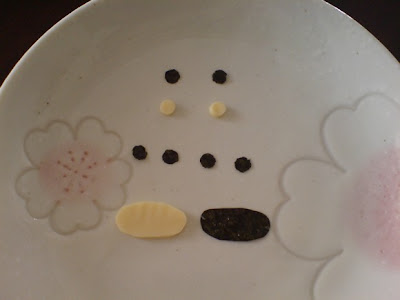
MB Step 9

Eyes
Black Pig: Take a slice of processed cheese and cut out 2 little circles using a straw or a little round cutter.

White Pig: With a small piece of nori, cut out 2 little circles using a nori face punch, or a small pair of scissors.

Nose
Black Pig: With a sharp paring knife, cut out an oval-shaped piece of cheese for the nose. Estimate the size of the nose according to the size of your onigiri pig. Tip: If you are unsure of how big it should be, cut out a larger oval, and slowly trim the ends until it is the right size.

White Pig: With a small pair of scissors, cut an oval out of nori. Try to make it the same size as the cheese oval you just made.

Nostrils
Black & White Pig: Cut out 4 small oval shapes out of nori, using a pair of scissors. The nostrils should be slightly smaller than the eyes.

If you used a nori face punch to cut out the eyes, cut out 4 more small circles, then convert them into oval shapes with the scissors. (This is what I did, therefore the nostrils in the above picture are round as I had not shaped them yet. See the picture below for the shaped nostrils)

Step 7 - Adding the Faces
MB Step 10
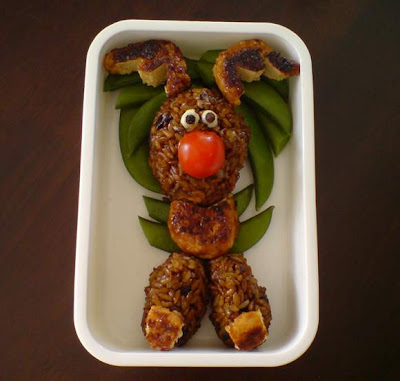
Black Pig: Place the cheese eyes, cheese nose, and nori nostrils onto the black pig.

White Pig: Place the nori nose lightly onto the white pig, then quickly lift it off before it sticks. The nori should now be soft, but not soggy. Fold the nose slightly and make a small cut in the centre with a pair of scissors. Then unfold and cut around the inside of the oval to make an oval ring as pictured. Place the nose on the white pig, as well as the nori nostrils and eyes.

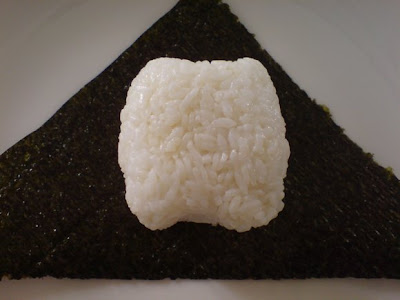
Your Monokuro Boo pigs are now complete!

Step 8 - Packing the Rest of the Bento
Now surround the pigs with colourful vegetables, meat, eggs, etc. of your choice.

Here is what I added:
  • steamed broccoli;
  • carrots (shaped into flowers using a flower cookie cutter. You can also shape them into stars, hearts, etc.);
  • cherry tomatoes;
  • edamame;
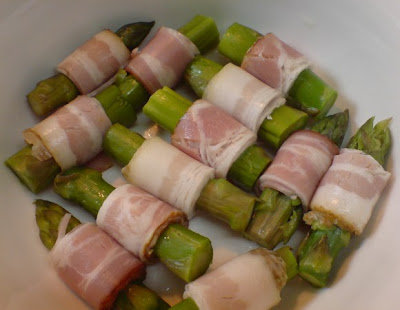
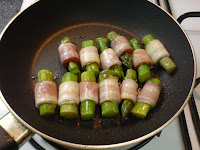
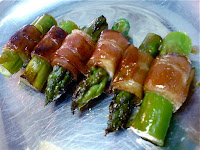
  • ham and egg rolls (Edit: Link added for the ham n egg rolls);
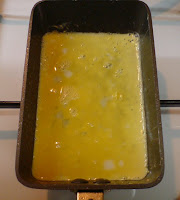
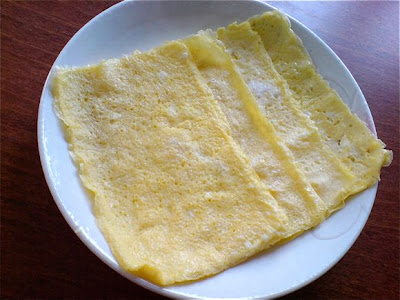
  • egg (fried thinly, then cut into flower shapes);
  • processed cheese (cut into flowers - a good way to use up the remainder of the cheese slice).
How I packed the bento:
I began by selecting the "harder", more bulky items. In this case, it was the broccoli, which I added around the sides of the bento box.
MB Step 11

This was followed by the cherry tomatoes and the ham and egg rolls.
MB Step 12

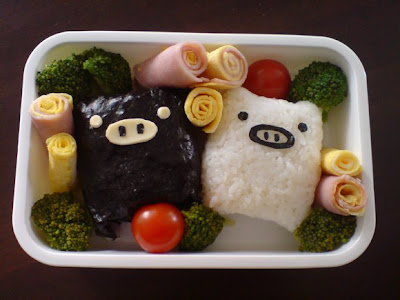
Next, half of the carrots and the edamame were added to fill in the gaps. The remaining carrots were placed on top to create a flower scene, and the egg and cheese flowers were added for further colour and design. The completed bento:

MB Step 13

Back


Friday, December 12, 2008

Rice n Egg Cubes Bento

rice and tamagoyaki cubes bento
I've been lazy this week and took a short break from making bento (which meant sending YH off without lunch twice - luckily he had lunch appointments on the other days). 

I finally got my act together this morning, with yet another salted salmon bento. I've been buying a lot of fish lately, so the bento have also all been rather fishy. Today's bento contains pan-fried salted salmon, stir-fried sweet peppers/capsicum, edamame, tamagoyaki and rice cubes. The rice cubes are topped with some baby sardines and black sesame seeds.

Friday, December 5, 2008

Bento Delivery


Today I visited a friend and made a bento for her. She's a fan of Precious Moments, so I got her a (very pink) Precious Moments bento box as a present. Instead of keeping the box though, she asked me to return with it another day, with another bento lunch! 

The bento contains asparagus wrapped with bacon, pan-fried yellowtail fish, cherry tomatoes, stir-fried beansprouts and mushrooms, and tamagoyaki.

Thursday, December 4, 2008

Tarako Onigiri Bento

tarako onigiri bento
Was in a rush today so I ended up making a simple lunch - tarako onigiri and an apple. It was back to the collapsible bento boxes, as well, as I was out all afternoon and didn't want to lug bulky bento boxes around with me. 

As my tarako (salted cod roe) had been sitting in the fridge for a while, I pan-fried it, cut it into chunks, and used it as an onigiri filling, along with a little kewpie mayonnaise. Delicious! I was also thrilled to use my plastic disposable onigiri wrappers which separate the nori seaweed sheet from the rice onigiri - just like the ones you buy at Japanese convenience stores! YH thought I'd bought the onigiri, so I guess it looked "professional" enough :)

Wednesday, December 3, 2008

Salted Salmon Bento

salted salmon bento
Today's bento was a little more Japanese - with pan-fried salted salmon, tamagoyaki, mushrooms, edamame and teriyaki chicken meatballs. I was happily packing the 1st tier, but when it came to the 2nd tier, after I'd shaped the rice into star shapes, I had nothing much else to place in it except some edamame! Hence the slightly odd star-shaped rice towers hovering on their own. This was just bad planning/design on my part!

Tuesday, December 2, 2008

Spicy Chicken & Cabbage Salad Bento

chicken cabbage salad bento
I had leftover roast chicken and cabbage sitting in the fridge, so I decided to make a Vietnamese/Thai-style chicken and cabbage salad for today's bento. A good thing about salads like this is that it is relatively healthy, as it doesn't include fattening/creamy salad dressing. Yet another good point about this bento is that it can all be prepared the night before.

Accompanying the bento are two little apples from Japan that I found in the local supermarket. The packet of apples were labelled, "Hime Ringo" (Princess Apple) which I thought was quite sweet. They were literally sweet as well, although a little mushy. There's also a little container of crushed peanuts to pour over the salad just before eating.

Continue reading for the Spicy Chicken & Cabbage Salad...


Spicy Chicken & Cabbage Salad
(serves 2)
1/4 roast chicken, teased into strips (or any leftover grilled chicken/boiled chicken you have on hand)
2 cups cabbage, finely shredded
1 medium carrot, shredded
1 small bundle glass noodles (optional - I added this to make the salad a little more filling)
few drops sesame oil (optional)
2 Tbsp fish sauce
2 Tbsp lemon juice
2 tsp sugar
1 red chilli, finely chopped (or few drops chilli oil, if you don't have fresh chilli on hand)
red pepper flakes & sliced green chilli (optional, for garnish)
  1. If you are using glass noodles, add the noodles into boiled water. Stir and leave to soak until the noodles are soft. Drain, then mix a few drops of sesame oil into the noodles. With a pair of scissors, cut the noodles roughly into smaller pieces.
  2. Add the chicken, shredded cabbage and carrot with the noodles and combine well.
  3. Mix the fish sauce, lemon juice, sugar and chilli together, then pour into the salad and toss.
  4. Taste, and add more seasoning if necessary.
  5. Garnish with some red pepper flakes or thinly sliced green chilli.

Back

Monday, December 1, 2008

Tonkatsu Pork Bento

frog bento
I don't know why but I have a thing for cute green frogs - but only cartoon ones, mind you. I don't like real frogs at all. So I was happy to use my smiling frog bento box today - one of my recent acquisitions from Hokkaido. The colours of the food sadly matched the rather pale green of the box, though! 

The first tier contains rice with furikake, and zucchini stir-fried with sesame oil and soya sauce in a little flower container to brighten it up. If your food is a little pale or dull in colour, it can help to use such accessories to brighten things up. The second tier contains pork tonkatsu slices on a bed of shredded cabbage, and some baby corn. The little container has some spicy tomato sauce to dip with the tonkatsu and there's another container (not pictured) that has some sesame salad dressing for the cabbage. 

I used my tonkatsu recipe for the pork, but this time I cut the pork into slices first, before breading and frying it.

Wrapped Up Over the Weekend

apple and wrap bento
I had a lot of soft flour tortillas as well lamb and grilled chicken leftover in the fridge, so I used them to make more wraps for an impromptu picnic on Sunday. Inside the wraps are lamb/chicken, with homemade spicy tomato sauce, roasted red and yellow peppers, tahini, and baby spinach leaves. I was in a hurry and using my rather large collapsible bento boxes from Muji, so I ended up sticking a whole apple into the bento. It's fun to slice fruit up into little bits for bento, but sometimes it is also nice to just bite into a whole, juicy apple... 

We headed up to Pinewood Battery again, and played some frisbee in the park, before setting out our picnic mat to eat lunch. After lunch, we snacked on senbei crackers, listened to some music from YH's phone, and enjoyed the warmth of the sun. The weather is starting to turn cold here, so the bright sun on our backs was actually welcome (for a change).

senbei in park