Sunday, June 21, 2009

Baked Chicken Breast with Tomato n Cheese

tomato chicken
This dish (although it looks like a gluggy mess in the photo) is fast becoming a favourite with me because it is so easy to make. It is a little like chicken parmigiana, but unlike chicken parmigiana, which is first breaded, fried and then baked, this dish is just baked - which means you throw all the ingredients into an oven-safe dish, and plonk it into the oven. Done!

Chicken breast works well in this dish - because it is baked in the tomato liquid, the chicken remains juicy and does not dry out.

Method:
Preheat your oven to 200 degrees C.
Place a raw chicken breast into a shallow medium size oven-proof dish and season with a little salt and pepper. Open a 400g can of chopped tomatoes in their natural juices (I use Waitrose brand) and pour over the chicken. Top the chicken with some shredded cheese (I use a mix of parmesan and cheddar cheese, you can also use mozarella). Bake the chicken for 30 - 40mins until the chicken is cooked (the juices will run clear). 

(If you happen to have a convection oven, you can decrease the cooking time by using a combination bake and microwave function)

Serve with vegetables and pasta or potatoes. Shorter pasta such as spiral, macaroni or ravioli works well because you can coat the pasta with the excess tomato and cheese sauce.

Tip: For this dish, I like to buy ready-made pasta like ravioli stuffed with roasted vegetables. It's a slightly more expensive alternative, though...but a nice treat...


In a Pasta Rut

chilli pasta
Sometimes I get so caught up making the same thing over and over again, there is nothing new to post. It's been a little like that lately, with poor YH constantly being served my regular favourite dishes (not that he ever complains). 

My obsession with pasta took on a life of its own last week, when we ate pasta 4 days out of 7! If you happen to get into a pasta rut like me, a nice way of making things more interesting is to explore the different types of pastas available. I found one interesting dried spaghetti with chilli in a little Italian deli, which was orange in colour. The pasta was made out of durum wheat semolina, water and red hot peppers (peperoncino). Since I love all things spicy, I had to buy it at once, and used it to make my Scallop & Sausage Aglio Olio spaghetti. The chilli spaghetti turned a lovely light tomato red colour when cooked, and a little to my surprise, you could still taste the chilli in the spaghetti (I thought the chilli might have been washed out or watered down after being boiled). 


Thursday, May 21, 2009

Beef & Potato Curry Puffs


Curry puffs are easily available in Malaysia and Singapore, but not so common in Australia when I was growing up, so we always looked forward to my mum's homemade version, which she would make using puff pastry (rather than the traditional flour pastry which is deep fried). My sister and I would help her measure and cut out the pieces of puff pastry, then fill it with a spicy mince beef and potato filling. Although I do like the more traditional curry puff pastry, if I make it myself, I will use ready-rolled puff pastry like my mother did - it's easier to make as it is is baked rather than deep fried.

If you don't want your curry puffs so spicy, just reduce the amount of chilli and curry powder, or you can omit it altogether and just make a non-spicy beef and potato puff, if you like. For a vegetarian version, omit the beef.

Continue reading for the recipe...


Beef & Potato Curry Puffs
(makes around 72 small triangular curry puffs)
1 medium onion, finely chopped
olive oil (or other cooking oil)
600g lean mince beef
3 large potatoes (or 4-5 medium potatoes)
curry powder
chilli powder (or cayenne powder)
salt and pepper
9 sheets frozen ready rolled puff pastry (1.5kg puff pastry)
1 egg, beaten
(chilli oil and chilli flakes - optional)
1. Peel and cut the potatoes into small cubes. Cook the potatoes until soft, either in boiling water, or in the microwave.

2. In a medium sized saucepan, heat 1 Tbsp oil and lightly fry the onions until soft. Add the mince beef and stir well until cooked. Begin to season the meat by adding 1-2 Tbsp of curry powder and a good shake of chilli powder (or cayenne powder). Stir well.

3. Over low heat, add the cooked potatoes to the meat, and mix well. It is fine if the potato cubes get a little mashed. Season with salt and pepper.

4. Taste the beef and potato filling, then add more curry powder and chilli powder if you wish. I like my curry puffs very spicy, so I go a bit wild with the curry and chilli here. I also add some chilli oil and chilli flakes at this stage for added spice. The filling should be a little on the salty side, as the flavour will dissipate once it's wrapped in the pastry. Set the filling aside to cool.

5. If you are using frozen ready rolled puff pastry, separate and defrost the square sheets of pastry. Cut the pastry into small squares or triangles. You may use a knife to do this, but I find it is easier to cut the pastry using a clean pair of kitchen scissors. Cut the large square of pastry into half, then half again to form 4 squares. Then cut each square into half diagonally to form 2 triangles. You will then have 8 triangles of pastry. 

If you want to make larger puffs, or square puffs, just cut the pastry accordingly. (If you live in a hot environment, keep the remainder of the pastry in the fridge/freezer until you are ready to use it, or the pastry will soften and will be hard to handle)

6. Line a baking tray with some foil, and lightly grease the foil with some cooking oil. Preheat the oven to 200 degrees C. 

7. Take a piece of the cut pastry in one hand, and add a heaped teaspoon (or more) of cooled curry puff filling. Fold the pastry over in half and squeeze the edges together to seal the filling inside. I like to squeeze together one edge of the pastry first to form a little "cup", add the filling, then seal the remaining edge. Place the curry puff on the lined baking tray. 
(Making up the curry puffs whilst watching TV helps pass time more quickly.)

8. Crack an egg into a small bowl and beat it. Brush a little beaten egg on top of the curry puffs, then bake them in the oven for 20 minutes, or until golden brown. Remove and place on a wire rack until cooled. Continue baking the rest of the curry puffs in batches.

Keep them covered in the fridge, or pack them into airtight freezer bags and freeze them. Reheat them in the oven before serving.

Back


Thursday, May 7, 2009

Paprika Chicken & Avocado Sandwich

chicken sandwich
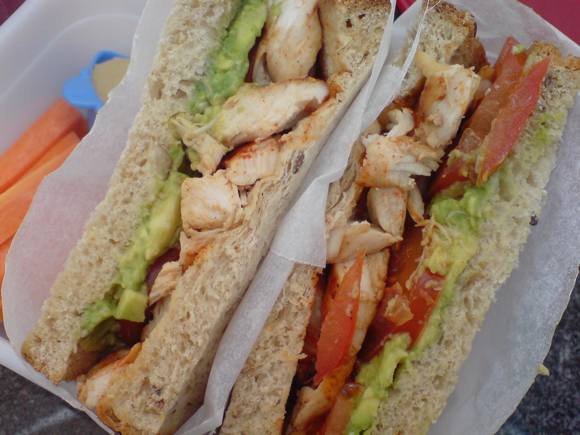
This is one of my favourite sandwiches. It's great in a bento lunch, easy to make, and healthy, too. The chicken tenderloin is marinated with a little soya sauce and paprika, then grilled. I use my George Foreman grill for this, but you can also panfry it if you prefer. The meat is then shredded, and added to a multi grain nut bread, along with slices of avocado and tomato. I find the nuttiness of the bread matches very well with the buttery avocado and paprika chicken. There is no need to butter the bread as the avocado already provides the sandwich with a moist buttery taste.

Accompany the sandwich with some raw carrot sticks and hummus dip.

Tip: When packing sandwiches in your bento lunch, a handy way to keep the sandwich together and your hands clean when eating it is to wrap the sandwich with baking paper/parchment paper. Then cut the wrapped sandwich in half, paper and all, with a sharp knife (a serrated bread knife works well). 


Monday, May 4, 2009

Noodle & Dumpling Bento

noodle bento
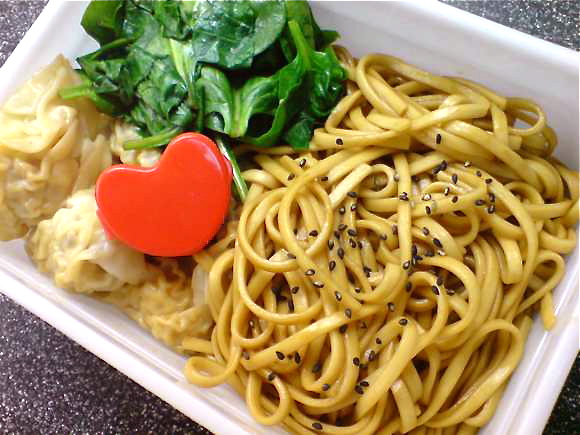
I find I'm always short on groceries (and time) Sunday night, so making bento for Monday usually involves rummaging around in the freezer. Today's lunch for YH is a simple combination of thin udon noodles mixed with sesame oil, soya sauce and oyster sauce, dumplings (from the freezer) and some baby spinach (wilted slightly with a little sesame oil and sesame seeds). A little red container of chilli sauce brightens up both the bento and the taste of the noodles. 

The best part about this lunch is that everything can be cooked in one small saucepan, which saves time and washing up. The water for boiling the frozen dumplings can also be used to cook the noodles, and the cooked noodles can be mixed with the sauces in the pot. Later, the spinach can be wilted slightly in the same saucepan as well. 


Wednesday, April 29, 2009

Sausage n Egg Bento

sausage bento
Today's bento reminds me of breakfast sets often served in Japan - sausage, egg, salad and rice. I lightly panfried the onion flavoured sausages, and made a giant tamagoyaki layered with leftover beef soboro. Accompanying that was some butter lettuce and cherry tomatoes. I topped the salad with some leftover boiled prawns from last night's dinner (which didn't quite fit with the breakfast theme.). 


Monday, April 27, 2009

Beef & Egg Soboro Bento


After a short trip away, it's back to bento for me this week. I was preparing this late Sunday night so I kept things simple and made some beef and egg soboro. Together with some peas and rice, it was quick and easy to prepare. As I find the beef soboro is already quite salty, I did not season the egg, so it is actually just plain, finely scrambled egg. (Normally, you would usually season the egg with a little soya sauce, mirrin, sugar and salt.)


Bento in Osaka

osaka bento
We just returned from a short trip to Osaka to catch the tail end of the sakura season. As expected, most of the flowers had already fallen there, so we headed out of the city to Yoshino, where over 10,000 sakura trees grow wild on the mountain. To my delight, there were still quite a few sakura blooming, especially in the higher regions of the mountain.

On the train journey to Yoshino, we enjoyed a lovely 3-tiered bento lunch that we purchased in the food section of Kintetsu Department Store. I was quite inspired by the first tier, and will try it out one day - it contained sushi rice, topped with shredded egg, slices of mushroom, a few peas, bamboo shoots and a prawn. The other two tiers contained a lovely assortment of pickles, savoury tamagoyaki, small fried fish, bamboo shoots, fish balls, lotus root and a sweet konnyaku jelly. It was really delicious, and very exciting to be eating a bento on a train in Japan!

sakura


Tuesday, April 14, 2009

Tofu n Egg Omelette

tofu egg omelette
This recipe is great if you are looking to add some extra protein and tofu into your diet, and it is also perfect to pack in your bento lunches, as it tastes good cold. It is also a handy way to use up any leftover tofu you may have in the fridge. The tofu makes the egg omelette very soft and juicy, and you can't really taste the tofu at all (which means it is a sneaky way to get non-tofu loving people to eat tofu, too). 

Serve this hot for breakfast (with a little chilli or tomato sauce), or cold in a bento lunch (together with rice and some other side dishes). 

Continue reading for the recipe...


Tofu n Egg Omelette

110g hard tofu
1 large egg
1/2 tsp soya sauce
1/2 tsp sesame oil
dash of pepper
a little oil for frying

1. In a small bowl, mash the tofu with the back of a spoon. Crack an egg into the tofu and mix gently until well combined.

2. Add the soya sauce, sesame oil and pepper to the mixture and mix well.

3. In a small non-stick frying pan or small egg pan, heat up a little oil over medium heat.

4. Pour the tofu and egg mixture into the pan and smooth the top of the mixture so that the height is even.

5. Cook over medium heat until the tofu omelette is golden brown and firm underneath. With a small spatula, slowly separate the omelette from the sides of the pan. When the mixture is solid enough to turn, quickly flip it over with the spatula (it can get a little tricky here). 

6. Cook the other side, until the omelette is golden brown on both sides and firm. Cut the omelette up into cubes or wedges with your spatula. The inside should be firm and not runny. Serve hot or cold.

Back


Sunday, April 12, 2009

Double Chocolate Chip Cookies

choc cookies
If you love soft, gooey, chocolate cookies (or are a Mrs Fields cookie fan), you'll love this recipe. Take them out when they are just cooked through (the bottom may still be a touch gooey) and they will remain soft even after they have cooled (which I find pretty amazing). The only downside is that the cookies, being a little cracked and brown, may not look overly attractive to some. The taste more than makes up for that, I think...

Eat on their own, with some black coffee or vanilla ice-cream!

& Happy Easter to those celebrating!

Continue reading for the recipe...

Double Chocolate Chip Cookies
(makes around 20 cookies)

140 g semisweet chocolate chips
70 g unsalted butter
1 large egg
5 ml vanilla essence (pure, if possible)
65 g caster sugar
30 g plain flour
1/2 tsp baking powder
10 g unsweetened cocoa powder
dash salt
100 g brazil nuts, chopped (you can also use macadamia nuts)

1. In a small saucepan, melt 85 g of the chocolate chips and butter together. Set aside to cool a little.

2. In a medium bowl, mix the sugar, egg and vanilla essence together until the mixture is well combined, thick and pale. Add the chocolate butter and stir.

3. Sift the flour into a separate bowl, and mix in the baking power, cocoa powder and salt. Add these dry ingredients into the liquid chocolate mixture and stir until blended.

4. Fold in the nuts and the remainder of the chocolate chips (55 g). Cover and refrigerate the dough for 1/2 hour - 1 hour.

5. Pre-heat the oven to 175 degrees C. Line a baking tray with nonstick baking paper/parchment paper, or lightly grease the baking tray.

6. Scoop out balls of the chilled dough and place them a little apart from each other on the baking tray. Flatten the top of each mound slightly. (I use a small ice-cream scoop to evenly measure out each ball of cookie dough.)

7. Bake for 14 minutes, or until the cookies are just set.

8. Remove from the oven. Allow the cookies to rest for 1 -2 minutes before transferring them onto a wire rack with a spatula. Cool thoroughly, before packing them away into an airtight container.

Back


Thursday, April 9, 2009

Teriyaki Chicken Mushroom Rice

chicken mushroom rice

This one pot, one dish meal was created out of a need to prepare something hot and satisfying with a minimal amount of preparation and cooking. All you need to do is cut and marinate the chicken and mushrooms, and dump them with the rice into a rice cooker. The rice cooker takes care of the cooking, leaving you free for other things. Simply serve it up when the rice is cooked, with a side of greens if you must, or on its own (I figure mushrooms are vegetables, too!). Japanese or Korean pickles (eg. takana - mustard greens) work very well with this dish too.

The rice is great for bento as well, so you can pack up any leftovers for lunch the next day.

Continue reading for the recipe...


Teriyaki Chicken Mushroom Rice
(serves 2)

150 - 200g boneless chicken thigh meat
10 - 12 chinese or shitake mushrooms
240g long grain white rice (uncooked)
240ml water
1 - 2 cm piece ginger
5 Tbsp soya sauce
3 Tbsp sake
3 Tbsp mirin
2 Tbsp sugar
dash pepper

1. Mix the soya sauce, sake, mirin, sugar and pepper together in a medium sized bowl. Peel the ginger skin (with a spoon) and slice the ginger into thin strips. Add to the marinade.

2. Trim the excess fat from the chicken meat and cut into generous bite-size chunks (around 1.5 inches). Slice the mushrooms. Add the chicken and mushrooms to the marinade and mix well. Set aside for around 5 minutes as you prepare the rice.

3. Add the uncooked rice into the inner pot of your rice cooker, and wash the rice under cold running water until the liquid is clear. Drain, then using the same cup in which you measured out the rice, add an equal amount of cold water. (Your rice cooker usually comes with a measuring cup. For me, 240g rice equals to 1.5 cups of my rice cooker cup. I then use the same cup to measure an equal amount of water, ie. 1.5 cups).

4. Pour the chicken and mushrooms, along with the marinade over the rice, and switch your rice cooker on (use the setting you normally would to steam plain white rice). 

5. When the rice cooker has completed cooking the rice, let it sit covered for a few minutes, before opening the rice cooker. Stir the chicken, mushrooms and rice together well to distribute the sauce evenly. Scoop the rice into bowls and serve with green vegetables, and/or Japanese pickles. 

Tip: Refrigerate any leftovers in a bowl, covered with plastic wrap, and pack it in a bento container for lunch the next day. The rice can be eaten at room temperature, but you could pack it in a thermos, or microwave-safe bento.

Back


Sunday, March 15, 2009

Roasted Chicken & Sausages with Sage & Onion

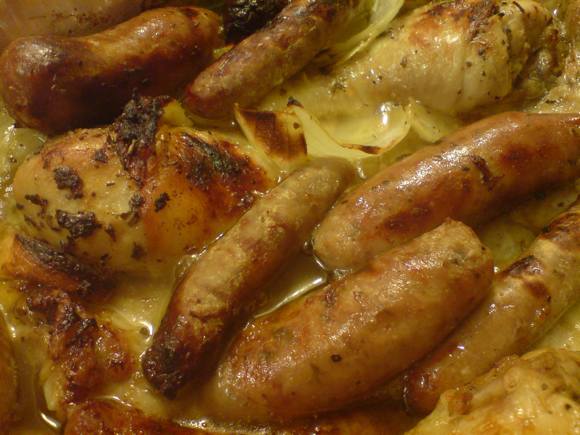
roast chick and sausages
I got this recipe from Nigella Lawson's book Feast, and wanted to share it here as I love the flavours in this dish, yet it is very simple to make. (by the way, I highly recommend many of the other recipes in that book, too...) The mustard, lemon, Worcestershire sauce, sage and onion marinade blend really well together and adds a little more zest and flavour to plain roast chicken.

This dish is perfect to make when inviting family or friends over for Sunday brunch, as the oven does all the cooking, allowing you time to prepare some side dishes. Serve with mashed potatoes, pasta salads, tomato ketchup spaghetti and salads/vegetables.

Continue reading...


Roasted Chicken & Sausages with Sage & Onion
(from Nigella Lawson's book
Feast)
(Serves 6)
1 large onion (I prefer red onions, but brown onions are also fine)
125 ml olive oil
2 tsp English mustard
1 Tbsp dried sage
black pepper
1 lemon
1 Tbsp Worcestershire sauce

2 kg chicken, jointed into 10 pieces (or else just buy a variety of chicken pieces, with their bones in)
12 sausages (thick English and Italian style sausages work well)
2 Tbsp chopped sage leaves (I don't usually have these on hand, and resort to the dried variety)
1. Peel and cut the onion into 8 pieces, and put it into a large freezer bag. Add the olive oil, mustard, dried sage, pepper and Worcestershire sauce. Wash and cut the lemon into 8 wedges, then squeeze the lemon juice into the freezer bag, and add the squeezed husks as well.

2. Mix the marinade together, then add the chicken pieces, and mix everything together until well combined. Marinate in the fridge overnight, or up to 2 days (check the expiry date of your chicken). If you do not have time, you can also marinate the chicken for a couple of hours at room temperature (this is not recommended if you live in a very warm climate).

3. Preheat the oven to 200 degrees C and allow the chicken and sausages to come to room temperature. Arrange the chicken, skin-side up, together with the marinade (including the onion and lemon wedges) in a roasting tin. Place the sausages around the chicken pieces. Sprinkle with fresh sage. Roast for 1 hour and 15 minutes, turning the sausages over halfway to brown them evenly.

Tip: I find that I get a lot of liquid at the bottom of the pan, so after roasting, I scoop the meat and onions into a separate serving dish, leaving behind the lemon wedges and excess liquid.

Back


Friday, March 6, 2009

Owl Bento

owl bento
I've taken a long break from making kyaraben (character) bento. I've just not been all that inspired, I suppose. It's been a blob of pasta, or leftovers with rice for poor YH for a few months! As my parents are visiting us right now, I thought I'd make the effort and make a special bento for them, especially since my mum has been hinting about how she'd love to eat one. My mother loves owls, so I thought an owl bento would be appropriate. To be honest, it was not one of my best efforts. But it was easy to put together...

The owl is made out of rice, with carrots for eyes, and brown mushrooms for its beak, wings and feathers. Surrounding the owl is a forest of broccoli, fried green capsicum, beef soboro, tamagoyaki (rolled egg omelette), corn and a little tofu moon and tamagoyaki star. The colours were a little dull (I guess it's nighttime) but my mum was pleased with it, and I guess that's all that matters.


Thursday, February 26, 2009

Easy One-Sauce Lasagna

lasagna
As the days go by, I've come to realise that Cloud9Food is all about comforting, home-style food that is not only tasty to eat, but is also heavenly for the chef ie. simple to prepare! Another favourite of mine which falls into this category is my One-Sauce Lasagna.

I love lasagna, but the thought of preparing the bolognese meat sauce, bechamel sauce, layering everything and then baking it sends me running to find something else that's faster to cook. Hence the One-Sauce version. 

Instead of making bechamel sauce from scratch (which I find terribly tedious), I make a large portion of "creamy" tomato meat sauce. The sauce is then layered with instant lasagna sheets and baked. It still takes some time, but is much faster than the original 2-sauce version, and I don't find I lose much taste-wise. This lasagna is still tomato-y, creamy and cheesy. The meat sauce can even be made in advance and frozen, which cuts down preparation time even more. And yes, I cheat and buy tomato soup (the no MSG, no preservative variety!) to add further flavour to the meat sauce. Who has time to boil and boil and boil the sauce?

For bento lunch makers, leftovers can be packed in microwaveable safe containers for lunch the next day.

Continue reading for the recipe...

Easy One-Sauce Lasagna
(makes one large lasagna in a 2.5 L capacity dish)
500g pack of instant lasagna sheets (which does not require pre-cooking)
6 -7 cloves garlic, chopped
1 Tbsp light olive oil (or other cooking oil)
400g minced beef or a mix of minced beef and pork (as lean as possible)
2 large carrots, chopped into small cubes
2 x 400g canned tomatoes
5 heaped Tbsp tomato paste
500 - 600g creamy tomato soup (look for the no MSG, no preservatives, organic soup variety if possible. For reference, I use Pacific Natural Foods Organic Creamy Tomato Soup)
black pepper
salt
1 -2 bay leaves (optional)
1 cup milk (low-fat, skim milk is also fine)
100g cheddar cheese
additional 200g - 250g cheddar and/or parmesan cheese (for layering and topping the lasagna)
1. In a large saucepan, add the olive oil and fry the garlic lightly until fragrant. Add the minced meat and stir to separate the mince until the meat is cooked. Add the chopped carrots. (If you are pressed for time, microwave the carrots to soften them first.)

2. Add the canned tomatoes and tomato paste. Season with some salt and pepper, and stir. Add 1 -2 bay leaves here for added flavour (optional). Bring to the boil, then simmer over medium heat for 20 - 30 minutes. 

3. Add 500g of the creamy tomato soup and simmer for another 5 - 10 minutes. Remove the bay leaves.

(When making the meat sauce in advance, allow to cool and transfer into a freezer-safe container for freezing at this point. To defrost, transfer the frozen sauce into a large saucepan and heat until defrosted.)

4. Add the milk and 100g cheddar cheese to the meat sauce and stir. Season with additional salt and pepper to taste. You should have quite a lot of meat sauce at this stage as it replaces both bolognese and bechamel sauces.)

5. Pre-heat your oven to 200 degrees C. Lightly grease a 2.5L capacity ovenproof dish. Ladle some meat sauce into the dish to cover the bottom. Add a layer of instant lasagna sheets (you may need to break them to fit the size of your dish), then a sprinkle of cheddar or parmesan cheese, then some more meat sauce. Repeat until the meat sauce is used up. (There may be leftover lasagna sheets as well.) End with a layer of meat sauce, and sprinkle some cheddar/parmesan (or a mix) of cheeses on top.

Tip: Around 3/4 of the way through layering, if it looks like you don't have enough sauce, add another 100g or so of the creamy tomato soup to the sauce and mix. 

6. Bake the lasagna in the oven according to the time indicated on your packet of instant lasagna sheets (approx 30 -45 minutes). Serve with a side salad.

Back


Pan Seared Foie Gras with Raspberry Apple Sauce

foie gras
Yes, yes, I know. Foie gras ("fat liver") is cruel to geese. But what can I say? It's only of my guilty eating pleasures. It was the day after Valentine's Day, and I was at the supermarket - to my surprise, I saw a packet of foie gras on sale - 2 decent sized pieces for HKD49.90 (USD6.40)!!! What an incredible bargain. Of course I could not resist and bought the last two packs. I pan fried them with glee and served them with a tart raspberry apple sauce to a surprised and happy YH as a post V-day treat. 
Continue reading for the recipe...

Pan Seared Foie Gras with Raspberry Apple Sauce
4 pieces of raw, chilled foie gras
salt
pepper
1 red apple
handful of raspberries (frozen or fresh)
sugar (to taste)
1. Make the Raspberry Apple Sauce first by chopping up the apple into small cubes. Heat up a small 20cm frying pan and add the apples. Stir over medium heat until the apples are stewing slightly, then add a similar amount of raspberries into the pan. Stir and crush the raspberries as they heat up. Add a little sugar to taste (the sauce should be tart and not too sweet). Continue frying and mixing until the fruit disintegrates into a thick sauce-like texture. Transfer the sauce to a side dish.

2. Liberally shake salt and pepper over the foie gras pieces. Lightly grease a large frying pan over high heat.

3. When the frying pan is very hot, add 2 pieces of foie gras. The foie gras will start "melting" so you have to work quickly. After around 10 seconds, flip the pieces over to sear the other side. When both sides are nicely browned and the foie gras has shrunk slightly, remove and set aside. Repeat for the other 2 pieces. 

(I cook 2 pieces at a time so I have better control over timing - the worst thing is to overcook your foie gras. You can of course cook all 4 pieces at once)

4. Serve immediately with the Raspberry Apple Sauce.

You can also serve your seared foie gras on top of freshly toasted slices of French Bread, or with sweet caramelized onions, and other tart/sweet fruit such as pears, plums, figs, etc.

Back


Wednesday, February 25, 2009

Simple Crêpes


Yesterday was Shrove Tuesday, or what is now more commonly known as Pancake Day. As my parents are in town visiting, and both my dad and YH love pancakes, I thought it would be appropriate to make some pancakes to celebrate. Apparently, in the past, Catholics used to eat pancakes on Shrove Tuesday, as it was the day before Ash Wednesday (the start of Lent). Pancakes were made to use up the household's supply of eggs and fat (which was restricted during Lent). 

I asked my dad which type of pancake he would like to eat - thick, fluffy American ones, small pikelets, etc. and he chose crêpes (thin pancakes made from wheat flour that originated in Brittany, France). My cooking, as always, tends towards the quick and simple, and these crêpes were no exception. The ingredients are just tossed into a blender (or food processor), blended, then poured out and cooked. Perfect for a "lazy" cook, and the results are pretty decent, too. (If you don't have access to a blender or processor, the ingredients can be mixed by hand as well.)

I served my crêpes with some sliced bananas, vanilla ice-cream, pure maple syrup, and also some homemade orange syrup, but you could also use strawberries, chocolate sauce, lemon juice and sugar, or anything else you like. 

Continue reading for the recipe...


Simple Crêpes
(makes around 12 crêpes when using a 20cm pan)
1/2 cup plain flour
2 tsps caster sugar
1 cup milk
2 eggs
60g butter
1 tsp pure vanilla essence
1. Place the flour, sugar, milk, light beaten eggs, melted butter and vanilla essence into a blender or food processor.

2. Blend/process for 15 - 20 seconds until ingredients are well combined and lump-free. 

(If you don't have a blender/processor, mix the wet ingredients and sugar together first, then slowly sift the flour into the mixture and stir well together until combined.)

3. Transfer the mixture to a jug (or bowl), cover, and leave for 10 minutes. This will allow the flour to absorb the liquid and produce a better batter.

4. Lightly grease a 20cm non-stick pan. Pour around 2 - 3 Tbsp of batter into the pan and swirl around until the batter covers the bottom of the pan evenly. Cook over medium heat for around 30 seconds or until the underside is golden. Flip and cook the other side of the crêpe until golden.

5. Transfer the crêpes to a plate, and cover with a tea-towel or paper towel to keep them warm. Repeat Step 4 until all the batter is used up.

6. To serve, fold each crêpe into half, and then half again to form a quarter circle, and serve with your favourite toppings - vanilla ice-cream, banana slices, pure maple syrup, chocolate sauce, lemon and sugar, etc. The crêpes can also be filled with cream or fruits, and then rolled up.

Back


Thursday, January 29, 2009

Chocolate Fondue


If you are searching for a quick, simple to prepare, yet satisfying dessert to serve up at your next casual dinner party, consider the chocolate fondue. It is easy to prepare (think - slicing fruits and putting them into bowls), most of it can be prepared ahead of time, and it still has that wow factor - who doesn't like the idea of dipping fruit into melted chocolate?

If you have a chocolate fondue set at home, that's great. You could also buy a cheap, simple one - mine are just a pair of little ceramic bowls on metal stands atop tea-light candles. Or else, get some small microwaveable bowls, add some chocolate chips in each, microwave them (a minute, then half a minute at a time on HIGH until the chocolate has melted) and serve the small bowls up to each guest or pair of guests. At the rate I eat the fondue, the chocolate doesn't have time to set, but if it did, just toss it back into the microwave.

Suggested toppings are strawberries, sliced bananas, marshmallows, sliced green apples, and small balls of ice-cream (scoop small balls of ice-cream and place them slightly apart on foil-lined baking trays. Freeze until set, then serve with the chocolate fondue).


Wednesday, January 28, 2009

Pumpkin & Pancetta Pasta II


On the second day of the New Year, I was already running low on fresh meat in the fridge, so I turned to my stock of preserved meat, namely some cubed pancetta. I combined the pancetta with pumpkin and cherry tomatoes and roasted it all in the oven to make a simple pasta sauce. It's the same pasta recipe that I made last Halloween (Roasted Pumpkin & Pancetta Pasta), except that for Halloween, I used squid ink spaghetti for a more ghoulish effect. 


Tuesday, January 27, 2009

Year of the Ox - Burger

burger

Apologies for not posting in a while, I've just finished up a project I was working on, and that took up most of my time for the past few weeks. Happy Chinese New Year for those celebrating! The first day of Chinese New Year was on 26th Jan, and we've been enjoying our 3-day holiday here in Hong Kong. Many small shops and restaurants close at this time of the year, so I tend to go on a grocery shopping frenzy beforehand to stock up the kitchen. I've been cooking almost non-stop (or so it seems) the past few days, and I'm finally taking a break - until lunchtime.

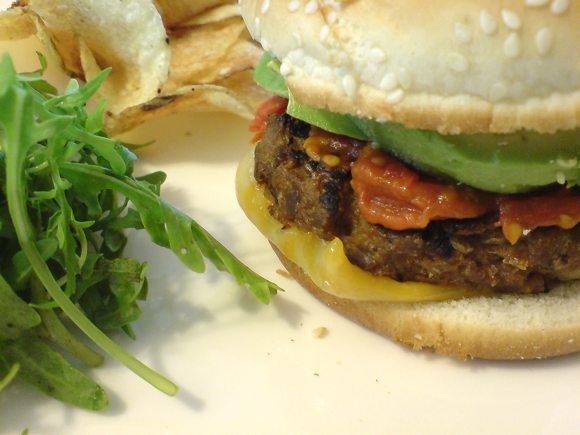
This year is the Year of the Ox, and although it was not planned, we ended up having (beef) burgers for lunch. I knew I would have a few days of cooking coming up, and some late nights, so I'd made the patties in advance and froze them. It made the world of difference in timing to simply defrost and re-heat the patties, and put together the rest of the burger. 

The recipe for my simple beef mince homemade burgers are here. If you are not raw onion eater (like me), or you don't like the taste of onion much, fry the onions first before adding them to the raw mince. That way, you can still have a medium-cooked burger, without the overpowering taste of semi-cooked onions. 

I topped the burgers with some avocado slices, mushrooms, melted cheese, and a homemade tomato sauce. This sauce is really quick and easy to make, and is a nice alternative to tomato slices (or store bought tomato ketchup) in your burgers. It can also be used as a dip for chicken nuggets, fish fingers, or as a topping for some pan fried seabass, etc.

Easy Homemade Tomato Sauce...


Easy Homemade Tomato Sauce
8 - 10 cherry tomatoes
1 Tbsp light olive oil
red pepper flakes (optional)
1. Slice the cherry tomatoes into quarters.
2. Heat up the oil in a small frying pan. Add the tomatoes and fry over medium high heat.
3. Squeeze the tomatoes with a spoon/spatula so their juices ooze out.
4. Add a few shakes of red pepper flakes if you like your sauce spicy (optional).
5. Continue frying until the tomato and their skins break down and the sauce thickens.


Back


Thursday, January 15, 2009

Another Bento delivery...


Yesterday, I popped over to my friend's place and delivered a soba salad bento lunch. It was a last minute decision, so I didn't have much time to prepare, which meant I arrived at around 2pm - my trick is to make the person I'm feeding so hungry that whatever I dish out is tasty. HA. 

Soba noodle salads are quick to make and relatively healthy. I mixed the noodles with a little sesame oil and soba sauce, sliced cucumbers, sugar snap peas, shredded egg omelette and served it with some hot smoked salmon. Kiwi fruit and blackberries were added for fruit content and colour, and overall I felt quite pleased with the amount of fruit and veggie in the dish. That's one of my new year's decision, by the way, to eat more fruit and veg...